Advertisement
Quick Links
Quick Hardware Installation Guide
MegaRAC G3
Thank you for purchasing the MegaRAC G3. Please take a few minutes to review this quick
guide before beginning the installation process. If you require a further explanation of any item
covered in this guide, please refer to the installation instructions on your CD.
Contents for the MegaRAC G3
You should have received the following:
•
an American Megatrends MegaRAC G3
•
This MegaRAC G3 Quick Installation Guide
•
a MegaRAC G3 User's Guide (located on the MegaRAC G3 CD)
•
a MegaRAC G3 CD
•
one USB cable
•
an AC Adapter
Step 2 Install the Optional Battery and Battery Clip
To install the optional Battery Backup Unit, plug the battery cable into the J2 Battery connector and
place the battery pack in between the three mounting holes. Next, align and snap the plastic battery
clip into the three mounting holes over the battery pack. See the following diagram.
Step 3 Install the Optional Modem Daughterboard
The MegaRAC G3 modem daughterboard is an optional component. Locate JP10 on the MegaRAC
G3 card. It has a series of pinholes that allow you to insert the modem daughterboard. Match the
modem daughterboard and the pin holes so that the pins align properly. Insert the modem
daughterboard by sliding it straight down into the MegaRAC G3 card.
MAN-840-QH
(Series 840)
Technical Support
02-24-04
If you need help installing, configuring, or running the MegaRAC G3, call American Megatrends
technical support at 770-246-8645.
Technical Support Web Site: http://www.ami.com/support/
Technical Support Email: support@ami.com
Hardware Installation
Use the following steps to install the MegaRAC G3.
Step
Action
1
Unpack the MegaRAC G3 card (and check jumper settings)
2
Install the optional battery and battery clip
3
Install the optional modem daughterboard
4
Plug in the MegaRAC G3 card into the host system and attach internal cables
5
Connect external cables
6
Confirm the motherboard's BIOS settings
7
Install the operating system and MegaRAC G3 card's drivers
8
Install all American Megatrends MegaRAC G3 Windows Software Components
9
Setup your client system's Internet browser
10
Connect to the MegaRAC G3 from a client system
Step 1 Unpack the MegaRAC G3 Card
Inspect the cardboard carton for obvious damage. If damaged, call 770-246-8600. Leave it in its
original packing.
Jumper
Setting
JP4
Confirm that pins one and two are open.
JP5
Confirm that pins one and two are open.
JP6
Confirm that pins one and two are open.
JP7
Confirm that pins one and two are open.
JP8
Confirm that pins one and two are open.
JP11
Confirm that pins one and two are shorted.
JP12
Confirm that pins one, two and three are open.
JP13
If your hosts system's motherboard has support for I2C on the PCI slots, place a short
pins one and two. If not, confirm that pins one and two are open.
JP14
If your hosts system's motherboard has support for I2C on the PCI slots, place a short
pins one and two. If not, confirm that pins one and two are open.
Note:
Only revision B1 and newer revisions of the MegaRAC G3 cards have jumpers JP13
and JP14. Revisions A and B do not have JP13 and JP14.
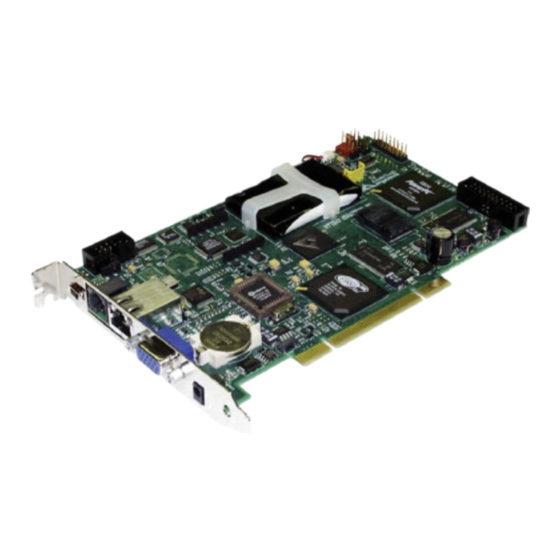
MegaRAC G3 Card Layout
English
(and check jumper settings)
Advertisement

Related Manuals for American Megatrends MegaRAC G3 840 Series


Summary of Contents for American Megatrends MegaRAC G3 840 Series
- Page 1 English Quick Hardware Installation Guide MAN-840-QH Technical Support 02-24-04 If you need help installing, configuring, or running the MegaRAC G3, call American Megatrends technical support at 770-246-8645. MegaRAC G3 Technical Support Web Site: http://www.ami.com/support/ Technical Support Email: support@ami.com (Series 840) Hardware Installation Use the following steps to install the MegaRAC G3.
- Page 2 Components on the system that you want to use to locate the MegaRAC G3 card. Double left click the Setup.exe icon to begin the installation of the American Megatrends • Locate the RacTrendsSeek Locator program on your remote client system. Run the MegaRAC G3 Windows Host Component.
Need help?
Do you have a question about the MegaRAC G3 840 Series and is the answer not in the manual?
Questions and answers