Hama DR350 - Digital Radio Manual
- Operating instructions manual (17 pages) ,
- Quick manual (64 pages)
Advertisement
- 1 Technical Data
- 2 Controls and Displays
- 3 Explanation of Warning Symbols and Notes
- 4 Package Contents
- 5 Safety Notes
- 6 Installation
- 7 General notes on use
- 8 Getting started
- 9 Operation modes (FM/DAB&DAB+/AUX IN)
- 10 Digital radio (DAB/DAB+)
- 11 Analogue radio (FM/VHF)
- 12 Aux in
- 13 Managing favourites (FM/DAB&DAB+)
- 14 Sleep timer
- 15 Alarm clock
- 16 System Settings
- 17 Care and Maintenance
- 18 Warranty Disclaimer
- 19 Service and Support
- 20 Declaration of Conformity
- 21 Documents / Resources
Technical Data
| Radio Receiver | DAB ✓ | DAB+ ✓ | FM ✓ | Internet - | Spotify - |
| Display | 2.4" (6.1 cm Colour TFT) | ||||
| Speaker | 3" 5 W RMS | ||||
| Acoustic Material | Plastic | ||||
| Power input | 12 V  1 A switch mode power supply 1 A switch mode power supply | ||||
| Power Consumption | Operation | max. 12 W | Standby | < 1 W | |
| Input & Output | DC Socket, Aux in, 3.5 mm Earphone Jack, USB (Update port) | ||||
| Presets | DAB: 30 | FM: 30 | |||
| Codec | DAB: MP2, AAC | ||||
| UI Languages | English, German, Danish, Dutch, Finnish, French, Italian, Norwegian, Polish, Swedish, Turkish, Czech, Slovak | ||||
| Package Content | DR350, Power Supply, Short Manual, flexible mounting clip, mounting plate | ||||
| Dimension (WxHxD) | 210 x 72 x 215 mm | ||||
| Weight | 1100 g | ||||
Controls and Displays

| A: Radio Front | ||
| 1 |  | [POWER] button |
| 2 |  | [MENU] button |
| 3 |  | [PRESET] button |
| 4 |  | [INFO] button |
| 5 |  | [MODE] button |
| 6 |  | [HOME] button |
| 7 |  | [BACK] button |
| 8-14 | [PRESET 1-7] buttons | |
| 15 | Display | |
| 16 | [VOLUME] / [ENTER] / [NAVIGATE] | |
| B: Radio Back | ||
| 17 | UPDATE PORT | Update port |
| 18 | AUX IN | AUX-In socket |
| 19 |  | Headphone socket |
| 20 | DC IN | Mains power supply |
| 21 | Antenna | |
Take your time and read the following instructions and information completely. Please keep these instructions in a safe place for future reference. If you sell the device, please pass these operating instructions on to the new owner.
Explanation of Warning Symbols and Notes
 Risk of electric shock Risk of electric shock |
| This symbol indicates product parts energized with a dangerous voltage of sufficient magnitude to constitute a risk of electric shock. |
 |
| This symbol is used to indicate safety instructions or to draw your attention to specific hazards and risks. |
 Note Note |
| This symbol is used to indicate additional information or important notes. |
Package Contents
- "DR350" Digital Radio
- Power Supply Unit
- Clamp Connection
- Screw Connection
- White Antenna Guide
- Black Antenna Guide
- Quick Guide
Safety Notes
- The product is intended for private, non-commercial use only.
- Protect the product from dirt, moisture and overheating and use it in dry rooms only.
- As with all electrical devices, this device should be kept out of the reach of children.
- Children are not permitted to play with the device. Children may not clean the product or perform user maintenance without supervision.
- Do not drop the product and do not expose it to any major shocks.
- Do not operate the product outside the power limits given in the specifications.
- Keep the packaging material out of the reach of children due to the risk of suffocation.
- Dispose of packaging material immediately according to locally applicable regulations.
- Do not modify the device in any way. Doing so voids the warranty.
| Risk of electric shock |
|
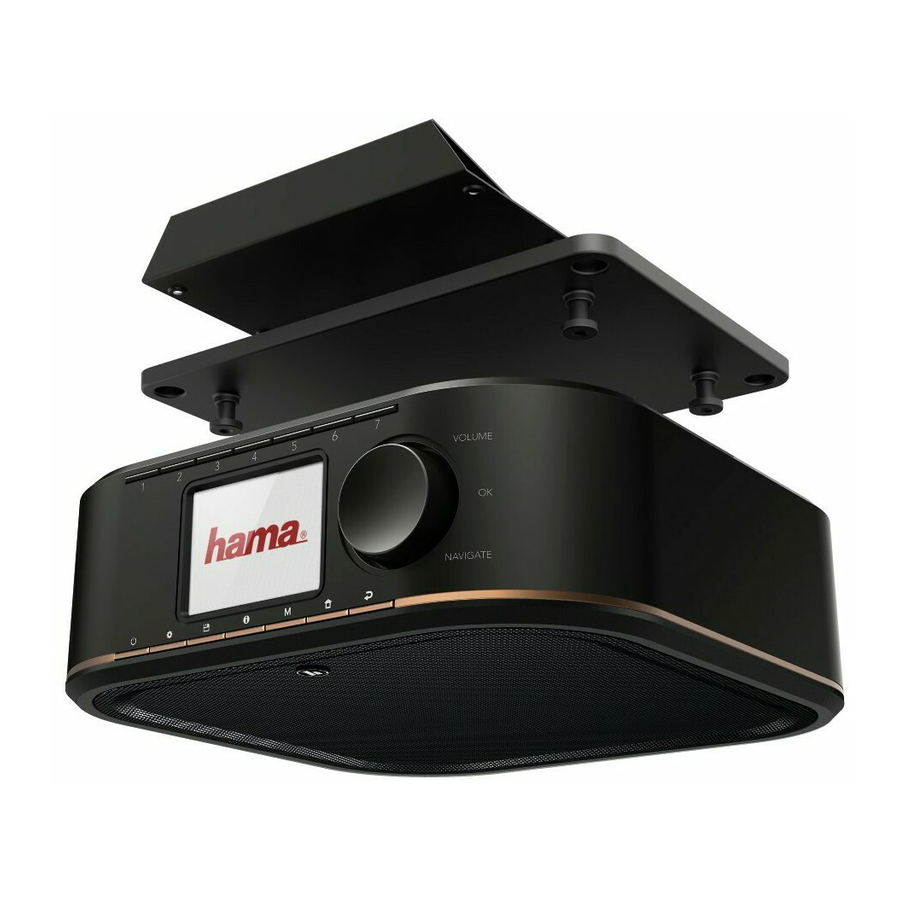
Installation
| Note – Installation location |
| Choose a suitable position for this purpose. The radio must not be exposed to heat sources or moisture (not above or near a stove/dishwasher/sink). |
Installation with holding clip (Clamp Connection)
- Attach the holding clip to the top of the radio using the four screws provided. You have the choice between three mounting positions. (Fig. B)

- Simply clip the radio with the mounted holding clip onto the bottom of your wall cupboards. You can change the mounting position of the radio this way at any time.
- The installation position of the radio may be adjusted at any time by changing the position of the holding clip.
- Check whether the radio is securely attached.

Mounting with connector system/mounting plate (Screw Connection)
- Attach the included mounting plate to the bottom of your wall cupboards using all 5 wood screws. (C)

- Mount the radio on the mounting plate so that the 4 pins click firmly into place (fig. C, 1 and 2)
- Check whether the radio is securely attached.

General notes on use
| Notes on use |
|
Navigation and controls
[VOLUME/SELECT/NAVIGATE] has two different functions:
- Menu
- Turn [VOLUME/SELECT/NAVIGATE] to select among menu items.
- Confirm the selection by pressing [VOLUME/SELECT/NAVIGATE].
- Playback screen
- Turn [VOLUME/SELECT/NAVIGATE] in the playback screen to adjust the volume of the radio.
- Turn [VOLUME/SELECT/NAVIGATE] to the left to reduce the volume and to the right to increase it.
| Note |
|
 ] to switch between volume control and the station selection list.
 ] to show the current input mode. If the station list is active, the info icon and the description 'station list' appears in the display. Turn [VOLUME/SELECT/NAVIGATE] to navigate through all the stations found.
From the menu, return to the playback screen by pressing [].
Press [![]() ] to return to the previous menu level.
] to return to the previous menu level.
Additional Information
Press [![]() ] to display context-dependent additional information. The information shown depends on the operating mode as well as the current station. Keep pressing [
] to display context-dependent additional information. The information shown depends on the operating mode as well as the current station. Keep pressing [![]() ] to cycle through the information available.
] to cycle through the information available.
- Description
Indicates the radio station, the current program, contents, subjects, etc. - Program genre/country
- Reliability/signal strength
- Bit rate
The current digital bit rate of the station currently being received. - Station's website
- Station information
- Today's date
- Artist
- Album
- Author
| Note |
|
Display mode of the playback screen
- Split screen (miniature slideshow, large display of station information)
- Slideshow with subtitles (station information on a single line)
- Slideshow in full-screen – no information displayed
Switching on/off/standby
Press [![]() ] to turn the radio on or off (standby).
] to turn the radio on or off (standby).
| Note |
|
Volume adjustment
Turn [NAVIGATE/ENTER/VOLUME] (16) to increase/reduce the volume.
Getting started
Radio – Connecting and starting up
- Before switching on the radio for the first time, make sure that the receiver antenna (21) on the back of the radio is unpacked and that the flexible cable antenna is unwound. The package contents include two cable guides for fixing the antenna.
- Attach the cable guides to a straight, clean surface and then clip the antenna cable into the guides.
Connect the network cable to a properly installed and easily accessible network socket. The power supply unit is suitable for mains voltages between 100 and 240 V, and is thus operable on almost any AC power grid. Please note that a country-specific adapter may be necessary. You can find a selection of compatible products at www.hama.com.
| Note |
|
Once the product has been connected to mains power, initialisation takes place. The radio starts.
After startup, the radio is in standby mode and can be switched on with the [![]() ] button.
] button.
| Note |
| When the radio is switched on, it immediately begins searching for any receivable DAB stations. Please wait until this search is completed. Once the search is completed, playback begins of the first station in the list. |
Initial setup/language settings
At initial startup, the language of the radio defaults to English. To change the language, please proceed as follows:
- Press [
![]() ] to access the settings menu.
] to access the settings menu. - Turn [VOLUME/SELECT/NAVIGATE] to navigate to the "System Settings" menu item.
- Confirm the selection by pressing [VOLUME/SELECT/ NAVIGATE].
- Turn [VOLUME/SELECT/NAVIGATE] to get to the "Language" menu item. Confirm the selection by pressing [VOLUME/SELECT/NAVIGATE].
- Turn [VOLUME/SELECT/NAVIGATE] to select your desired system language.
- Confirm the selection by pressing [VOLUME/SELECT/ NAVIGATE].
Operation modes (FM/DAB&DAB+/AUX IN)
This device is equipped with a module for receiving analogue radio via VHF/FM and digital radio via DAB/DAB+. Alternatively, it can play back audio received at its 3.5-mm audio jack.
Press [![]() ] repeatedly to select the desired audio source.
] repeatedly to select the desired audio source.
Digital radio (DAB/DAB+)
Display mode
| Note |
| The display mode can be changed only from the playback screen. |
If a station broadcasts image content (slideshow content/ SLS) in addition to general information (RDS), you can choose between three different display modes during playback. Press [VOLUME/SELECT/NAVIGATE] to change the display mode.
Station list
| Note |
| The station list contains all of the stations found during the most recent station search run. The reception quality of a station depends on various factors, including the weather conditions, the location of the radio and the orientation of the antenna. If a station in the station list cannot be received, try changing the orientation of the antenna or moving the radio to a different location. If a station cannot be received, consult section Inactive stations/cleaning up the station list to find out how to remove it from the station list. |
If the automatic station search run was completed upon initial startup of the radio, it is not necessary to search for any further stations.
- Press [
![]() ] and choose the "Station list" menu item.
] and choose the "Station list" menu item. - Press [VOLUME/SELECT/NAVIGATE] to get to the current station list (sorted alphabetically).
- Turn [VOLUME/SELECT/NAVIGATE] to navigate through the list.
- Press [VOLUME/SELECT/NAVIGATE] to select the desired station and begin playback.
Station search / find all stations
- Press [
![]() ] and navigate to the "Find all stations" menu item to initiate a new station search.
] and navigate to the "Find all stations" menu item to initiate a new station search. - Confirm the selection by pressing [VOLUME/SELECT/NAVIGATE]. Please wait until this search is completed.
Inactive stations/cleaning up the station list
Inactive stations that can no longer be received may be removed from the list.
- To do this, press [
![]() ] and navigate to the "Inactive stations" menu item.
] and navigate to the "Inactive stations" menu item. - Confirm the selection by pressing [VOLUME/SELECT/ NAVIGATE].
- At the safety check that follows, select "Yes" and confirm by pressing [VOLUME/SELECT/NAVIGATE].
- Press [
![]() ] or select "No" at the safety check to cancel removing the station.
] or select "No" at the safety check to cancel removing the station.
| Note |
| To keep the station list current, we recommend regularly updating the list by finding all stations (see section Station search / find all stations). |
Adjusting the volume/dynamic range control (DRC)
Some DAB network radio stations support a volume control feature that actively takes effect during playback. If the volume suddenly increases, DRC automatically lowers it. If the volume suddenly becomes quieter, DRC automatically raises it. The same happens when playback is suddenly quiet. The radio then increases the volume again.
DRC high: total equalisation of different volumes. Strong compression can audibly reduce the dynamics of a piece of music.
DRC low: partial equalisation of different volumes. More subtle compression, without too much loss of dynamics.
DRC off: no equalisation.
To change the setting, proceed as follows:
| Note |
| By default, DRC volume adjustment is disabled. |
- Press [
![]() ] and navigate to the "Volume adjustment" menu item.
] and navigate to the "Volume adjustment" menu item. - Confirm the selection by pressing [VOLUME/SELECT/NAVIGATE].
- Select the desired option and confirm the selection by pressing [VOLUME/SELECT/NAVIGATE].
Analogue radio (FM/VHF)
Setting the station manually
When you make station settings manually, you can define the desired frequency yourself and tune into stations that were ignored during automatic station search because their signals were too weak.
- In FM mode, press [
![]() ] to switch back and forth between volume control and station selection.
] to switch back and forth between volume control and station selection. - Select the "Select station" menu item and confirm the selection by pressing [VOLUME/SELECT/NAVIGATE].
- Turn [VOLUME/SELECT/NAVIGATE] (left: –0.05 MHz / right: +0.05 MHz) until you see the desired frequency.
- Wait for a moment until playback of the received signal commences.
| Note |
After a few seconds, the radio automatically returns to volume control mode. If you do not make any changes to the frequency setting, you may have to press the [ ] button again to return to setting the station. ] button again to return to setting the station. |
Automatic station search
The radio can automatically search for stations. This process searches the entire frequency range of the analogue radio receiver. The radio stops the search and starts playback when it finds a station.
- In FM mode, press [
![]() ] to switch back and forth between volume control and station selection.
] to switch back and forth between volume control and station selection. - Select the "Select station" menu item and confirm the selection by pressing [VOLUME/SELECT/NAVIGATE].
- Turn [VOLUME/SELECT/NAVIGATE] (left: - 0.05 MHz/ right: + 0.05 MHz), to set the desired direction of the scan and then press [VOLUME/SELECT/NAVIGATE] to start the automatic station search.
Station search setting
The search run setting allows you to determine whether stations with low signal strength are to be considered during the automatic search run.
Proceed as follows:
- Repeatedly press [
![]() ] to get to the "Station search settings" menu item.
] to get to the "Station search settings" menu item. - Confirm the selection by pressing [VOLUME/SELECT/NAVIGATE].
- To have the search stop only at stations with a strong signal, select "Only strong stations". Otherwise, the search run will stop at every station for which a signal is received.
| Note |
| By default, "Only strong stations" is enabled. |
Audio settings
Some radio stations broadcast their signals in stereo quality. This radio uses stereo signals as standard and optimises playback for them.
For some stations with a weak signal, quality can be improved slightly by playing them in mono. You can enable this function in the menu, and the radio will automatically switch to mono reception when signal quality is poor. To change this option, proceed as follows:
- Press [
![]() ] and navigate to the "Audio settings" menu item.
] and navigate to the "Audio settings" menu item. - Select "Mono only" and confirm the selection by pressing [VOLUME/SELECT/NAVIGATE].
Aux in
You can use the analogue audio input (AUX IN socket) to connect mobile devices (for example, smartphone, tablet PC, MP3 player, etc.) to the radio and play your audio files using the radio.
- Repeatedly press [
![]() ] to activate the Aux in operating mode.
] to activate the Aux in operating mode. - Connect your mobile device to the audio input (the AUX IN socket [18]) of the radio using a 3.5-mm audio cable (jack cable).
- Start and control audio playback using the controls of the connected terminal device.
| Note |
|
Managing favourites (FM/DAB&DAB+)
The radio has seven freely configurable slots for saving favourite stations (8 to 14) and a freely definable memory list with 30 memory slots. The favourites lists of the analogue and digital radios are independent of each other. Both the favourite quick-select buttons as well as the favourites list are each separately available for FM and DAB/DAB+.
| Note |
| The quick-select buttons 1 to 7 (8 to 14) correspond to slots 1 to 7 in the large favourites list. |
Assigning the favourites quick-select buttons (8 to 14)
- Set the station that you would like to save as a favourite station preset.
- While the station is playing, press and hold down the quick-select button for the slot to which you wish to assign it until [✓] appears in the display.
- The display shows "Program [1 to 7] saved" to confirm the assignment.
| Note |
| It is not possible to delete a preset station. You can only replace a preset station with another station and overwrite the previous favourite. |
Recalling favourites
To call up a preset station, press the corresponding quick-select button (8 to 14).
Filling the favourites list (1 to 30)
- Set the station that you would like to save as a favourite station preset.
- While the station is playing, press and hold [
![]() ] until the favourites list opens.
] until the favourites list opens. - Navigate to the slot you wish to use and confirm the selection by pressing [VOLUME/SELECT/NAVIGATE].
- The display shows [
![]() ] and "Program [1 to 7] saved" to confirm the assignment.
] and "Program [1 to 7] saved" to confirm the assignment.
| Note |
| It is not possible to delete a preset station. You can only replace a preset station with another station and overwrite the previous favourite. |
Recalling stations from the favourites list (1 to 30)
- Press [
![]() ] to access the favourites list.
] to access the favourites list. - Navigate to the slot you wish to recall and confirm the selection by pressing [VOLUME/SELECT/NAVIGATE].
Sleep timer
The radio has a timer function, which switches the radio to standby mode after a pre-defined length of time.
- Press [
![]() ] and open "System settings".
] and open "System settings". - Select the "Sleep timer" menu item and confirm the selection by pressing [VOLUME/SELECT/NAVIGATE].
- Turn [VOLUME/SELECT/NAVIGATE] to set the timer duration.
- Confirm the setting by pressing [VOLUME/SELECT/ NAVIGATE].
Alarm clock
The radio allows you to set two different alarm times.
Settings
- Press [
![]() ] and open "System settings".
] and open "System settings". - Select the "Alarm clock" menu item and confirm the selection by pressing [VOLUME/SELECT/NAVIGATE].
- Configuration of alarm 1 and alarm 2 is identical. They allow two alarm times to be saved independently. Select alarm 1 or 2 and then make the following settings by means of [VOLUME/SELECT/NAVIGATE]:
Repeat
- Choose when the alarm is to activate:
Off – Daily – Once – On weekdays – On weekends
Alarm time
- Turn [VOLUME/SELECT/NAVIGATE] to set the alarm time digit by digit.
- Press [VOLUME/SELECT/NAVIGATE] to confirm the setting of each digit and move to the next.
Source
- Set whether you wish to be woken by an alarm tone (buzzer), DAB or FM.
Duration
- Set the duration for which the alarm is to sound once the alarm time has been reached.
- If the alarm is not stopped, then the radio automatically switches to standby mode after the selected duration.
Volume
- Set the volume of the alarm tone.
| Note |
| The alarm tone does not immediately reach the set volume. Rather, it starts quiet and then gets louder until it reaches the set volume. |
Activate/deactivate alarm clock
- Press [VOLUME/SELECT/NAVIGATE] to enable or disable the alarm clock.
Stop alarm/snooze
- When the alarm activates, press [
![]() ] once to stop the alarm.
] once to stop the alarm. - Press [VOLUME/SELECT/NAVIGATE] to activate snooze mode.
- The alarm turns off for the selected time interval (5/10/15/30 minutes) before being triggered once again.
Timer
| Note |
| The egg timer feature is available from software version 6.2 or higher. |
The radio is equipped with an egg timer, which emits an alarm tone after a pre-defined length of time has elapsed.
- Press [
![]() ], select [Egg Timer] in the system settings and confirm your selection by pressing [VOLUME/SELECT/NAVIGATE].
], select [Egg Timer] in the system settings and confirm your selection by pressing [VOLUME/SELECT/NAVIGATE].

Turn [VOLUME/SELECT/NAVIGATE] to select the desired count-down time (0–99 minutes). - Press [VOLUME/SELECT/NAVIGATE] to display the time remaining.
- Once the time interval has elapsed, press [POWER] or [BACK] to stop the alarm tone. Otherwise, the alarm will stop automatically after 30 minutes.
- Set the time interval to 0 minutes to turn off the egg timer.

System Settings
Equaliser
The equaliser allows you to adjust the sound of the radio to suit your preferences by amplifying or reducing the amount of bass or treble in the audio.
You can choose from preconfigured profiles, adjusted to suit a variety of music genres, or create your own custom profile.
To change the equaliser settings, proceed as follows:
- Press [
![]() ] and open "System settings".
] and open "System settings". - Select the "Equaliser" menu item and confirm the selection by pressing [VOLUME/SELECT/NAVIGATE].
- Turn [VOLUME/SELECT/NAVIGATE] to select one of the preconfigured profiles. If playback is already started when you modify these settings, you can hear the changes in the audio immediately.
- Confirm the setting by pressing [VOLUME/SELECT/NAVIGATE].
My EQ
- Press [
![]() ] and open "System settings".
] and open "System settings". - Select the "My EQ setting" menu item and confirm the selection by pressing [VOLUME/SELECT/NAVIGATE].
- Here you can configure the settings for the bass and treble frequencies of the audio.
- Turn [VOLUME/SELECT/NAVIGATE] to the left or right to change a value. If music is playing while you modify these settings, you will hear the changes in the audio immediately.
- When you have finished configuring the settings, press [VOLUME/SELECT/NAVIGATE].
- Press [
![]() ] to save the settings for the "My EQ" profile.
] to save the settings for the "My EQ" profile. - To use the newly created profile, select the "My EQ" option and confirm by pressing [VOLUME/SELECT/NAVIGATE].
Time settings
- Press [
![]() ] and open "System settings".
] and open "System settings". - Select the "Clock" menu item and confirm the selection by pressing [VOLUME/SELECT/NAVIGATE].
Time and date settings
- Turn [VOLUME/SELECT/NAVIGATE] to set the time and date digit by digit.
- Press [VOLUME/SELECT/NAVIGATE] to confirm the setting of each digit and move to the next.
- Press [
![]() ] to save the settings.
] to save the settings.
Updating
If automatic time and date adjustment is activated, the device receives time and date information from the station over the FM/DAB/DAB+ radio network. This is the best way to ensure that the clock will run accurately and the alarm will trigger at the correct time, even after power outages.
From ALL – Time information is retrieved from all available sources.
From digital radio – Time information is retrieved only from DAB stations.
From FM – Time information is retrieved only from the analogue radio network.
No updating – No time information is retrieved (manual updating).
Format
Choose between 12-hour and 24-hour time formats.
Date format
Choose between DD-MM-YYYY and MM-DD-YYYY date formats.
Lighting
The backlight can be configured separately for each operating mode (playback mode, standby mode and snooze mode).
Proceed as follows:
- Press [
![]() ] and open "System settings".
] and open "System settings". - Select the "Lighting" menu item and confirm the selection by pressing [VOLUME/SELECT/NAVIGATE].
"Dimming"
Set whether the display should be switched off or dimmed during operation once a certain length of time has passed with no input. The value used is that set for standby mode.
"Operation"
Set the brightness level of the display during playback.
"Standby"
Set the brightness level of the display in standby mode.
Language
To change the menu language of the radio, proceed as follows:
- Press [
![]() ] and open "System settings".
] and open "System settings". - Select the "Language" menu item and confirm the selection by pressing [VOLUME/SELECT/NAVIGATE].
- Select the desired language and confirm the selection by pressing [VOLUME/SELECT/NAVIGATE].
Factory settings
To reset the radio to the factory default settings, proceed as follows:
- Press [
![]() ] and open "System settings".
] and open "System settings". - Select the "Factory settings" menu item and confirm the selection by pressing [VOLUME/SELECT/NAVIGATE].
- Confirm the next prompt with YES to reset the radio to the factory default settings. All settings made previously are deleted.
| Note |
|
Software version
To check the version of the software currently installed on your radio, please proceed as follows:
- Press [
![]() ] and open "System settings".
] and open "System settings". - Select the "SW version" menu item and confirm the selection by pressing [VOLUME/SELECT/NAVIGATE].
| Note |
|
Care and Maintenance
- Only clean this product with a slightly damp, lint-free cloth and do not use aggressive cleaning agents.
- If you do not use the product for a long time, turn off the device and disconnect it from the power supply. Store it in a clean, dry place out of direct sunlight.
Warranty Disclaimer
Hama GmbH & Co. KG assumes no liability and provides no warranty for damage resulting from improper installation/ mounting, improper use of the product or from failure to observe the operating instructions and/ or safety notes.
Service and Support
Please contact Hama Product Consulting if you have any questions about this product
Hotline: +49 9091 502-115 (German/English)
Further support information can be found here: www.hama.com
Declaration of Conformity
![]() Hereby, Hama GmbH & Co KG declares that the radio equipment type [00054862, 00054864] s in compliance with Directive 2014/53/EU. The full text of the EU declaration of conformity is available at the following internet address: www.hama.com - > 00054862, 00054864 - > Downloads.
Hereby, Hama GmbH & Co KG declares that the radio equipment type [00054862, 00054864] s in compliance with Directive 2014/53/EU. The full text of the EU declaration of conformity is available at the following internet address: www.hama.com - > 00054862, 00054864 - > Downloads.

Documents / Resources
References
Download manual
Here you can download full pdf version of manual, it may contain additional safety instructions, warranty information, FCC rules, etc.
Advertisement


Need help?
Do you have a question about the DR350 and is the answer not in the manual?
Questions and answers