
Related Manuals for Energotech EnergoControl T60 Series


Summary of Contents for Energotech EnergoControl T60 Series
- Page 1 EnergoControl Touchscreen Thermostat - T60 Series User Guide version 3-v2.58 ENERGY EFFICIENT HEATING SYSTEMS...
-
Page 3: Table Of Contents
Table of Contents LCD Main Display ......... Hold Mode (Timer Function) ....... Overview ............. System Information ........Getting Started - General ......Reset To Factory Settings ......Mode Selection ........... Startup Wizard - Wi-Fi ......... Mode 1 - Thermostat Mode Mode 2 - Time Clock Home/Away Mode ........ -
Page 4: Lcd Main Display
LCD Main Display... -
Page 5: Overview
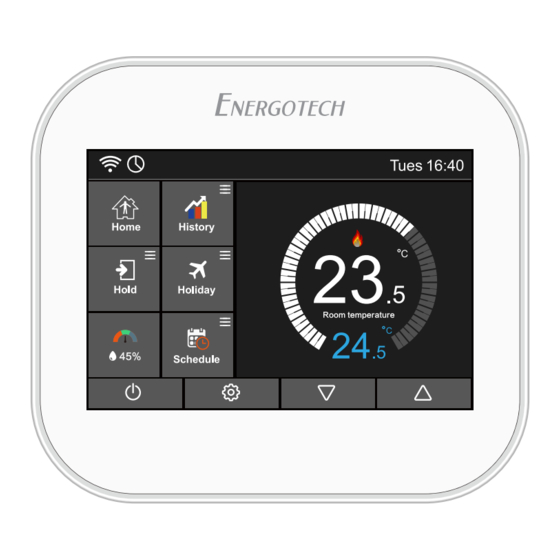
Overview Wi-Fi indicator - Displayed when connected to a Wi-Fi network (T60-EW/SW only). Schedule indicator - Displayed when a schedule is active / in use. History: Shows the running time, the room temperature and the room humidity. Day Indicator and Clock. Home/Away: Allows a preset set-back temperature while away from the premises. -
Page 6: Getting Started - General
Getting Started - General When the thermostat has been installed and powered on for the first time, you must set the Language, Time Zone, Date/Time and the Daylight Saving Time. Whenever the use of the icons is mentioned in this user guide, you can also swipe navigate on the main display. -
Page 7: Startup Wizard - Wi-Fi
Startup Wizard - Wi-Fi This page applies only if you have purchased the Wi-Fi version, T60-EW or SW, of the thermostat Use only the 2.4GHz band, if you have a selectable dual-band router. Download and install the free T60 App Myhouse Pro on your smart device, via App Store or Google Play Store. -
Page 8: Mode 1 - Thermostat Mode
MODE 1 - THERMOSTAT MODE / Operation of Main Display Home/Away Mode The Home/Away Mode is a shortcut button to easily change to a preset temperature when leaving the premises. The range is +7°C to +35°C, default is +7°C. In Away Mode, the thermostat will only turn the heating ON, if/when the room tem- perature drops below the set Away temperature. -
Page 9: History
History The thermostat can show the running time (hours), the room temperature (°C) and the room humidity (%) for the latest seven days. Press the button “History”. Select/tap on information boxes of your choice. Press the icon to return to main display. Holiday Mode The T60 will maintain the set temperature “Holiday Temp”... - Page 10 Press the “Schedule” again on the main display and enter the setting interface. On the edit page, Monday to Sunday can now be selected. Press “Monday” and select a time period: Morning / Day / Evening / Night. Each time period has options, On/Off.
-
Page 11: Setup
Setup Language Press the icon Setup. Browse to the “Language” menu and press on it for submenu. Select your desired language. Press the icon twice to save and return to main display. Date and Time To set the Date and Time, follow these steps: Press the icon Setup. -
Page 12: Backlight Setting
There are three options: Europe /USA & Canada / Australia & New Zealand Press the icon in the front of your choice and it will turn to Press the icon to save and return to the submenu. Press the icon again to return to the setup menu. -
Page 13: Screen Lock
time. For example, setting the standby time for 10 minutes: press the icon in the front of “10 Min” and it will turn to Press the icon twice to save and return to main display. Screen Lock Press the icon Setup. -
Page 14: Qr Code
Enter the password, using the keyboard, and then click “join”. The thermostat will now attempt to connect to your wireless network. Please be patient, since this may take a while (several minutes). Return back, by pressing the icon twice, to the main display and observe the Wi-Fi icon. - If it is flashing, it means the Wi-Fi connecting is under process. -
Page 15: Away Temperature
Note: The External Sensor must not be used for controlling electric underfloor heat- ing. Only designated floor sensors or both (External & Floor Sensor) should be used. If the optional external- or floor sensor is not supplied by Energotech, an 10 kΩ sen- sor must be used together with the thermostat. -
Page 16: Humidity Sensor - Calibration
The following sensors can be calibrated: Built in Sensor (Default) External Sensor Floor Sensor Only (external sensor) Select the chosen value, you must then offset the thermostat to reflect the tempera- ture actually measured, air or floor, by pressing the icons Press on the submenu “08. -
Page 17: Work Mode Selection
Select/tap “OFF” if you simply want the heating to start at the beginning of a set point, default function. Select/tap “ON” if you want the heating to run with the optimum/adaptive function. You can select the rate of change between 10 to 90 minutes, in steps of 10 minutes. Use the icons for adjusting the value. -
Page 18: Hold Mode (Timer Function)
Hold Temp (Timer Function) The Temperature Hold function allows you to manually override the current operating program and set a different temperature for a desired period. Press the icon Setup. Browse to the “Hold Temp” menu and press on it for submenu. Press the first column of “Hold Temp”, use the icons to set the desired hold temperature. -
Page 19: Reset To Factory Settings
Reset To Factory Settings Press the icon Setup. Browse to the “Reset To Factory Settings” and press on it for submenu. Press ‘Reset’ for factory settings. The thermostat will now automatically restart. Warning! Upon reset, all current settings on the device will be lost. -
Page 20: Mode 2 - Time Clock
MODE 2 - TIME CLOCK Setting the Time Clock To program the time clock times, follow these steps: Press the button “Schedule” on the main display. Press on Weekday or Weekend Four time periods, Morning / Day / Evening / Night, can be selected to set. Each period has the options ON/OFF. - Page 21 Press the ‘Hours’ column and use the icons to set the desired Boost time. Press the ‘Minutes’ column and use the icons to set the desired Boost time. Press the icon to save and return to the main screen. The indication “Boost On Left **:**”...
-
Page 23: Technical Specification
Operating voltage / Power supply 85-230VAC, 50/60Hz Standby power < 1.0W Rated Current / Relay 16A resistive load, 230V Setting range, temperature 5-45°C Floor limitation, temperature range 20-45°C On/Off differential ±0.5°C Humidity sensor, air 0-100% Three programming modes: Weekday/Weekend (5 + 2) - edit/set 4 time periods per day Seven day programming (7) - edit/set 4 time periods per day... - Page 24 Energotech AB Firmagatan 5 SE-213 76 Malmö, Sweden Tel: +46 40 866 90 info@energotech.se www.energotech.com For latest updated information please visit our website...
Need help?
Do you have a question about the EnergoControl T60 Series and is the answer not in the manual?
Questions and answers