Advertisement
8002 Nitro-Fuzer
Congratulations on purchasing Polyvance's 8002 nitrogen plastic welder. Prior to powering
up the welder, please read and follow the directions outlined in this booklet on the setup
and use of your plastic welder. Scan the QR code using your smartphone to watch the
Setup and Use video. Failure to read and fully understand these instructions or failure to
watch the instructional video will potentially cause damage to your welder, will increase
your risk of injury, and may cause the welder to become a fire hazard. Videos are also
accessible on our website at:
Getting started:
1. Assemble the welding cart and mount the
8002 welder to the top shelf using 2 sheet
metal screws (included). Connect the air
manifold to the air inlet on the back of the
welder with the green tubing.
2. Unpack the accessories box. Place
the welding rod in the bins on top of the
cart and thread the welding tips into the
appropriate welder.
3. Place the nitrogen welder into the top
holster and make sure there is nothing
flammable near the hot end of welder.
Place the airless welder into the lower
holster.
4. Install your shop's male air fitting in the
bottom of the air manifold on the front of the
cart. If desired, you may install a hose to
the front of the manifold to power air tools.
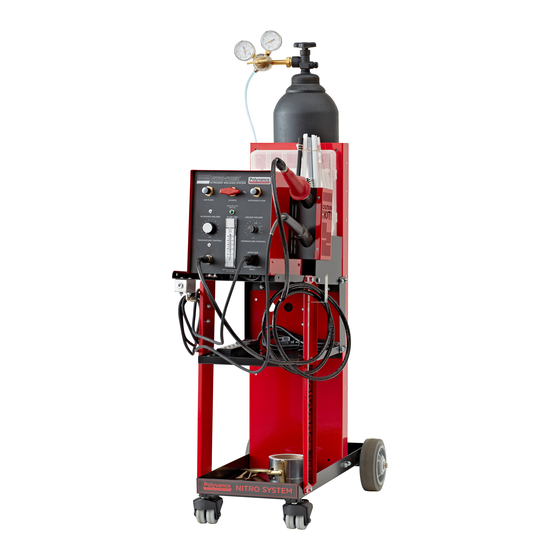
5. Secure your nitrogen tank to the back of
the cart with chains (included), move the top
tank cradle as needed. Mount the regulator
to the nitrogen bottle. Connect the N
on the welder to the regulator with tubing.
6. With the welder off, connect your
CLEAN, DRY, and OIL-FREE shop air
supply to the manifold.
CAUTION: Always use CLEAN,
DRY, and OIL-FREE air for the
nitrogen welder. Water and/or
oil inside the heating element
will drastically shorten its life
span.
https://www.polyvance.com/video
1
2B
4
inlet
2
5B
Quick Start Guide
®
Your hose
Your shop
fitting
Page 1
Setup and Use Video
2A
3
5A
Adjustable
tank cradle
6
Your shop air
Chain to
cart
Advertisement
Table of Contents

Related Manuals for Polyvance Nitro-Fuzer 8002


Summary of Contents for Polyvance Nitro-Fuzer 8002
- Page 1 Quick Start Guide ® Congratulations on purchasing Polyvance’s 8002 nitrogen plastic welder. Prior to powering up the welder, please read and follow the directions outlined in this booklet on the setup and use of your plastic welder. Scan the QR code using your smartphone to watch the Setup and Use video.
- Page 2 CAUTION: ALWAYS maintain adequate airflow through the welder while it is hot or the power is on. Failure to do so will burn out your heating element. Polyvance DOES NOT WARRANT the heating element because its life is completely under YOUR control.
- Page 3 At this point, begin pressing the rod downward onto the surface, rolling it towards the heat. Be sure the surface of the rod and the surface of the substrate are both melted when pushing the two materials together. For more information on welding plastic, please watch the instructional videos found at www.polyvance.com. Page 3...
- Page 4 • If out of range, or an open circuit is indicated, replace the faulty heating element. • If elements check OK, turn the unit on with no elements installed. If the fuse continues to blow, contact Polyvance. If unit appears to function normally without the elements installed, plug in the airless welder only and test.
Need help?
Do you have a question about the Nitro-Fuzer 8002 and is the answer not in the manual?
Questions and answers