Advertisement
Welder Shut-down Procedure:
To shut off individual welders:
Airless Welder:
Press the airless welder control knob one
time.
Nitrogen Welder:
Place welder into the top holster and press
the nitrogen welder control knob one time.
1
"OFF" will show on the display.
System Shut-down:
1. Shut off main power
2. Close the valve on the nitrogen bottle,
but leave the compressed air connected
and on.
3
3. Allow the welder to completely cool
before disconnecting the air supply.
The shutdown procedure is VERY IMPORTANT for maximizing the
life of your heating element. You MUST maintain airflow through
Diagnostics:
the heating element until it is completely cool.
of your heating element's life!
Welder will not turn on.
heating elements for this reason.
• Check power supply to welder.
• Check wall outlet for 120V.
• Make sure power strip is on.
• Check that all cords going to the welder are plugged in.
• Check circuit breaker on the back of the welder.
Circuit breaker trips.
• Check heating elements for shorts. Remove the hot air element and unplug the airless welder from the control panel. Check the resistance of the
elments using an Ohm meter.
• Hot air welder: 26.0 ± 1.0 Ohm
• Airless welder: 53 ± 3.0 Ohms
• If out of range, or an open circuit is indicated, replace the faulty heating element.
• If elements check OK, turn the unit on with no elements installed. If circuit breaker continues to trip, contact Polyvance. If unit appears to function
normally without the elements installed, plug in the airless welder only and test. If unit continues to operate normally, shut power off, then reinstall
the hot air element and test. If unit trips circuit duiring either test, its safe to assume the fault lies withing the last element installed.
Nitrogen welder does not heat or is not hot enough.
• Turn the controller power "ON" by pushing the control knob once.
• Check air flow to hot air welder. If the green "safe" light does not illuminate, power will not be sent to the Nitrogen welder. Increase airflow until the
green light illuminates. (It should illuminate at approximately 10 LPM. If it does not, contact Polyvance.)
• Check the temperature setting. If the airflow is at 12, set the temp to 52.
• If it still does not heat, check resistance of the heating element. (see above)
• If no faults are found, contact Polyvance.
Airless welder does not heat.
• Turn the controller power "ON" by pushing the control knob once.
• Check the temperature setting, set the temp to 100. Low settings will produce very little heat.
• If still no heat, check resistance of the heating element (see above).
• If no faults are found, contact Polyvance.
2
Ah, cool
air!
You are in control
Polyvance cannot warrant the
1128 Kirk Road, Rainsville, AL 35986
Tech Support: 800-633-3047
email: info@polyvance.com
Page 4
web: www.polyvance.com
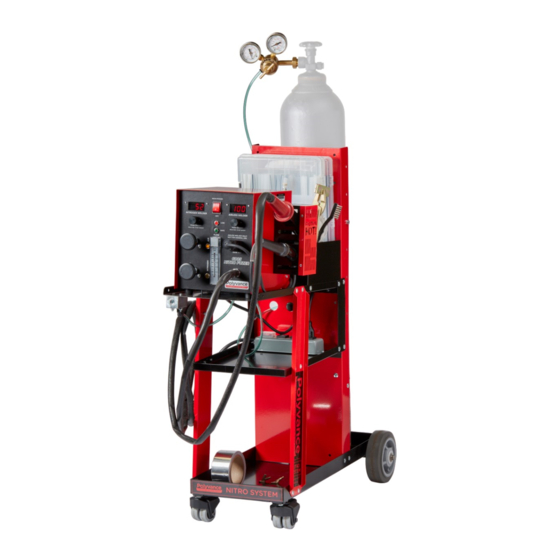
6085-C Nitro Fuzer Welding Cart - Quick Start Guide
REV: 11-2018
Congratulations on purchasing the easiest-to-use nitrogen plastic welder on the market. Prior to powering up
the welder, please read and follow the directions outlined in this booklet on the set-up and use of your plastic
welder. Scan the QR codes on the included sheet using your smart phone to see how to use the welder.
Failure to read and fully understand these instructions or failure to watch the instructional videos will potentially
cause damage to your welder, will increase your risk of injury, and may cause the welder to become a fire
hazard. Videos are also accessible on our website at:
Getting started:
1. Unpack the accessories box. Place
the welding rod boxes onto the large
compartment on the top of the cart
and thread the welding tips into the
appropriate welder.
2. Place the welders into the holster
on the right side of the welder. Be sure
to place the nitrogen welder into the
rectangular top tray and make sure there
is nothing flammable near the holster.
3. Install your shop's male air fitting in
the bottom of the air manifold on the front
of the cart. If desired, you can install a
hose to the front of the manifold to power
air tools.
4. Secure your nitrogen tank to the back
of the cart with the included chains and
adjust the top tank cradle if needed.
Install the nitrogen regulator securely to
the nitrogen bottle.
5. With the welder off, connect your
CLEAN, DRY, and OIL FREE shop air
supply to the manifold.
CAUTION: Always use
CLEAN, DRY, and OIL-FREE
air for the nitrogen welder.
Water and/or oil inside
the heating element will
drastically shorten its life
span.
http://www.polyvance.com/video
1
Install tips
2
3
4
Adjustable
tank cradle
Chain to
cart
5
Your shop air
Page 1
Your hose
Your shop
fitting
Advertisement
Table of Contents

Related Manuals for Polyvance 6085-C


Summary of Contents for Polyvance 6085-C
- Page 1 • If out of range, or an open circuit is indicated, replace the faulty heating element. • If elements check OK, turn the unit on with no elements installed. If circuit breaker continues to trip, contact Polyvance. If unit appears to function supply to the manifold.
- Page 2 The welding rod should be applied perpendicular to when the airflow is over 10 LPM, contact the base material with the welder aimed at approximately a 45° angle between Polyvance tech support for adjustment the two. procedure.
Need help?
Do you have a question about the 6085-C and is the answer not in the manual?
Questions and answers