
Related Manuals for TP-Link Archer BE800


Summary of Contents for TP-Link Archer BE800
- Page 1 User Guide BE19000 Tri-Band Wi-Fi 7 Router Archer BE800 © 2023 TP-Link 1910013365 REV1.0.0...
-
Page 2: Table Of Contents
5. 4. Manage the Router via the TP-Link Tether App ......27... - Page 3 7. 4. Advanced Settings ............40 Chapter 8 Wireless Settings 8.
- Page 4 Chapter 14 NAT Forwarding 14. 1. Share Local Resources on the Internet by Port Forwarding ....81 14. 2. Open Ports Dynamically by Port Triggering ........83 14.
-
Page 5: About This Guide
The Quick Installation Guide can be found where you find this guide or inside the package of the router. Specifications can be found on the product page at https://www.tp-link.com. TP-Link Community is provided for you to discuss our products and share knowledge at https://community.tp-link.com. Our Technical Support contact information can be found at the... - Page 6 * HomeShield includes the Free Basic Plan. Fees apply for the Pro Plan. Visit tp-link com/homeshield for more information. * Use of WPA3 requires clients to also support the corresponding feature. * This router may not support all the mandatory features as ratified in Draft 3.0 of IEEE 802.11ax specification.
-
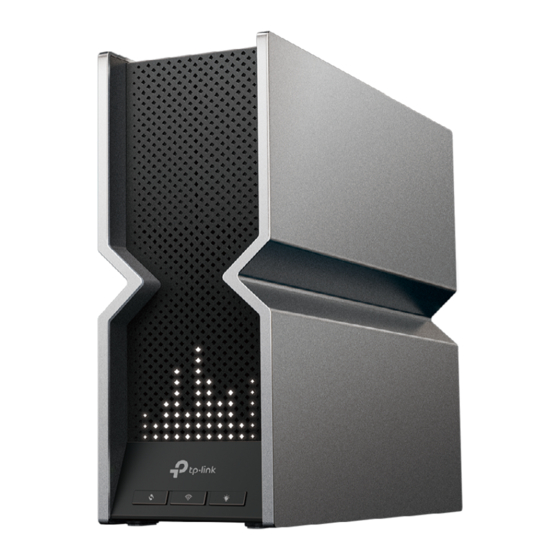
Page 7: Chapter 1 Get To Know About Your Router
Chapter Get to Know About Your Router This chapter introduces what the router can do and shows its appearance. It chapter contains the following sections: • Product Overview • Appearance... -
Page 8: Product Overview
Access to the 6 GHz band brings more bandwidth, faster speeds, and lower latency, opening up resources for future innovations. Moreover, it is simple and convenient to set up and use the TP-Link router due to its intuitive Tether app and powerful web interface. - Page 9 Chapter 1 Get to Know About Your Router Status Indication Establishing a WPS connection. If successful, a √ will appear, if failed, an × will appear The router is being upgraded. The router is disconnected from the internet. LEDs in the top are pulsing in a line, indicating Wi-Fi is off. Buttons Three physical buttons are located on the back of the router Press the WPS button, and immediately press the WPS button on your client device to...
-
Page 10: Back Panel And Side Panel
Chapter 1 Get to Know About Your Router 1 2 2 Back Panel and Side Panel The following parts are located on the back panel. Item Description Power On/Off Button Press this button to power on or off the router. POWER Port For connecting the router to a power socket via the provided power adapter. -
Page 11: Chapter 2 Connect The Hardware
Chapter Connect the Hardware This chapter contains the following sections: • Position Your Router • Connect Your Router... -
Page 12: Position Your Router
Chapter 2 Connect the Hardware Position Your Router • The product should not be located in a place where it will be exposed to moisture or excessive heat. • Place the router in a location where it can be connected to multiple devices as well as to a power source. - Page 13 Chapter 2 Connect the Hardware Turn off the Wi-Fi on your computer and connect the devices to the LAN port of your router. • Method 2: Wirelessly 1 ) Find the SSIDs (Network Names) and Wireless Password printed on the label at the bottom of the router.
-
Page 14: Chapter 3 Log In To Your Router
Chapter Log In to Your Router... - Page 15 Chapter 3 Log In to Your Router With a web-based utility, it is easy to configure and manage the router. The web-based utility can be used on any Windows, Mac OS or UNIX OS with a Web browser, such as Microsoft Internet Explorer, Mozilla Firefox or Apple Safari.
-
Page 16: Chapter 4 Set Up Internet Connection
Furthermore, you can also set up an IPv6 connection if your ISP provides IPv6 service. It contains the following sections: • Use Quick Setup Wizard • Quick Setup Via TP-Link Tether App • Manually Set Up Your Internet Connection • Set Up the Router as an Access Point •... -
Page 17: Use Quick Setup Wizard
• To learn more about the TP-Link Cloud service, please refer to the TP-Link Cloud Service section. • If you do not want to register a TP-Link ID now, you may click Skip to proceed. • If you have changed the preset wireless network name (SSID) and wireless password during the Quick Setup process, all your wireless devices must use the new SSID and password to connect to the router. -
Page 18: Manually Set Up Your Internet Connection
ISP. Follow the steps below to check or modify your internet connection settings. 1. Visit http://tplinkwifi.net, and log in with your TP-Link ID or the password you set for the router. - Page 19 Chapter 4 Set Up Internet Connection 1 ) If you choose Dynamic IP, you need to select whether to clone the MAC address. Dynamic IP users are usually equipped with a cable TV or fiber cable. 2 ) If you choose Static IP, enter the information provided by your ISP in the corresponding fields.
- Page 20 Chapter 4 Set Up Internet Connection 4 ) If you choose L2TP, enter the username password and choose the Secondary Connection provided by your ISP. Different parameters are needed according to the Secondary Connection you have chosen. 5 ) If you choose PPTP, enter the username and password, and choose the Secondary Connection...
-
Page 21: Set Up The Router As An Access Point
Set Up the Router as an Access Point The router can work as an access point, transforming your existing wired network to a wireless one. 1. Visit http://tplinkwifi.net, and log in with your TP-Link ID or the password you set for the router. 2. Go to Advanced >... -
Page 22: Set Up An Ipv6 Internet Connection
Your ISP provides information about one of the following IPv6 internet connection types: PPPoE, Dynamic IP(SLAAC/DHCPv6), Static IP, 6to4 tunnel, Pass-Through (Bridge). 1. Visit http://tplinkwifi.net, and log in with your TP-Link ID or the password you set for the router. - Page 23 Chapter 4 Set Up Internet Connection Dynamic IP(SLAAC/DHCPv6): Click Advanced to input further information if your ISP requires. Click SAVE and then click Renew. PPPoE: By default, the router uses the IPv4 account to connect to the IPv6 server. Click Advanced to input further information if your ISP requires.
- Page 24 Chapter 4 Set Up Internet Connection 6to4 Tunnel: An IPv4 internet connection type is a prerequisite for this connection type (Manually Set Up Your Internet Connection). Click Advanced input further information if your ISP requires. Click SAVE and then click Connect. Pass-Through (Bridge): Click SAVE...
- Page 25 Chapter 4 Set Up Internet Connection 5. Configure LAN ports. Windows users are recommended to choose from the first two types. Fill in Address Prefix provided by your ISP, and click SAVE. 6. Click Status to check whether you have successfully set up an IPv6 connection. Tips: Visit the section if there is no internet connection.
-
Page 26: Chapter 5 Tp-Link Cloud Service
TP-Link Cloud service provides a better way to manage your cloud devices. Log in to your router with a TP-Link ID, and you can easily monitor and manage your home network when you are out and about via the Tether app. To ensure that your router stays new and gets better over time, the TP-Link Cloud will notify you when an important firmware upgrade is available. -
Page 27: Register A Tp-Link Id
Manage the User TP-Link IDs. • Once you have registered a TP-Link ID on the web management page, you can only register another TP-Link ID via the Tether APP. Please refer to Manage the Router via the TP-Link Tether App to install the app. -
Page 28: Manage The User Tp-Link Ids
Password. 2. Enter the current password, then a new password twice. And click SAVE. Manage the User TP-Link IDs The TP-Link ID used to log in to the router for the first time will be automatically bound as the Admin... -
Page 29: Add Tp-Link Id To Manage The Router
3. Click , enter another TP-Link ID as needed and click SAVE. Note: If you need another TP-Link ID, please register a new one via the Tether app. Refer to Manage the Router via the TP-Link Tether App to install the app and register a new TP-Link ID. -
Page 30: Manage The Router Via The Tp-Link Tether App
5. Manage your router as needed. Note: If you need to remotely access your router from your smart devices, you need to: • Log in with your TP-Link ID. If you don’t have one, refer to Register a TP-Link • Make sure your smartphone or tablet can access the internet with cellular data or a Wi-Fi network. -
Page 31: Chapter 6 Network Map
Chapter Network Map...
Need help?
Do you have a question about the Archer BE800 and is the answer not in the manual?
Questions and answers