
Related Manuals for Kogan SMARTERHOME KSOBCAMWGAB


Summary of Contents for Kogan SMARTERHOME KSOBCAMWGAB
- Page 1 KOGAN SMARTERHOME™ OUTDOOR BATTERY POWERED 1080P WIRELESS SECURITY SMART CAMERA KSOBCAMWGAB, KSOBCAMWGAC...
-
Page 2: Table Of Contents
Components Overview Connect to SmarterHome™ App Google Home Control Amazon Alexa Control Installation Operation Notes... -
Page 3: Components
COMPONENTS Security Camera Power Adapter USB Cable Bracket Mounting Hardware Allen Key User Guide... -
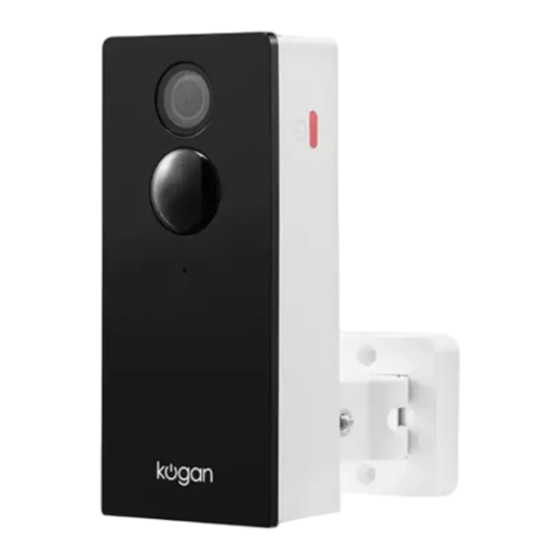
Page 4: Overview
OVERVIEW Power button & status light Micro USB Lens Charging indicator SD card slot (motion sensor) Reset Microphone Speaker Power DC 5V/1A Power button Press the button for 3 seconds to turn the camera on/off Solid Red light: the camera network is abnormal Blinking Red light: awaiting Wi-Fi connection or currently Status Light connecting (fast blinking), connecting (slowly blinking) -
Page 5: Connect To Smarterhome™ App
Install App Download the “Kogan SmarterHome” app from the Play Store (Android) or App Store (iOS). Register If you do not have a Kogan SmarterHome™ account, register or sign in with a verification code sent by SMS. To register: Tap to enter registration page. - Page 6 Ensure the device is powered on. Make sure Wi-Fi is available and your phone is connected to the internet. Open the “Kogan SmarterHome” app and tap “Add Device” or “+” in the upper right to add a new device through the network.
- Page 7 10. Select Wi-Fi network (note: network must be 2.4Ghz band), enter the password and tap “Confirm”. Read the instruction on screen then tap “Continue”. 12. Scan the QR code using the camera on the light, after prompt is heard, tap “I Heard a Prompt”, and wait for the device to be paired.
- Page 8 Using AP Mode to add device Once registered, tap “+” in the upper right corner of the app’s home page to add a new device through the network. Select the product type from the list of options in the app “Home Security > Camera”...
- Page 9 Select “AP Mode” for the set-up type. Ensure that the device is in pairing mode, with the indicator flashing, and tap “Confirm indicator flashing”. Enter your Wi-Fi details. It is important that your SmarterHome™ device and the app are connected to the same Wi-Fi network during setup.
- Page 10 Follow the in-app prompts to continue AP Mode connection, which will pair your mobile phone to the device’s Wi-Fi hotspot to ensure a connection. Note: If the Wi-Fi hotspot does not appear on your phone in the list of available networks, your device may not be set in AP Pairing Mode correctly.
-
Page 11: Google Home Control
From the home page of the Google Home app, select the “+” icon to access the ‘Add and manage’ page. Select ‘Set up device’, then under the Works with Google banner, select ‘Have something already set up?’ Select the search bar and type ‘Smarter Home’ to locate the Kogan SmarterHome™ service. - Page 12 Tap ‘Authorise’ to grant Google permission to access the SmarterHome™ app and your devices. From here, you will be prompted to sign into your SmarterHome™ account using either your email or mobile phone number, depending on which method you used to register your account.
- Page 13 Tap on any of the devices to view a list of available commands. Note: Please note that Google Home can only control the base/core functions of any compatible SmarterHome™ devices. To make full use of this product’s smart functionality, please use the Kogan SmarterHome™ app.
-
Page 14: Amazon Alexa Control
AMAZON ALEXA CONTROL Note: You will need to have set up an Alexa account prior to linking your Kogan SmarterHome™ device. Adding “SmarterHome” to the Alexa app From the home page of the Alexa app, select the “ ” icon in the top-right and select Skills &... - Page 15 Tap ‘Enable to Use’ to add the Kogan SmarterHome™ skill to Alexa. From here, you will be prompted to sign into your SmarterHome™ account using either your email or mobile phone number, depending on which method you used to register your account.
- Page 16 SmarterHome™ account. When your devices have successfully connected to the Alexa app, you will be able to control your Kogan SmarterHome™ devices via Alexa’s voice commands. Note: Please note that Alexa can only control the base/core functions of any compatible SmarterHome™...
-
Page 17: Installation
INSTALLATION Using the supplied hardware, attach the bracket to the wall. If you are unsure as to what hardware is required for your chosen surface, please consult a qualified trade professional. Slide the camera onto the bracket. To adjust the angle of the camera, use the Allen key to loosen the fastener. -
Page 18: Operation
OPERATION In the camera’s control page, tap the "…" icon in top right-hand corner to access the camera’s functions. Preview mode Audio About device Signal strength Full screen mode... - Page 19 Screenshot: Save a screenshot to the microSD card. Remote wake-up The camera will be in a sleep mode to save power; you can preview the camera in the SmarterHome™ app. Two-way audio You can see and hear the visitors from the camera in your SmarterHome™ app. PIR motion detection Built-in motion sensor detects movement, and the camera will send push notifications and app alerts.
- Page 20 Automated Scheduling From the “Scene” menu tap on the “+” button in the top right corner. Select “Schedule”.
- Page 21 Set the condition of the schedule (time etc.) then tap “Next” in the top right corner. Select the task you wish to schedule by clicking “Run the device”.
- Page 22 Select the device you wish to schedule from the list of connected devices. Select the motion sensor function by tapping on “PIR Switch” when prompted select whether to turn the device ON or OFF.
- Page 23 Review all the conditions of the schedule and then tap “Save” in the top right corner. The schedule can now be toggled ON or OFF from the Scene menu.
-
Page 24: Faq
Q: The camera cannot be previewed properly. A: Check that the network status is normal. Place the camera closer to the router. If this doesn’t solve the issue, reset the camera and re-add it to using the SmarterHome™ app. Q: Why is the camera still in list of devices after resetting? A: Resetting only resets the network configuration of the camera. -
Page 25: Notes
NOTES... - Page 28 Need more information? We hope that this user guide has given you the assistance needed for a simple set-up. For the most up-to-date guide for your product, as well as any additional assistance you may require, head online to help.kogan.com...
Need help?
Do you have a question about the SMARTERHOME KSOBCAMWGAB and is the answer not in the manual?
Questions and answers