Table of Contents
Advertisement
Quick Links
Advertisement
Table of Contents
Troubleshooting

Related Manuals for SeQual INTEGRA E-Z


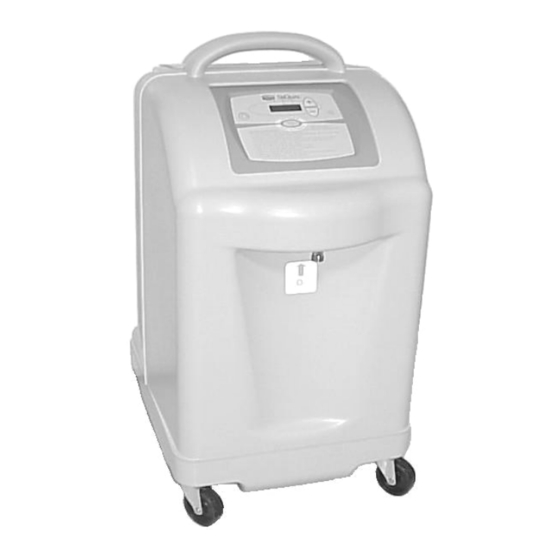
Summary of Contents for SeQual INTEGRA E-Z
- Page 1 Integra E-Z Oxygen Concentrator Service Manual P/N 2917 Rev E - F Dec 2011...
-
Page 2: Table Of Contents
Unit starts but shuts down after a short period of operation ................18 Compressor pressure relief valve actuates ......................18 Compressor Noisy .............................. 19 Trouble Shooting Guide for Integra E-Z units ....................20 REPAIR PROCEDURES ............................23 Removal and installation of covers ........................23 Removal and installation of the POD Assembly .................... -
Page 3: Introduction
The rated flow of an Integra E-Z 5 is five liters per minute. The rated flow of an Integra E-Z 7 is seven liters per minute and Integra E-Z 10 is ten liters/minute. Upgraded – It is the policy of SeQual Technologies to incorporate certain design improvements into machines, which have been returned to the factory for inspection and/or repair. - Page 4 There are no field serviceable components in the ATF assembly. Any attempt to open the module, without the express written consent of SeQual Technologies, will result in module contamination and will void the warranty. The ATF product flow/pressure is self-regulating by matching compressor size (pressure and volume of flow) to the rated flow of a particular ATF module.
-
Page 5: Basic Mechanical Layout
ATF module, and POD assembly. These components are mounted to the base and center frame and are housed in a two-piece cover. Although the plastic components are common to all the Integra E-Z concentrators, refer to the appropriate model data sections concerning parts replacement. - Page 6 (a maximum of 10 minutes). The Integra E-Z oxygen concentrator does not utilize a conventional circuit breaker. A separate “current-sense” transformer mounted on the printed circuit board continuously monitors the current being drawn by the compressor.
- Page 7 Service Manual Integra E-Z Oxygen Concentrators start running. In addition the Integra E-Z has two fuses. The primary fuse F2 (service technician replaceable fuse, see Section 10 for spare parts) is used as a back-up to the current- sensing system and will prevent excessive current draw by the compressor. Another non- replaceable fuse, F1, provides protection in the event of a transformer failure.
-
Page 8: Set-Up And Operation
Service Manual Integra E-Z Oxygen Concentrators Set-up and Operation 2.1. The proper location. Locate the concentrator in a well-ventilated space that provides adequate airflow. Ensure that furniture, draperies or clothing will not impede air circulation. The Integra requires 6 air exchanges per hour to properly ventilate. -
Page 9: Starting The Integra E-Z
2.5.2. Start-up Sequence OM units On initial start-up Integra E-Z units light the Green, Yellow and Red LED’s with a 3 second beep followed by an intermittent beep for the remainder of the warm-up. As concentration increases to ~70%, the Red LED turns off and the Yellow and Green remain on. -
Page 10: Service Mode
Use of downstream or external flow control device is not recommended. The Integra E-Z will attempt to control the flow rate to the target flow set on the indicator. If the unit cannot control to this flow rate an alarm indication will occur and potential damage may occur to the unit. -
Page 11: Maintenance
Service Manual Integra E-Z Oxygen Concentrators 3. Maintenance Routine Maintenance: Routine maintenance consists of cleaning the air inlet filter at a weekly interval to keep the unit functioning properly. Once the filter is cleaned, dried, and re-installed. The user can easily achieve this maintenance. -
Page 12: Scheduled Preventive Maintenance
Service Manual Integra E-Z Oxygen Concentrators 3.2. Scheduled Preventive Maintenance (Use PN 4542-SEQ “Annual PM Kit”- once every 12 Months(Annually) or as needed) 3.2.1. Replace the 9V Battery once every 12 Months(Annually) or when Battery Level is at 2 Bars: Replace the 9V battery(8098-SEQ) annually or when the Battery Indicator Level is at 2 Bars. -
Page 13: Test Procedures
(approximately 5 minutes). 4.1.3 Set the target flow on the Integra E-Z to the maximum rated flow, 5 LPM for Integra Five, 7 LPM for Integra Seven, 10 LPM for Integra Ten and oxygen monitor flow valve to low flow settings. -
Page 14: Unit Test Procedure-Alternate Method
4.3.1. Start-up Sequence OM units On initial start-up Integra E-Z units light the Green, Yellow and Red LED’s with a 3 second beep followed by an intermittent beep for the remainder of the warm-up. As concentration increases to ~70%, the Red LED turns off and the Yellow and Green remain on. -
Page 15: Troubleshooting
Concentrators. 4.3.2. Start-up Sequence Non-OM units Non-OM Integra E-Z units start-up with the Green, Yellow and Red LED’s lit and a 3 second beep indicating all alarms indicators are functioning followed by the green LED turning on. The table below shows the normal start-up operating conditions for Integra E-Z Concentrators. - Page 16 Off/On button to restart the Integra E-Z. 5.1.1.5.Oxygen flow rate being measure and controlled by the Integra E-Z doesn’t agree with flow set on the front panel by more or less than 30% of target flow rate. If alarm persists, check for kinked or blocked tubing inside or outside the unit, or for leaks between the flow meter and the control valve.
-
Page 17: Unit Fails To Start
The alarm will not sound until this 10 minute warm-up time delay is complete. During this time an intermittent beep will sound alerting the user that the Integra E-Z is warming up. 5.2. -
Page 18: Unit Does Not Produce Adequate Oxygen Flow
5.3.3. Check for damage to the traces on the circuit board. Failure of an internal component can cause excessive power draw. This will typically result in burn marks adjacent to the eight-pin connector that can be observed with the back cover removed. Contact SeQual Customer Service for assistance. -
Page 19: Compressor Noisy
5.6.10 Cycle the PRV a few times to clean out any potential contamination. Test the PRV again to see if it activates at 35 (+2) psig. Replace if it fails. 5.6.11 If these steps do not identify the problem, contact SeQual Customer Service for assistance. 5.7. -
Page 20: Trouble Shooting Guide For Integra E-Z Units
A noise free installation requires the compressor to sit on the four springs in a neutral position without any external force pushing it out of position. 5.8. Trouble Shooting Guide for Integra E-Z units Table 1: Concentrator is not Running Symptom Probable Cause Remedy Check condition of power cord. - Page 21 Remove power cord from wall Red Light On System malfunction outlet. Flow Indicator Blank Service required. Back Light On Note: If abnormal operating conditions are detected and cannot be remedied, contact SeQual Customer Service. Chart SeQual Technologies Inc. Page 21 of 34 P/N 2917...
- Page 22 * These conditions are displayed only on units equipped with optional oxygen monitor(OM). Call the SeQual Customer Service if abnormal conditions are detected and cannot be remedied. During System Malfunction condition the Green and Yellow lights may be On or Off.
-
Page 23: Repair Procedures
Service Manual Integra E-Z Oxygen Concentrators 6. Repair Procedures WARNING: Observe all safety precautions during maintenance. Unplug the unit unless power is required for observation of operation, adjustment, power readings or leak checks. WARNING: At the completion of any procedure which disturbs any air or oxygen carrying hose or tube, conduct a leak check of the affected area prior to returning the unit to service. -
Page 24: Printed Circuit Board Assembly (Pcba) Replacement Procedure
Service Manual Integra E-Z Oxygen Concentrators 6.2.6 Remove the four screw hardware sets that physically attach the POD to the center frame (save them for reinstallation). 6.2.7 Installation is conducted in the reverse order. Ensure that the oxygen feed tube is routed through the opening in the center frame to the HEPA filter coming from the ATF. - Page 25 Service Manual Integra E-Z Oxygen Concentrators 6.3.1.5 Remove Qty 6 small Phillips style screws securing the PCBA to the front panel (save for reinstallation). 6.3.1.6 Carefully lift off the Circuit Board (do not slide off due to buzzer and LCD components mounted on the underside of the board) and place into appropriate ESD packaging.
-
Page 26: Removal And Installation Of The Atf Module
Repeat the test. Plug outlet & apply pressure. Showing the outlet blocked using a cap. Apply 10psig gas pressure POD Leak test for Integra E-Z Plugged DISS outlet 0-15 psi PBCA Gauge PVC tube to ATF Once the assembly passes the leak test, install the POD following guidance from Section 6.2... -
Page 27: Removal And Installation Of The Compressor Assembly
Service Manual Integra E-Z Oxygen Concentrators Oxygen Outlet Hose Clamp Compressed Air Inlet Hose Clamp Compressed Air Heat Exchanger ATF HEPA Filter ATF Power Connector 6.4.4 Loosen the clamp on the compressed air inlet line and remove the hose. You must Plug or tape over the opening in the ATF. - Page 28 Service Manual Integra E-Z Oxygen Concentrators 6.5.8 Remove the 4 compressor bolts. NOTE: The spring mounts will be loose at this point. Use care in hardware removal to avoid loss of parts. 6.5.9 Compressor may now be pulled clear of unit. Check all wire routing while removing to ensure that the compressor wire harness does not snag in other wiring.
-
Page 29: Compressor Top-End Rebuild
6.5.18 Shut down unit and install covers. Compressor Top-End rebuild NOTE: Refer to Replacement Parts Section for proper rebuild kit. Contact SeQual Customer Service for all other compressor accessories. Compressor manufacturer instructions supersede SeQual’s if differences occur. NOTE: Experienced technicians with proper tools may elect to perform the compressor top end rebuild without removing the compressor from the unit. - Page 30 Service Manual Integra E-Z Oxygen Concentrators NOTE: Prior to installing the heat exchanger tubing into push lock fitting ensure that any sharp edges are removed to avoid cutting the O-ring and generating a compressor leak. A compressed air leak will cause the ATF performance to degrade quickly. This will result in premature unit failure.
-
Page 31: Integra E-Z 5L Specifications
Service Manual Integra E-Z Oxygen Concentrators 7. Integra E-Z 5L Specifications Integra E-Z Model Number 6323A / 6323A-OM Technical Data Flow Rate 0.5 to 5.0 LPM 1.0 to 5.0 LPM 91 ± 3% at sea level Oxygen Concentration Green Light = Normal Operation... -
Page 32: Integra E-Z 7L Specifications
Service Manual Integra E-Z Oxygen Concentrators 8. Integra E-Z 7L Specifications Integra Model Number 6323A-7 / 6323A-OM-7 Technical Data Flow Rate 0.5 to 7.0 LPM 0.5 to 7.0 LPM 91 ± 3% at sea level Oxygen Concentration Green Light = Normal Operation... -
Page 33: Integra E-Z 10L Specifications
Service Manual Integra E-Z Oxygen Concentrators 9. Integra E-Z 10L Specifications Integra E-Z Model 6323A-10 / 6323A-OM-10 Technical Data Flow Rate 0.5 to 10.0 LPM 1.0 to 10.0 LPM 91 ± 3% at sea level Oxygen Concentration Green Light = Normal Operation... -
Page 34: Part Numbers
Service Manual Integra E-Z Oxygen Concentrators 10. Part Numbers 10.1. Preventive Maintenance Parts Description SeQual Part Number Air Inlet Filter SP2185-SEQ Compressor Inlet Filter 2607-SEQ HEPA Filter SP2033-SEQ 9V Battery 8098-SEQ Annual PM kit, including filters, 9V 4542-SEQ battery GAST Compressor Rebuild Kit...
Need help?
Do you have a question about the INTEGRA E-Z and is the answer not in the manual?
Questions and answers