JumpPro Xcite Assembly Instructions Manual
Hide thumbs
Also See for Xcite:
- Assembly instructions manual (23 pages) ,
- Assembly instructions manual (21 pages)
Advertisement
Quick Links
JumpPRO Xcite Assembly Instructions
8ft, 10ft, 12ft and 14ft JumpPRO Xcite Round
Trampoline with Enclosure
WARNING! Read these Assembly Instructions before assembling and
using your trampoline. Max User weight Limit
8ft: 50kg, 10ft: 120kg, 12ft,14ft: 150kg
Warning! Not suitable for children under
36 months - small parts, choking hazard!
Advertisement

Related Manuals for JumpPro Xcite


Summary of Contents for JumpPro Xcite
- Page 1 JumpPRO Xcite Assembly Instructions 8ft, 10ft, 12ft and 14ft JumpPRO Xcite Round Trampoline with Enclosure WARNING! Read these Assembly Instructions before assembling and using your trampoline. Max User weight Limit 8ft: 50kg, 10ft: 120kg, 12ft,14ft: 150kg Warning! Not suitable for children under...
- Page 2 WARNINGS! Max User Weight: 8ft: 50kg, 10ft: 120kg, 12ft: 150kg, 14ft: 150kg Recommended age 6+ years. Only for domestic use. The trampoline is intended for outdoor use only. The trampoline shall be assembled by an adult in accordance with the assembly instructions and thereafter checked before the first use.
- Page 3 INFORMATION The trampoline is not intended to be buried into the ground. Product dimensions: 8ft: 244x244x231CM 10ft: 305x305x245CM 12ft: 366x366x265CM 14ft: 427x427x269CM All users should be aware of their own limitations. The risk of severe injury must by taken seriously. It is important to bend your knees on landing to achieve the best possible control.
- Page 4 ASSEMBLY AND MAINTENANCE INSTRUCTIONS Please pay attention to the need to carry out checks and maintenance of the main parts (frame, suspension system, mat, padding and enclosure) at the beginning of each season and also at regular intervals. If these checks are not carried out, the trampoline could become dangerous. Check all nuts and bolts for tightness and tighten when required.
-
Page 5: Jumping Instructions
JUMPING INSTRUCTIONS Fundamental Bounce 1. Start from a standing position with your head erect and your eyes on the frame pad. 2. Swing your arms forward and up in a circular motion. 3. Bring your feet together and point your toes downward while in the air. - Page 6 WHAT YOU WILL NEED FOR BUILDING YOUR TRAMPOLINE Gloves Safety glasses Mallet To help build your trampoline, you will need gloves, safety glasses and a mallet. Please note that these are not supplied with your trampoline. ASSEMBLY INSTRUCTIONS To assemble this trampoline we have provided you with our special spring loading tool (item H), a cross head screwdriver (item J) and spanners (items I).
- Page 7 TRAMPOLINE PART LIST...
-
Page 9: Step 1: Trampoline Parts
STEP 1: TRAMPOLINE PARTS Note: Product images are for illustration purposes only, component part colours may vary dependent on which JumpPRO model you have purchased. Lay out all the trampoline parts in groups, as shown in the picture. STEP 2: ASSEMBLING THE FRAME 2. - Page 10 3. Connect the top rails (C) with the T-connectors (G) as shown in the picture above. Continue until you form a large circle. Note: The images below are for the 8ft and 10ft models. 12ft and 14ft versions have 8 top rails, 8 T connectors and 4 legs.
- Page 11 STEP 3: ATTACHING THE BED WARNING: Be careful where you place your hands during spring assembly as connector points can pinch! IMPORTANT: Springs must be attached the right way around and fully inserted into the holes along the top of the frame. Note: It is easier to place one hand on the frame and pull the spring towards you, as shown above.
- Page 12 The First Spring Hole 5. Slot one of the springs (D) onto one of the D- rings of the jumping mat (B). Slot the other end of T-connector(G) the spring into one of the spring holes along the top rail. Start by attaching the springs to the left sides of each T-connector (G) using spring pulling tool (H).
- Page 13 ① ② 6. Each time you connect a spring to the jumping mat, make sure you attach another spring to the opposite side to allow better tension and pressure. Repeat this until all the springs are attached. Note: 1) Make sure that the D-rings on the bed, match the number of holes along the top rails. 2) If you notice that you have skipped a hole and D-ring connection, recount, remove and adjust accordingly.
- Page 14 STEP 4: FITTING THE FRAME PAD 7. Lay the frame pad (A) over the trampoline so that the springs and the steel frame are covered. Please ensure that the frame pad covers all metal parts. 8. Tie the straps located underneath the frame pad to the frame. Do not tie them to the springs. STEP 5: ASSEMBLING THE ENCLOSURE POLES WARNING: The trampoline MUST NOT be used during construction.
- Page 15 9. Insert the fork screws (P) through the bottom enclosure poles (M). Use the plastic spacer (supplied with the fork screws) in between the bottom enclosure poles (M) and the leg extensions (E) Tighten the nuts of each fork screw with the bolts and spanner provided (I). DO NOT OVER TIGHTEN! 10.
- Page 16 11. Insert the top enclosure poles (N) into the bottom enclosure poles (M) using the screws (O) and screwdriver provided (J) as shown in the above images. STEP 6: ATTACHING THE FIBERGLASS RODS AND T PLASTIC CAPS TO THE NET T Plastic Cap (R) Fiberglass Rod (S) Passage sewn on the top of...
- Page 17 13. Attach the fiberglass rods with the safety net to the top of the enclosure poles (N) by inserting the T Plastic Caps (R) into the top of the enclosure poles. Door Enclosure Net D-rings on Jumping Mat Cord (L) 14.
- Page 18 Door Enclosure Net Cord (L) D-rings on Jumping Mat 15. Thread the cord (L) through the lower eyelet of the enclosure net (K) halfway between the first D- ring and the D-ring to the left, and then thread the cord through to the left. Repeat this procedure until all the cords are threaded through the enclosure net and the D-rings as shown.
-
Page 19: Spare Parts
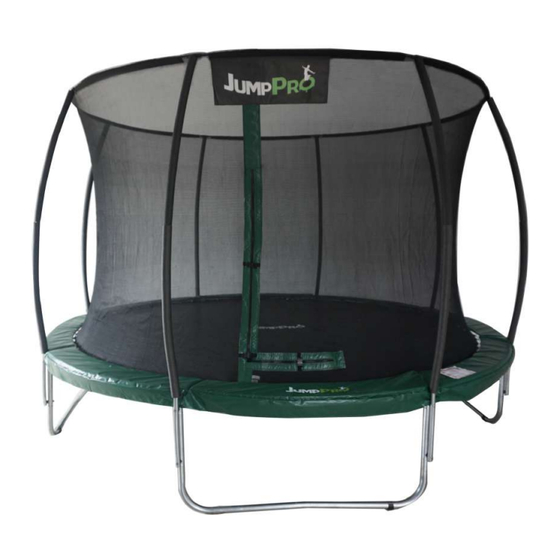
17. The trampoline and enclosure are now fully assembled. Make sure that all parts are securely attached. Familiarise yourself and all users of the trampoline and enclosure with the safety precautions, use and instructional materials, and care and maintenance instructions in this manual before using.
Need help?
Do you have a question about the Xcite and is the answer not in the manual?
Questions and answers