Puffco PEAK PRO Instruction Manual
Hide thumbs
Also See for PEAK PRO:
- Instruction manual (32 pages) ,
- Quick start manual (13 pages) ,
- Instruction manual (11 pages)
Table of Contents
Advertisement
Available languages
Available languages
Advertisement
Chapters
Table of Contents

Related Manuals for Puffco PEAK PRO


Summary of Contents for Puffco PEAK PRO
- Page 1 P E A K P R O I N S T R U C T I O N M A N U A L...
-
Page 2: Table Of Contents
READ CAREFULLY! Please read the entire instruction booklet before using your device to ensure you’re getting the most out of your Peak Pro. You will avoid damaging your device, or interrupting your experience if you do it now vs. later. -
Page 3: What's Inside / P
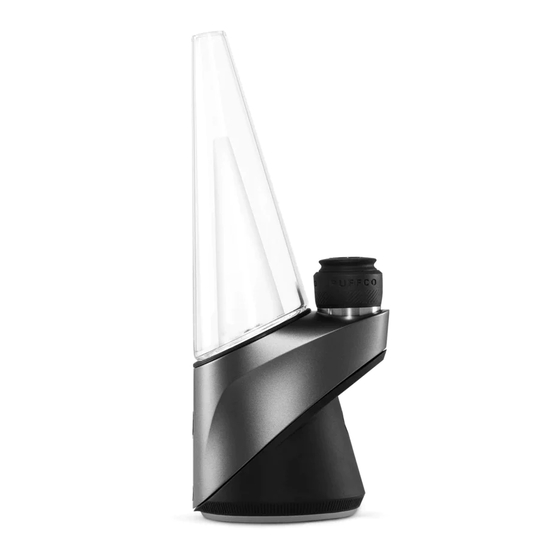
B: Dual Tools (5) G: Chamber C: AC Adapter** H: Glass* D: USB-C Cable I: Peak Pro Base E: Jacket & Tether Carrying Case (not shown) *Each glass piece is hand blown and may vary slightly in size. **AC Adapter May Not be Supplied. -
Page 4: What's New / P
WHAT’S NEW: Bluetooth App Wireless Charging (Power Dock sold separately) Enabled Real-Time USB-C Temperature Control Charging Large Capacity Customizable Chamber LED lights QUICK START: Fully charge the Fill glass with water device before first just above the air- use. The light color holes. - Page 5 Single click to toggle Use loading tool or through heat settings. a Puffco Dual Tool Blue (Low) - to place contents on Green (Medium) the bottom surface (High) -...
- Page 6 Attach tether here Place carb cap on Double click to top of chamber. initiate heat-up. Press down until Press and hold snug. Use the button anytime to included chamber exit. Pulsing light jacket & tether to indicates heat-up keep it safe during mode is active.
-
Page 7: Temperature Settings / P
TEMPERATURE SETTINGS: HOW TO CHOOSE A SETTING 1. Ensure device is on. 2. Click once to cycle through each heat level. 3. Double click to initiate heat-up Each heat setting has an intended purpose and results depending on the experience you’re looking for. -
Page 8: Cleaning Your Device / P
CLEANING: CHAMBER 1. Remove the cap and unscrew the chamber from the base. Do not handle if hot. 2. Light Cleaning: Use a cotton swab to gently remove any residue with 90%+ isopropyl alcohol. Deep Cleaning: Submerge the chamber in 90%+ isopropyl alcohol for 20 minutes. - Page 9 - Do not blow or exhale hard into the glass. This will force water into the base. - Do not store device with water in the glass, unless you have the Puffco Travel Glass. - Strong inhales may cause spillage and damage to your chamber.
-
Page 10: Advanced Features / P
READY MODE (APP): *The Peak Pro Power Dock and mobile app are required to activate ready mode. Once the Peak Pro is paired with a mobile device, enable “Ready Mode” found in the Peak Pro app settings. Your device will now automatically initiate the selected heat profile when lifted from... -
Page 11: App Integration / P
APP INTEGRATION: The Peak Pro app integration has a wealth of new features that allow you to customize your experience, unlock special features, and more. Go to Puffco.com to learn more. Hold the button for 6 seconds to sync your Peak Pro with your app. - Page 12 N E E D H E L P ? CONTACT US! *Please do not return your Peak Pro to the store. *Keep your proof of purchase. If you’re having anything less than a perfect experience, reach out to our support team.
- Page 13 SHARE THE VIEW: Use #PuffcoPeak to share your experience. Kindly follow us on Instagram! Puffco...
- Page 14 LEER DETENIDAMENTE Lee todo el manual antes de empezar a usar tu dispositivo para asegurarte de que estás aprovechando al máximo tu Peak Pro. Si lo haces ahora, evitarás dañar el dispositivo o interrumpir tu experiencia. Visita Puffco.com/Support para ver vídeos...
-
Page 15: Contenido / Págs
B: Dual Tools (5) G: Chamber C: Adaptador AC** H: Vidrio* D: Cable USB-C I: Base Peak Pro E: Funda de atomizador Bolsa de viaje con atadura (no se muestra) *Todas las piezas de vidrio están hechas a mano, así que el tamaño puede variar ligeramente. -
Page 16: Novedades / Págs
NOVEDADES: Conexión por Carga inalámbrica Bluetooth con la (la base de carga se vende por aplicación separado) Carga USB-C Control de temperatura en tiempo real Chamber de Luces LED gran capacidad personalizablest INICIO RÁPIDO: Llena el vidrio con Carga por completo agua hasta los orificios el dispositivo antes internos. - Page 17 Presiona el botón Utiliza una una sola vez para herramienta de los ajustes de carga o un Dual Tool de Puffco temperatura. Azul (baja) - Verde (media) para introducir el Rojo (alta) -...
- Page 18 Attach tether here Haz doble clic para Coloca el carb cap en la parte superior que empiece a del chamber. calentar. Presiona y Presiona hacia abajo mantén presionado hasta que quede el botón en cualquier momento para salir. ajustado. Utiliza la funda de atomizador Una luz parpadeante y atadura incluidas...
-
Page 19: Ajustes De Temperatura / Págs
AJUSTES DE TEMPERATURA: CÓMO ELEGIR UN AJUSTE 1. Asegúrate de que el dispositivo está encendido. 2. Haz clic una vez para repasar todos los niveles de calentamiento. 3. Haz doble clic para que empiece a calentar. Todos los ajustes de calentamiento tienen un objetivo concreto y los resultados dependerán de la experiencia que estés buscando. -
Page 20: Limpieza Del Dispositivo / Págs
LIMPIEZA: CHAMBER 1. Retira la tapa y desenrosca el chamber de la base. No tocar si está caliente. 2. Limpieza rápida: Utiliza un bastoncillo de algodón y limpia suavemente cualquier residuo con alcohol isopropílico +90 %. Limpieza a fondo: Sumerge la cámara en alcohol isopropílico +90 % durante 20 minutos. - Page 21 - No soples ni exhales con fuerza sobre el vidrio. Esto llevaría el agua hacia la base. - No guardes el dispositivo con agua dentro del vidrio, a menos que tengas el Puffco Travel Glass. - Las inhalaciones fuertes pueden causar derrames y dañar el chamber.
-
Page 22: Ajustes Avanzados / Págs
READY MODE (APP): *La base de carga del Peak Pro y la aplicación móvil son necesarias para activar el «Ready Mode» . Cuando tu Peak Pro esté emparejado con un móvil, habilita la opción «Ready Mode»... -
Page 23: Conexión Con La Aplicación / Págs
INTEGRACIÓN DE LA APLICACIÓN: La aplicación de Peak Pro tiene un abanico de nuevas funciones que te permitirán personalizar tu experiencia, desbloquear ajustes nuevos y mucho más. Visita Puffco.com para más información. Presiona el botón durante 6 segundos para sincronizar tu Peak Pro con la aplicación. El dispositivo se apagará... - Page 24 ¿NECESITAS AYUDA? ¡CONTACTA CON NOSOTROS! *No devuelvas tu Peak Pro a la tienda. *Guarda tu ticket de compra. Si no estás disfrutando del todo este producto, ponte en contacto con el servicio de atención al cliente. 1. ¡Usa la aplicación! La aplicación ofrece datos importantes de...
- Page 25 COMPÁRTELO: Usa el hashtag #PuffcoPeak para compartir tu experiencia. ¡Síguenos en Instagram! PUFFCO...
- Page 26 LE PEAK PRO DE PUFFCO Ce guide vous expliquera comment utiliser votre Peak Pro et comment le préparer, le nettoyer et le connecter a l’application. Contenu/ p. 27 Nouveautés / p. 28 Démarrage rapide / p. 28 - 30 Réglages de température / p. 31 Nettoyer votre dispositif / p.
-
Page 27: Contenu
A: Outil de remplissage B: Outils à double usage (5) G: Chambre H: Récipient* C: Adaptateur secteur** I: Base du Peak Pro D: Câble USB-C Étui de transport E: Attache (pas montré) *Les pièces en verre ont été soufflées et peuvent donc être de tailles légèrement différentes. -
Page 28: Nouveautés
NOUVEAUTÉS: Application Charge sans fil compatible (Power Dock vendu Bluetooth séparément) Port de charge Contrôle de la température USB de type C en temps réel Chambre de Voyants DEL grande capacité personnalisables DÉMARRAGE RAPIDE: Remplissez le récipient Chargez complètement en verre d’eau; le le dispositif avant niveau devrait être toute utilisation. - Page 29 Appuyez une fois pour Utilisez l’outil de basculer entre les remplissage ou un outil à double usage différents paramètres de température. Puffco pour placer Bleu (basse) — Vert votre concentré au (moyenne) — Rouge fond du bol (et non (élevée) —...
- Page 30 Fixer la sangle ici Attach tether here Appuyez deux fois Placez le bouchon sur la chambre. pour que le dispositif Appuyez jusqu’à ce commence à chauffer. qu’il soit bien fermé. Faites un appui long Utilisez l’attache sur le bouton à tout moment pour arrêter.
-
Page 31: Réglages De Température
RÉGLAGES DE TEMPÉRATURE: CÓMO ELEGIR UN AJUSTE 1. Vérifiez que le dispositif est allumé 2. Appuyez une fois pour parcourir tous les niveaux de température. 3. Appuyez deux fois pour que le dispositif commence à chauffer Chaque profil de température a un but précis, et les résultats dépendent des effets que vous recherchez. -
Page 32: Nettoyer Votre Dispositif
NETTOYAGE : CHAMBRE 1. Retirez le bouchon et dévissez la chambre de la base. Ne pas manipuler lorsque c'est chaud. 2. Nettoyage rapide : Retirez délicatement les résidus avec un coton-tige imbibé d'isopropanol à 90 %. Nettoyage en profondeur : Plongez la chambre dans de l'isopropanol à... - Page 33 De l'eau pourrait entrer dans la base. – Ne pas ranger le dispositif avec de l'eau dans le récipient, à moins que vous disposiez du récipient de voyage Puffco. – Des inhalations trop fortes peuvent entraîner des débordements et endommager votre chambre.
-
Page 34: Fonctionnalités Avancées
Boost. MODE PRÊT (APPLICATION) : *Le Peak Pro Power Dock et l'application mobile sont nécessaires pour activer le mode prêt. Une fois le Peak Pro couplé avec un dispositif mobile, activez le mode Prêt dans les paramètres de l'application du Peak Pro. -
Page 35: Intégration De L'application
INTÉGRATION DE L'APPLICATION : L'intégration de l'application Peak Pro propose de nombreuses nouvelles fonctionnalités permettant de personnaliser votre expérience, débloquer des fonctionnalités spéciales et plus. Rendez-vous sur Puffco.com pour en savoir plus. Maintenez le bouton enfoncé pendant 6 secondes pour synchroniser votre Peak Pro avec l'application. - Page 36 BESOIN D'AIDE ? COMMUNIQUEZ AVEC NOUS? *Veuillez ne pas retourner votre Peak Pro au magasin. *Conservez votre preuve d'achat. Si votre expérience n'a pas été parfaite, veuillez contacter notre équipe d'assistance. 1. Utilisez l'application L'application nous fournit des informations de diagnostic importantes à propos de votre dispositif.
- Page 37 PARTAGEZ VOTRE AVIS : Utilisez #PuffcoPeak pour partager votre expérience. Suivez-nous sur Instagram! PUFFCO...
- Page 38 DER PUFFCO PEAK PRO Diese Anleitung erklärt Ihnen die Nutzung Ihres Peak Pro, einschließlich Vorbereitung, Reinigung und Konnektivität zu Apps. Lieferumfang / S. 39 Neuigkeiten / S. 40 Kurzanleitung / S. 40 - 42 Temperatureinstellungen / S. 43 Gerätereinigung / S. 44 - 45 Erweiterte Funktionen/ S.
-
Page 39: Lieferumfang
LIEFERUMFANG: Rundfenster Carb Cap* A: Ladegerät Kammer B: Dual Tools (5) Glas* C: AC-Adapter** Peak Pro-Basis D: USB-C-Kabel E: Hülle und Halteband Etui (nicht gezeigt) *Jedes gläserne Teil ist handgeblasen und kann eine unterschiedliche Größe aufweisen. **Netzteil wird möglicherweise nicht mitgeliefert. -
Page 40: Neuigkeiten
NEUERUNGEN: Bluetooth Drahtloses Laden App-fähig (Power-Dockingstation ist separat erhältlich) USB-C-Ladelaufwerk Temperaturkontrolle in Echtzeit Kammer mit Anpassbare großer Kapazität LED-Lampen KURZANLEITUNG: Füllen Sie das Glas Laden Sie das Gerät mit Wasser bis etwas vor der ersten Nutzung über die Luftlöcher. vollständig. Die Farbe Füllen Sie das Glas des Lichts zeigt den nicht, wenn es mit der... - Page 41 Basis und drücken Sie dann die Rückseite nach unten. Verwenden Sie ein Einfacher Klick, um durch die Füllwerkzeug oder Temperatureinstellungen ein Puffco Dual durchzuschalten. Tool, um den Inhalt Blau (Niedrig) auf den Boden der Schale (nicht die Grün (Mittel) (Hoch) Seiten) zu legen.
- Page 42 Halteband hier anbringen Attach tether here Mit einem Doppelklick Setzen Sie das Carb Cap oben auf die beginnen Sie den Kammer. Drücken Aufwärmprozess. Sie es nach unten, Drücken und halten bis es einrastet. Sie den Knopf zu einem beliebigen Verwenden Sie die mitgelieferte Hülle Zeitpunkt, um den und das Halteband...
-
Page 43: Temperatureinstellungen
TEMPERATUREINSTELLUNGEN: CÓMO ELEGIR UN AJUSTE 1. Stellen Sie sicher, dass das Gerät eingeschaltet ist. 2. Klicken Sie einmal, um jede Hitzestufe zu durchlaufen. 3. Mit einem Doppelklick beginnen Sie den Aufwärmprozess. Jede Temperatureinstellung hat einen beabsichtigten Zweck und die Ergebnisse hängen von der gewünschten Erfahrung ab. -
Page 44: Gerätereinigung / S
REINIGUNG: KAMMER 1. Entfernen Sie das Cap und schrauben Sie die Kammer der Basis ab. Nicht anfassen, wenn sie heiß ist. 2. Leichte Reinigung: Entfernen Sie mit einem in 90 %+ Isopropylalkohol getränkten Wattestäbchen vorsichtig alle Reste. Gründliche Reinigung: Tauchen Sie die Kammer 20 Minuten lang in 90 %+ Isopropylalkohol. - Page 45 - Blasen Sie nicht und atmen Sie nicht fest in das Glas. Das drückt das Wasser in die Basis. - Lagern Sie das Gerät nicht mit Wasser im Glas, es sei denn, Sie haben das Puffco Travel Glas. - Starkes Inhalieren kann zu Austritt und Schaden an Ihrer Kammer führen.
-
Page 46: Erweiterte Funktionen
Bedarf weiter boosten. Mit der App können Sie die gewünschte Zeit und die Temperatur Ihres Boosts einstellen. BEREITSCHAFTSMODUS (APP): *Die Peak Pro Power Dockingstation und die mobile App sind für die Aktivierung des Bereitschaftsmodus erforderlich. Wenn der Peak Pro mit einem Mobilgerät gepaart ist, können Sie den «Bereitschaftsmodus»... -
Page 47: Integration Von Apps
INTEGRATION DER APP: Die Integration der Peak Pro App bietet eine Vielzahl neuer Funktionen, mit denen Sie Ihr Erlebnis personalisieren können und Zugang zu vielen besonderen Funktionen usw. erhalten. Auf Puffco.com erhalten Sie weitere Infos. Halten Sie den Knopf 6 Sekunden lang gedrückt, um Ihren Peak Pro mit Ihrer App zu synchronisieren. - Page 48 SIE BRAUCHEN HILFE? KONTAKTIEREN SIE UNS! * Geben Sie Ihren Peak Pro bitte nicht an das Geschäft zurück. *Bewahren Sie die Einkaufsquittung auf. Kontaktieren Sie unser Supportteam, falls Sie nicht ein perfektes Erlebnis haben sollten. 1. Nutzen Sie die App! Die App gibt uns wichtige diagnostische Informationen über Ihr Gerät.
- Page 49 TEILEN SIE DIE ANSICHT: Über #PuffcoPeak können Sie Ihre Erfahrung teilen. Folgen Sie uns auf Instagram! Puffco...
- Page 52 Puffco Creation Labs - Subject to alterations · All rights reserved...
Need help?
Do you have a question about the PEAK PRO and is the answer not in the manual?
Questions and answers