Table of Contents
Advertisement
Quick Links
Advertisement
Table of Contents

Related Manuals for Philips Selecon PLSTUPNL-03


Summary of Contents for Philips Selecon PLSTUPNL-03
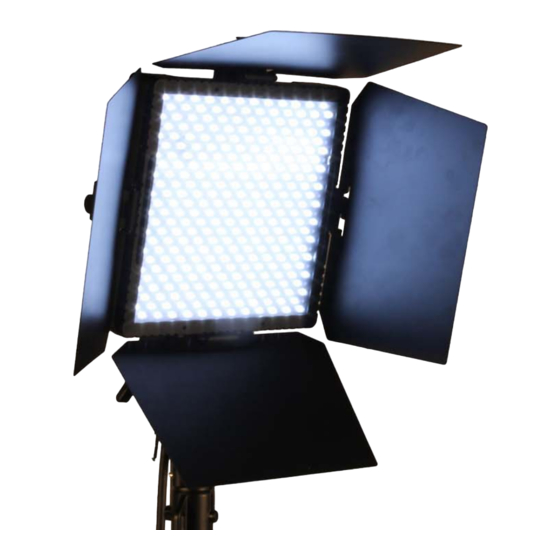
- Page 1 Studio Panel LED Luminaire (shown with optional barndoors - PLSTUPNLBD, 2 sets)
-
Page 2: Philips Selecon Offices
Information contained in this document may not be duplicated in full or in part by any person without prior written approval of Philips Selecon. Its sole purpose is to provide the user with conceptual information on the equipment mentioned. The use of this document for all other purposes is specifically prohibited. -
Page 3: Important Information
Philips Selecon offers a three-year limited warranty of its luminaires against defects in materials or workmanship from the date of delivery. A copy of Philips Selecon three-year limited warranty containing specific terms and conditions can be obtained from the Philips Selecon web site at www.seleconlight.com or by contacting your local... -
Page 4: Table Of Contents
TABLE OF CONTENTS Philips Selecon Offices........................... Inside Front Cover IMPORTANT INFORMATION Warnings and Notices................................. 1 Additional Resources for DMX512............................ 1 Philips Selecon Limited Three-Year Warranty ........................1 TABLE OF CONTENTS PREFACE About this Manual ..................................3 Included Items..................................... 3 Accessories ....................................3 Studio Panel LED Luminaire Power Input Cables (for North America only).............. -
Page 5: Preface
• Installation and User’s Manual (this document) 3. Accessories Contact your Authorized Philips Selecon Dealer for price and availability of all accessories for Studio Panel LED Luminaires. Additional information can be found on the Philips Selecon web site at www.seleconlight.com. -
Page 6: Studio Panel Led Luminaire Overview
Studio Panel LED Luminaires Installation & User’s Manual STUDIO PANEL LED LUMINAIRE OVERVIEW 1. Studio Panel LED Luminaire Components Major Luminaire Components Rear of Unit Front of Unit 1) Studio Panel LED Luminaire Head 2) LCD Display Menu System (see "LCD Display / Menu System"... -
Page 7: Lcd Display / Menu System
Studio Panel LED Luminaires Installation & User’s Manual LCD Display / Menu System 1) LCD Display (Menu System) 2) Menu Navigation Wheel and Select Button 3) CCT (Correlated Color Temperature) Selection Button 4) Dimmer Selection Button 5) Preset Selection Button Figure 3: LCD Display &... -
Page 8: Installation And Set Up Power Requirements
Studio Panel LED Luminaires Installation & User’s Manual INSTALLATION AND SET UP 1. Power Requirements The Studio Panel LED Luminaire operates on either AC or DC voltage. The luminaire contains an on-board ON / OFF switch. WARNING! Turning off the unit at power switch does not disconnect power from unit. Always disconnect power input cables to completely remove power from unit when not in use. -
Page 9: Connecting Studio Panel Led Luminaires To Ac Power
CAUTION: In the event the AC input cable of this luminaire is damaged, it must be replaced, by the user, with an approved cable by Philips Selecon through an Authorized Dealer or Service Center. Replacement AC input cables are listed in "Accessories"... -
Page 10: Connecting Studio Panel Led Luminaires To Dc Power
Studio Panel LED Luminaires Installation & User’s Manual Connecting Studio Panel LED Luminaires to DC Power The Studio Panel LED Luminaire can be connected to a DC Voltage power source (i.e., AC to DC converter or battery). Table 4 describes how to connect power to your Studio Panel LED Luminaire to a VDC power source. Field wiring of the Studio Panel LED Luminaire is straight forward. -
Page 11: Connecting To The Dmx512 Network
Studio Panel LED Luminaires Installation & User’s Manual 3. Connecting to the DMX512 Network Basic DMX512 installation consists of connecting multiple Studio Panel LED Luminaires together (up to 32 luminaires) in "daisy-chain" fashion. A cable runs from the control console (or DMX512 control source) to the DMX connector on the first Studio Panel LED Luminaire. -
Page 12: Mounting Luminaire
Studio Panel LED Luminaires Installation & User’s Manual 4. Mounting Luminaire The Studio Panel LED Luminaire is provided with a Handle / Mount Assembly. This assembly easily attaches and detaches from the luminaire via a quick-release handle. This Handle / Mount Assembly is designed to accept a variety of mounting hooks, clamps, etc. -
Page 13: Stud Adapter Installation
Studio Panel LED Luminaires Installation & User’s Manual Stud Adapter Installation Installing an optional Stand Stud Adapter is quick and easy. Simply rotate the Handle / Mount Assembly to access the mounting hole in Handle / Mount Assembly. As shown in Figure 10, insert retaining bolt into hole and thread into Stud Adapter. -
Page 14: Operation And Programming
Studio Panel LED Luminaires Installation & User’s Manual OPERATION AND PROGRAMMING 1. LCD Display and Menu System The Studio Panel LED Luminaire’s LCD Display and Menu System provides local control for accessing the following fixture’s settings: • CCT (Correlated Color Temperature) •... -
Page 15: Quick Selection Buttons
Studio Panel LED Luminaires Installation & User’s Manual Step 3. Press Navigation Wheel / Select Button at desired menu item to access and make changes. Step 4. Make changes as desired. Table 5: Menu Categories and Options Category Options Next Level Meaning Rotate wheel to set dimmer level from 0 to 100% (in 1% Manual... -
Page 16: Preset Selection Button
Studio Panel LED Luminaires Installation & User’s Manual Step 2. Rotate the Navigation Wheel / Selection Button to desired value/setting. Step 3. Press Navigation Wheel / Selection Button. Step 4. Unit is set to desired CCT value/setting. Preset Selection Button In Manual Mode, you can press the Preset button to access the nine (9) preprogrammed white presets in the Studio Panel LED Luminaire’s memory. -
Page 17: Dmx Control
Studio Panel LED Luminaires Installation & User’s Manual DMX CONTROL This section contains information for operating the luminaire using DMX control in 16-bit or 8-Bit modes. For Menu options and detailed information, see "LCD Display and Menu System" on page Note: These tables assume a DMX start address of 1. -
Page 18: Rdm Control
Table 9: Studio Panel LED Luminaire RDM Product Parameters IDs Model ID Manufacturer Model Description Product Category 0x0101 Philips Selecon Studio Panel LED Light 0x0509 Table 10: Studio Panel LED Luminaire RDM UID MSB of ESTA LSB of ESTA MSB of... - Page 19 Studio Panel LED Luminaires Installation & User’s Manual Table 11: Studio Panel LED Luminaire RDM Parameters IDs RDM Parameter IDs Value Comment Implemented Allowed Allowed ■ ■ DEVICE_INFO 0x0060 ■ PRODUCT_DETAIL_ID_LIST 0x0070 ■ ■ DEVICE_MODEL_DESCRIPTION 0x0080 ■ ■ MANUFACTURER_LABEL 0x0081 ■...
- Page 20 Studio Panel LED Luminaires Installation & User’s Manual Table 11: Studio Panel LED Luminaire RDM Parameters IDs RDM Parameter IDs Value Comment Implemented Allowed Allowed ■ ■ PERFORM_SELFTEST 0x1020 ■ SELF_TEST_DESCRIPTION 0x1021 ■ CAPTURE_PRESET 0x1030 ■ ■ PRESET_PLAYBACK 0x1031 Table 12: Studio Panel LED Luminaire RDM Manufacturer Status IDs Manufacturer Specific messages are in the range of 0x8000 - 0xFFDF.
-
Page 21: Cleaning And Care
Studio Panel LED Luminaire. These types of cleaners or solvents can permanently damage the optics or housings of the fixture. If you have any questions regarding the use or care of your Studio Panel LED Luminaire, please contact Philips Selecon technical support or your local Authorized Dealer. -
Page 22: Accessories
Contact your local Philips Selecon office or an Authorized Service Center for technical support and service. 4. Accessories Only Philips Selecon approved accessories should be used with your Studio Panel LED Luminaire. For a list of available accessories from Philips Selecon, please see "Accessories" on page 3. -
Page 23: Technical Specifications
Compliance: cETLus listed and CE Marked. IP20 Rated Note: Common model specifications shown. For specific model specifications, features, and accessories, refer to the product specification sheet or visit the Philips Selecon web site at www.seleconlight.com for more details. 2. Studio Panel LED Luminaire Dimensions 10.9 in / 278 mm...
Need help?
Do you have a question about the Selecon PLSTUPNL-03 and is the answer not in the manual?
Questions and answers