
Related Manuals for Electrolux EH7L5XDSP


Summary of Contents for Electrolux EH7L5XDSP
- Page 1 EH7L5XDSP Backofen Benutzerinformation Four Notice d'utilisation Forno Istruzioni per l’uso Oven User Manual...
-
Page 2: Table Of Contents
WIR DENKEN AN SIE Danke, dass Sie ein Gerät von Electrolux gekauft haben. Sie haben sich für ein Produkt entschieden, in dem jahrzehntelange Berufserfahrung und Innovation stecken. Bei der Entwicklung dieses genialen und eleganten Geräts haben wir an Sie gedacht. Wann immer Sie das Gerät verwenden, können Sie sicher sein, dass Sie jedes Mal großartige Ergebnisse... -
Page 3: Sicherheitshinweise
SICHERHEITSHINWEISE 5. VOR DEM ERSTEN GEBRAUCH..... 12 10.3 Gartabellen für Prüfinstitute..26 5.1 Erste Reinigung......13 11. REINIGUNG UND PFLEGE..... 28 5.2 Erstes Vorheizen......13 11.1 Hinweise zur Reinigung....29 6. TÄGLICHER GEBRAUCH......13 11.2 Reinigung: Garraumvertiefung..29 11.3 Entfernen der: Einhängegitter ..29 6.1 Einstellung: Ofenfunktionen...13 11.4 Benutzung: Katalytische 6.2 Ofenfunktionen...... -
Page 4: Allgemeine Sicherheitshinweise
SICHERHEITSHINWEISE durch eine für ihre Sicherheit zuständige Person beaufsichtigt werden oder in die sichere Verwendung des Geräts eingewiesen wurden und die mit dem Gerät verbundenen Gefahren verstanden haben. Kinder unter 8 Jahren sowie Personen mit schweren Behinderungen oder Mehrfachbehinderung sollten vom Gerät ferngehalten werden, wenn sie nicht ständig beaufsichtigt werden. - Page 5 SICHERHEITSHINWEISE Wenn das Netzkabel beschädigt ist, muss es vom • Hersteller, seinem autorisierten Kundenservice oder einer gleichermassen qualifizierten Person ausgetauscht werden, um Gefährdungen durch elektrischen Strom zu vermeiden. Um mögliche Gefahren zu vermeiden, muss das Bedienfeld • mit den passenden farblich gekennzeichneten Steckverbindern am vorgeschriebenen Heizelement angeschlossen werden.
-
Page 6: Sicherheitsanweisungen
SICHERHEITSANWEISUNGEN 2. SICHERHEITSANWEISUNGEN 2.1 Aufstellen WARNUNG! Das Gerät darf nur von einer Fachkraft installiert werden. • Entfernen Sie die gesamte Verpackung. • Montieren oder verwenden Sie ein beschädigtes Gerät nicht. • Halten Sie sich an die mitgelieferte Montageanleitung. • Seien Sie beim Bewegen des Gerätes vorsichtig, da es sehr schwer ist. Tragen Sie stets Sicherheitshandschuhe und festes Schuhwerk. -
Page 7: Elektroanschluss
SICHERHEITSANWEISUNGEN Befestigungsschrauben 4x12 mm 2.2 Elektroanschluss WARNUNG! Brand- und Stromschlaggefahr. • Alle elektrischen Anschlüsse sind von einem geprüften Elektriker vorzunehmen. • Das Gerät muss geerdet sein. • Achten Sie darauf, dass die Parameter auf dem Typenschild mit den elektrischen Werten der Netzstromversorgung übereinstimmen. -
Page 8: Reinigung Und Pflege
SICHERHEITSANWEISUNGEN • Öffnen Sie die Gerätetür vorsichtig. Die Verwendung von Zutaten, die Alkohol enthalten, kann eine Mischung aus Alkohol und Luft zur Folge haben. • Achten Sie beim Öffnen der Tür darauf, dass keine Funken oder offene Flammen in das Gerät gelangen. -
Page 9: Wartung
GERÄTEBESCHREIBUNG Temperatur, Vibration, Feuchtigkeit, oder Informationen zum Betriebsstatus des Geräts anzuzeigen. Sie dienen nicht dem Einsatz in anderen Anwendungen und eignen sich nicht zur Raumbeleuchtung. • Dieses Produkt enthält eine Lichtquelle der Energieeffizienzklasse G. • Verwenden Sie stets nur eine Lampe mit der gleichen Leistung.. 2.6 Wartung •... -
Page 10: Zubehörteile
ZUM EIN- UND AUSSCHALTEN DES GERÄTS 3.2 Zubehörteile Gitterrost Für Töpfe, Backformen, Roste. Backblech Für Kuchen und Biskuitboden. Kuchenblech hochrandig Zum Backen und Braten oder zum Auffangen von abtropfendem Fett. Aufbewahrungsschublade Die Aufbewahrungsschublade befindet sich unter dem Backofen. WARNUNG! Sie kann bei Betrieb des Ofens heiss werden. -
Page 11: Bedienfeld
ZUM EIN- UND AUSSCHALTEN DES GERÄTS 4.2 Bedienfeld Drehen Sie Sensorfelder im Bedienfeld Drücken Sie den Knopf Back‐ Kurz‐ Schnell‐ ofen‐ Verriege‐ Einstellung zeitwe‐ aufhei‐ be‐ lung bestätigen cker zung leuch‐ tung Wählen Sie eine Ofenfunktionen aus und schalten Sie den Backofen ein. Drehen Sie den Backofen-Einstellknopf in die Position Aus, um den Ofen auszuschalten. -
Page 12: Einstellknöpfe Für Die Garzonen
VOR DEM ERSTEN GEBRAUCH Fortschrittsanzeige–für Temperatur oder Zeit. Die Anzeige wird vollständig rot, wenn der Ofen die eingestellte Temperatur erreicht hat. Dampfgarfunktionsanzeige 4.3 Einstellknöpfe für die Garzonen WARNUNG! Siehe Kapitel «Sicherheit» in der Bedienungsanleitung des Kochfelds. Sie können das Kochfeld mit den Drehknöpfen für die Kochzonen bedienen. 4.4 Versenkbare Knöpfe Drücken Sie zum Benutzen des Geräts den Knopf. -
Page 13: Erste Reinigung
TÄGLICHER GEBRAUCH 5.1 Erste Reinigung Vor der ersten Anwendung reinigen Sie den leeren Ofen und stellen die Zeit ein: 00:00 Stellen Sie die Zeit ein. Drücken Sie 5.2 Erstes Vorheizen Heizen Sie den leeren Ofen vor der ersten Inbetriebnahme auf. Schritt Entfernen Sie das gesamte Zubehör und die herausnehmbaren Einhängegitter aus dem Ofen. -
Page 14: Ofenfunktionen
TÄGLICHER GEBRAUCH Stellen Sie die Temperatur ein. Wählen Sie eine Ofenfunktion aus. Drücken Sie - drücken und halten, um die Funktion einzuschalten: Schnellaufheizung. Dies ist für einige Ofenfunktionen verfügbar. BakingPlus Vergewissern Sie sich, dass der Ofen kalt ist. Schritt 1 Schritt 2 Schritt 3 Schritt 4... - Page 15 TÄGLICHER GEBRAUCH Standard-Ofenfunktionen Ofenfunktion Anwendung Zum Backen und Braten auf drei Einschubebenen und zum Dörren von Lebensmitteln. Stellen Sie eine 20–40 °C niedrigere Temperatur ein als bei Ober-/Unterhitze. Heissluft Zum Backen und Braten auf einer Ebene. Ober-/Unterhitze Anreichern der Luft mit Feuchtigkeit während des Garvorgangs. Die richti‐ ge Farbe und knusprige Kruste beim Backen erhalten.
-
Page 16: Hinweise Für: Feuchte Umluft
TÄGLICHER GEBRAUCH 6.3 Hinweise für: Feuchte Umluft Diese Funktion wurde verwendet, um der Energieeffizienzklasse und den Ökodesign- Anforderungen gemäss EU 65/2014 und EU 66/2014 zu entsprechen. Prüfungen nach: IEC/EN 60350-1 Die Ofentür muss beim Garen geschlossen werden, damit die Funktion nicht unterbrochen wird und der Ofen möglichst energiesparend funktioniert. - Page 17 TÄGLICHER GEBRAUCH Legende Einschubebene. Wenn die Funktion endet, überprüfen Sie, ob die Speise fertig gegart ist. Speise Gewicht Einschubebene/Zubehör Garzeit Rind Roastbeef, 40 Min. blutig 2; Backblech 1–1,5 kg; 4– Roastbeef, Braten Sie das Fleisch einige Min.uten in 5 cm dicke 50 Min.
- Page 18 TÄGLICHER GEBRAUCH Speise Gewicht Einschubebene/Zubehör Garzeit Roastbeef, blutig (Nieder‐ 75 Min. temperatur Ga‐ ren) 2; Backblech Roastbeef, Verwenden Sie Ihre liebsten Gewürze Medium (Nie‐ 1–1,5 kg; 4– 85 Min. oder einfach nur Salz und frisch gemah‐ dertemperatur 5 cm dicke lenen Pfeffer.
- Page 19 TÄGLICHER GEBRAUCH Speise Gewicht Einschubebene/Zubehör Garzeit Pulled Pork 1,5–2 kg 215 Min. 2; Backblech (Niedertempe‐ Verwenden Sie Ihre liebsten Gewürze. ratur Garen) Wenden Sie das Fleisch nach der Hälfte der Garzeit für eine gleichmässige Bräu‐ nung. Nierenstück, 1–1,5 kg; 5– 55 Min.
- Page 20 TÄGLICHER GEBRAUCH Speise Gewicht Einschubebene/Zubehör Garzeit Pouletschen‐ 30 Min. 3; Backblech kel, frisch Wenn die Pouletschenkel mariniert sind, garen Sie sie länger und bei niedrigerer Temperatur. Ente, ganz 2–3 kg 100 Min. 2; Braten der Speise auf dem Git‐ terrost Verwenden Sie Ihre liebsten Gewürze.
- Page 21 TÄGLICHER GEBRAUCH Speise Gewicht Einschubebene/Zubehör Garzeit Apfeltorte 60 Min. 100–150 ml; 22 cm Ku‐ chenform auf Gitterrost Brownies 2 kg 30 Min. 3; tiefes Kuchenblech Schokoladen- 30 Min. 100–150 ml; Muffin-Blech auf Muffins Gitterrost Kastenku‐ 50 Min. 2; Kastenform auf Gitterrost chen Gemüse/Beilagen Ofenkartof‐...
-
Page 22: Uhrfunktionen
UHRFUNKTIONEN Speise Gewicht Einschubebene/Zubehör Garzeit Kartoffelgra‐ 1–1,5 kg 50 Min. 1; Auflaufform auf Gitterrost tin (rohe Kar‐ Drehen Sie das Gratin nach der Hälfte toffeln) der Garzeit. Pizza, frisch, 100 ml; Backblech ausge‐ 15 Min dünn legt mit Backpapier Pizza, frisch, 25 Min. -
Page 23: Einstellung: Uhrfunktionen
UHRFUNKTIONEN 7.2 Einstellung: Uhrfunktionen Einstellung: Uhrzeit Schritt 1 Schritt 2 Schritt 3 Zum Ändern der Uhrzeit gehen Sie ins Me‐ Stellen Sie die Uhr ein. Drücken Sie: nü und wählen Einstellungen, Uhrzeit. Einstellung: Kurzzeit-Wecker Schritt 1 Schritt 2 Schritt 3 Im Display er‐... -
Page 24: Verwendung: Zubehörteile
VERWENDUNG: ZUBEHÖRTEILE Einstellung: Zeitverzögerung Schritt Schritt 2 Schritt 3 Schritt 4 Schritt 5 Schritt 6 Display Im Dis‐ wird die play er‐ einge‐ scheint: stellte --:-- Zeit an‐ Wählen gezeigt. Stellen Stellen STOPP Wieder‐ Sie die Drücken Drücken Sie die Sie die holt drü‐... -
Page 25: Zusatzfunktionen
ZUSATZFUNKTIONEN 9. ZUSATZFUNKTIONEN 9.1 Verriegelung Diese Funktion verhindert eine versehentliche Änderung der Gerätefunktion. Schalten Sie sie ein, wenn das Gerät funktioniert – der eingestellte Garvorgang wird fortgesetzt, das Bedienfeld ist gesperrt. Schalten Sie sie ein, wenn das Gerät ausgeschaltet ist – es lässt sich nicht einschalten, das Be‐ dienfeld ist gesperrt. -
Page 26: Feuchte Umluft - Empfohlenes Zubehör
RATSCHLÄGE UND TIPPS Nutzen Sie die dritte Einschubebene. (°C) (Min.) Nudel-Auflauf 200 - 220 45 - 55 Kartoffelgratin 180 - 200 70 - 85 Moussaka 170 - 190 70 - 95 Lasagne, frisch 180 - 200 75 - 90 Cannelloni 180 - 200 70 - 85 Brotpudding... - Page 27 RATSCHLÄGE UND TIPPS BACKEN AUF EINER EINSCHUBEBENE. Backen in Formen (°C) (min) Biskuitkuchen (fettfrei) Heissluft 140–150 35–50 Biskuitkuchen (fettfrei) Ober-/Unterhitze 35–50 Apfeltorte, 2 For‐ Heissluft 60–90 men à Ø 20 cm Apfeltorte, 2 For‐ Ober-/Unterhitze 70–90 men à Ø 20 cm BACKEN AUF EINER EINSCHUBEBENE.
-
Page 28: Reinigung Und Pflege
REINIGUNG UND PFLEGE BACKEN AUF MEHREREN EBENEN. Plätzchen (°C) (min) Buttergebäck / Feinge‐ Heissluft 25–45 1 / 4 bäck Törtchen, 20 pro Blech, Heissluft 23–40 1 / 4 heizen Sie den leeren Backofen vor Biskuitkuchen (fettfrei) Heissluft 35–50 1 / 4 GRILL Heizen Sie den leeren Ofen 5 Minuten lang vor. -
Page 29: Hinweise Zur Reinigung
REINIGUNG UND PFLEGE 11.1 Hinweise zur Reinigung Reinigen Sie die Oberfläche des Geräts nur mit einem Mikrofasertuch, warmem Wasser und einem milden Reinigungsmittel. Verwenden Sie eine Reinigungslösung zum Reinigen der Metalloberflächen. Reinigungs‐ Beseitigen Sie Flecken mit einem milden Reinigungsmittel. Tragen Sie es nicht mittel auf die katalytischen Flächen auf. -
Page 30: Benutzung: Katalytische Reinigung
REINIGUNG UND PFLEGE Schritt Schalten Sie den Backofen aus und warten Sie, bis er abge‐ kühlt ist. Schritt Ziehen Sie das Vordere der Einhängegitter von der Seiten‐ wand ab. Schritt Ziehen Sie das Einhängegitter hinten von der Seitenwand ab, und nehmen Sie es vollständig heraus. - Page 31 REINIGUNG UND PFLEGE VORSICHT! Geben Sie bei der Handhabung der Glasscheiben vorsichtig vor, insbesondere an den Kanten der Frontscheibe. Das Glas kann brechen. Schritt Öffnen Sie die Tür vollstän‐ dig. Schritt Heben Sie die Klemmhebel (A) an beiden Türscharnieren an und drücken Sie auf sie. Schritt Schliessen Sie die Backofentür bis zur ersten Öffnungsstellung (Winkel ca.
-
Page 32: Wie Ersetzt Man: Lampe
REINIGUNG UND PFLEGE Schritt Setzen Sie zuerst die kleinere Scheibe ein, dann die grössere Scheibe und die Tür. Achten Sie darauf, dass die Gläser in korrekter Position eingesetzt werden, da sich die Türoberfläche sonst überhitzen kann. 11.6 Wie ersetzt man: Lampe WARNUNG! Stromschlaggefahr. -
Page 33: Fehlersuche
FEHLERSUCHE Schritt Entfernen und reinigen Sie den Metallrahmen und die Dichtung. Schritt Ersetzen Sie die Lampe durch eine bis 300 °C hitzebeständige Halogenlampe mit 230 V und 25 W. Schritt Montieren Sie den Metallrahmen und die Dichtung. Ziehen Sie die Schrauben fest. Schritt Montieren Sie das linke Einhängegitter. -
Page 34: Servicedaten
Typenschild befindet sich auf der vorderen Rahmen des Garraums. Das Typenschild darf nicht vom Garraum entfernt werden. Wir empfehlen Ihnen, die Daten hier einzutragen: Modell (MOD.) ......... Produktnummer (PNC) ......... Seriennummer (S.N.) ......... 13. ENERGIEEFFIZIENZ 13.1 Produktinformationen und Produktinformationsblatt Name des Lieferanten Electrolux 34/148... -
Page 35: Energie Sparen
ENERGIEEFFIZIENZ Modell-Kennzeichnung EH7L5XDSP 948533584 Energieeffizienzindex 81,2 Energieeffizienzklasse Energieverbrauch bei einer Standardlast, konventioneller 1,09 kWh/Programm Betrieb Energieverbrauch bei Standardbeladung, forcierte Heiss‐ 0,69 kWh/Programm luft Anzahl der Hohlräume Wärmequelle Elektrizität Volumen 71 l Backofentyp Einbauherd Gewicht 40.5 kg IEC/EN 60350-1 – Elektrische Kochgeräte für den Hausgebrauch – Teil 1: Herde, Backöfen, Dampfgarer und Grillgeräte –... -
Page 36: Menüstruktur
MENÜSTRUKTUR Garen mit ausgeschalteter Backofenbeleuchtung Schalten Sie die Beleuchtung während des Garens aus. Schalten Sie sie nur bei Bedarf ein. Feuchte Umluft Funktion dient zum Energiesparen beim Kochen. Wenn Sie diese Funktion verwenden, wird die Backofenlampe nach 30 Sekunden automatisch ausgeschaltet. -
Page 37: Garantie
MENÜSTRUKTUR Einstellungen Schnellaufheizung Ein/Aus DEMO Aktivierungsc‐ ode: 2468 Softwareversion Prüfen Gerät auf Werksein‐ Ja/Nein stellungen zurück‐ setzen GARANTIE Kundendienst Servicestellen Industriestrasse 10 Le Trési 6 Via Violino 11 5506 Mägenwil 1028 Préverenges 6928 Manno Morgenstrasse 131 3018 Bern Langgasse 10 9008 St. - Page 38 MENÜSTRUKTUR elektrische und elektronische Geräte. Entsorgen Sie Geräte mit dem Symbol nicht mit dem Hausmüll. Bringen Sie das Gerät zu Ihrer örtlichen Sammelstelle oder wenden Sie sich an Ihr Gemeindeamt. Für die Schweiz: Wohin mit den Altgeräten? Überall dort wo neue Geräte verkauft werden oder Abgabe bei den offiziellen SENS-Sammelstellen oder offiziellen SENS-Recyclern.
- Page 39 NOUS PENSONS À VOUS Merci d’avoir choisi un appareil Electrolux. Vous avez choisi un produit qui bénéficie de décennies d'expérience professionnelle et d'innovation. Ingénieux et élégant, il a été pensé pour vous. C'est la raison pour laquelle vous pouvez avoir la certitude d'obtenir d'excellents résultats à...
-
Page 40: Information Sur La Sécurité
INFORMATION SUR LA SÉCURITÉ 5. AVANT LA PREMIÈRE UTILISATION..49 10.3 Tableaux de cuisson pour les instituts de tests........63 5.1 Nettoyage initial......50 5.2 Préchauffage initial......50 11. ENTRETIEN ET NETTOYAGE....65 6. UTILISATION QUOTIDIENNE....50 11.1 Remarques concernant le nettoyage.......... -
Page 41: Personnes Vulnérables
INFORMATION SUR LA SÉCURITÉ 1.1 Sécurité des enfants et des personnes vulnérables Cet appareil peut être utilisé par des enfants âgés d'au • moins 8 ans et par des personnes ayant des capacités physiques, sensorielles ou mentales réduites ou dénuées d’expérience ou de connaissance, s'ils sont correctement surveillés ou si des instructions relatives à... - Page 42 INFORMATION SUR LA SÉCURITÉ Cet appareil doit être installé et le câble remplacé • uniquement par un professionnel qualifié. N'utilisez pas l'appareil avant de l'avoir installé dans la • structure encastrée. Débranchez l'appareil de l'alimentation électrique avant • toute opération d'entretien. Si le câble d’alimentation secteur est endommagé, son •...
-
Page 43: Consignes De Sécurité
CONSIGNES DE SÉCURITÉ 2. CONSIGNES DE SÉCURITÉ 2.1 Installation AVERTISSEMENT! L'appareil doit être installé uniquement par un professionnel qualifié. • Retirez l'intégralité de l'emballage. • N'installez pas et ne branchez pas un appareil endommagé. • Suivez scrupuleusement les instructions d'installation fournies avec l'appareil. •... -
Page 44: Branchement Électrique
CONSIGNES DE SÉCURITÉ Dimensions minimales de l’ouverture de ventila‐ 550 x 20 mm tion. Ouverture placée sur la partie inférieure de la face arrière Vis de montage 4x12 mm 2.2 Branchement électrique AVERTISSEMENT! Risque d'incendie ou d'électrocution. • Tous les raccordements électriques doivent être effectués par un électricien qualifié. •... -
Page 45: L'appareil
CONSIGNES DE SÉCURITÉ • N'exercez pas de pression sur la porte ouverte. • N'utilisez pas l'appareil comme plan de travail ou comme espace de rangement. • Ouvrez la porte de l'appareil avec précaution. L'utilisation d'ingrédients avec de l'alcool peut provoquer un mélange d'alcool et d'air. •... -
Page 46: Description De L'appareil
DESCRIPTION DE L'APPAREIL • Concernant la/les lampe(s) à l’intérieur de ce produit et les lampes de rechange vendues séparément : Ces lampes sont conçues pour résister à des conditions physiques extrêmes dans les appareils électroménagers, telles que la température, les vibrations, l’humidité, ou sont conçues pour signaler des informations sur le statut opérationnel de l’appareil. -
Page 47: Accessoires
COMMENT ALLUMER ET ÉTEINDRE L'APPAREIL 3.2 Accessoires Grille métallique Pour les plats de cuisson, les moules à gâteaux, les rôtis. Plateau de cuisson Pour les gâteaux et biscuits. Plat à rôtir Pour cuire et rôtir ou comme plat pour récupérer la graisse. -
Page 48: Bandeau De Commande
COMMENT ALLUMER ET ÉTEINDRE L'APPAREIL 4.2 Bandeau de commande Appuyez sur Tournez la ma‐ Touches tactiles du bandeau de commande la touche nette Pré‐ Eclai‐ Confirmez Minu‐ chauffa‐ Touches rage la configu‐ teur ge rapi‐ Verrouil four ration Sélectionnez un mode de cuisson pour mettre en fonctionnement le four. Tournez la manette des modes de cuisson sur la position Arrêt pour mettre à... -
Page 49: Manettes Des Zones De Cuisson
AVANT LA PREMIÈRE UTILISATION Barre de progression - de la température ou de l’heure. La barre est entièrement rouge lorsque le four atteint la température réglée. Voyant de cuisson à la vapeur 4.3 Manettes des zones de cuisson AVERTISSEMENT! Reportez-vous au chapitre « Sécurité » de la notice d’utilisation de la table de cuisson. -
Page 50: Nettoyage Initial
UTILISATION QUOTIDIENNE 5.1 Nettoyage initial Avant la première utilisation, nettoyez le four à vide et réglez la durée : 00:00 Réglez l’heure. Appuyez sur la tou‐ 5.2 Préchauffage initial Préchauffez le four à vide avant de l'utiliser pour la première fois. Étape 1 Retirez les supports de grille amovibles et tous les accessoires du four. -
Page 51: Modes De Cuisson
UTILISATION QUOTIDIENNE Réglez la température. Sélectionnez un mode de cuisson. Appuyez sur la touche - maintenez la touche enfoncée pour activer la fonction : Préchauffage rapide. Disponible avec certaines fonctions du four. BakingPlus Assurez-vous que le four est froid. Étape 1 Étape 2 Étape 3 Étape 4... - Page 52 UTILISATION QUOTIDIENNE Modes de cuisson standard Mode de cuisson Application Pour faire cuire sur 3 niveaux en même temps et pour sécher des ali‐ ments. Diminuez les températures de 20 à 40 °C par rapport à la Chauffa‐ ge Haut/Bas. Chaleur tournante Pour cuire et rôtir des aliments sur un seul niveau.
-
Page 53: Remarques Sur : Circulation D'air Humide
UTILISATION QUOTIDIENNE Mode de cuisson Application Pour accéder au menu : Cuisson assistée, Nettoyage, Configurations. Menu 6.3 Remarques sur : Circulation d'air humide Cette fonction était utilisée pour se conformer à la classe d'efficacité énergétique et aux exigences Ecodesign (selon les normes EU 65/2014 et UE 66/2014). Tests conformes aux normes : IEC/EN 60350-1 La porte du four doit être fermée pendant la cuisson pour que la fonction ne soit pas... -
Page 54: Cuisson Assistée
UTILISATION QUOTIDIENNE 6.5 Cuisson assistée Légende Poids automatique disponible. La quantité d’eau pour la fonction. Préchauffez le four avant de commencer la cuisson. Niveau de grille. Lorsque la fonction se termine, vérifiez si les aliments sont prêts. Plat Poids Niveau/Accessoire Durée Bœuf Rôti de bœuf,... - Page 55 UTILISATION QUOTIDIENNE Plat Poids Niveau/Accessoire Durée Rôti de bœuf, saignant 75 min (cuisson basse température) 2 ; plateau de cuisson Rôti de bœuf, Servez-vous de vos épices préférées ou 1 - 1,5 kg ; 4 à point (cuis‐ simplement du sel et du poivre fraîche‐ - 5 cm 85 min son basse...
- Page 56 UTILISATION QUOTIDIENNE Plat Poids Niveau/Accessoire Durée Longe, fraî‐ 1 - 1,5 kg ; 5 55 min 2 ; plat à rôtir sur grille métallique - 6 cm Utilisez vos épices préférées. d’épaisseur Travers 2 - 3 kg ; 90 min 3 plat profond crus, 2 - Ajoutez du liquide pour recouvrir le fond...
- Page 57 UTILISATION QUOTIDIENNE Plat Poids Niveau/Accessoire Durée Oie entière 4 - 5 kg 110 min 2 ; plat profond Utilisez vos épices préférées. Placez la viande sur un plateau de cuisson pro‐ fond. Retournez l’oie à la moitié du temps de cuisson. Autres Rôti haché...
- Page 58 UTILISATION QUOTIDIENNE Plat Poids Niveau/Accessoire Durée Quatre-quarts 50 min 2 ; moule quatre-quarts sur grille mé‐ tallique Légumes/Garnitures Pommes de 1 kg 50 min 2 ; plateau de cuisson terre au four Placez les pommes de terre entières avec la peau sur un plateau de cuisson. Quartiers 1 kg 35 min...
-
Page 59: Fonctions De L'horloge
FONCTIONS DE L'HORLOGE Plat Poids Niveau/Accessoire Durée Pizza fraîche, 25 min 2 ; plateau de cuisson recouvert épaisse de papier sulfurisé Quiche 45 min 2 ; plat de cuisson sur grille métalli‐ Baguette/ 0,8 kg 30 min 150 ml ; plateau de cuis‐ Ciabatta/Pain son recouvert de papier sulfurisé... - Page 60 FONCTIONS DE L'HORLOGE Comment régler Heure actuelle Pour modifier l'heure actuelle, accédez au menu et sélectionnez Configurations, Heu‐ Réglez l’horloge. Appuyez sur re actuelle. Comment régler Minuteur Étape 1 Étape 2 Étape 3 L’affichage indique : 0:00 Réglez la Minuteur Appuyez sur : Appuyez sur Le minuteur commence son décompte immédiatement.
-
Page 61: Conseils D'utilisation : Accessoires
CONSEILS D'UTILISATION : ACCESSOIRES Comment régler Départ différé Étape 1 Étape 2 Étape 3 Étape 4 Étape 5 Étape 6 L'affi‐ chage L’affi‐ indi‐ chage que : indique : l'heure --:-- actuelle Sélec‐ AR‐ Appuyez à Réglez DÉ‐ tionnez Réglez RÊTER plusieurs Appuyez... -
Page 62: Fonctions Supplémentaires
FONCTIONS SUPPLÉMENTAIRES 9. FONCTIONS SUPPLÉMENTAIRES 9.1 Touches Verrouil. Cette fonction permet d’éviter une modification involontaire de la fonction de l'appareil. Activez-la lorsque l'appareil est allumé - la cuisson réglée est maintenue, le bandeau de comman‐ de est verrouillé. Allumez-le lorsque l’appareil est éteint - il ne peut pas être allumé, le bandeau de commande est verrouillé. -
Page 63: Circulation D'air Humide - Accessoires Recommandés
CONSEILS (°C) (min) Gratin de pâtes 200 - 220 45 - 55 Gratin de pommes de terre 180 - 200 70 - 85 Moussaka 170 - 190 70 - 95 Lasagnes 180 - 200 75 - 90 Cannelloni 180 - 200 70 - 85 Pudding au pain 190 - 200... - Page 64 CONSEILS CUISSON SUR UN SEUL NIVEAU. Cuisson dans des moules (°C) (min) Génoise allégée Chaleur tournante 140 - 150 35 - 50 Génoise allégée Chauffage Haut/Bas 35 - 50 Tarte aux pommes, Chaleur tournante 60 - 90 2 moules Ø20 cm Tarte aux pommes, Chauffage Haut/Bas 70 - 90...
-
Page 65: Entretien Et Nettoyage
ENTRETIEN ET NETTOYAGE CUISSON SUR PLUSIEURS NIVEAUX. Biscuits/Gâteaux secs (°C) (min) Sablé / Tresses feuille‐ Chaleur tournante 25 - 45 1 / 4 tées Petits gâteaux, 20 par Chaleur tournante 23 - 40 1 / 4 plateau, préchauffer le four à vide Génoise allégée Chaleur tournante 35 - 50... -
Page 66: Remarques Concernant Le Nettoyage
ENTRETIEN ET NETTOYAGE 11.1 Remarques concernant le nettoyage Nettoyez l’avant de l’appareil uniquement avec un chiffon en microfibre imbibé d’eau tiède et d’un détergent doux. Utilisez une solution de nettoyage pour nettoyer les surfaces métalliques. Agent nettoy‐ Nettoyez les taches avec un détergent doux. Ne l'appliquez sur les surfaces ca‐ talytiques. -
Page 67: Comment Utiliser : Nettoyage Catalytique
ENTRETIEN ET NETTOYAGE Étape 1 Éteignez le four et attendez qu’il soit froid. Étape 2 Écartez l'avant du support de grille de la paroi latérale. Étape 3 Écartez l'arrière du support de grille de la paroi latérale et reti‐ rez-le. Étape 4 Installez les supports de grille dans l'ordre inverse. -
Page 68: Comment Remplacer : Éclairage
ENTRETIEN ET NETTOYAGE Étape 1 Ouvrez entièrement la porte. Étape 2 Soulevez et appuyez sur les leviers de blocage (A) sur les deux charnières de la porte. Étape 3 Fermez la porte du four à la première position (à un angle d'environ 70°). Tenez la porte des deux côtés et retirez-la du four en la soulevant. -
Page 69: Dépannage
DÉPANNAGE Avant de remplacer l'éclairage : Étape 1 Étape 2 Étape 3 Éteignez le four. Attendez que Débranchez le four de l'ali‐ Placez un chiffon au fond de le four ait refroidi. mentation secteur. la cavité. Lampe supérieure Étape 1 Tournez le diffuseur en verre pour le retirer. -
Page 70: Que Faire Si
DÉPANNAGE 12.1 Que faire si… Dans tous les cas ne figurant pas dans ce tableau, veuillez contacter un service après-vente agréé. Le four ne fonctionne pas ou ne chauffe pas Problème Vérifiez si... Vous ne pouvez pas activer le four ni la faire Le four est correctement branché... -
Page 71: Données De Maintenance
Numéro de série (SN) ......... 13. RENDEMENT ÉNERGÉTIQUE 13.1 Informations produits et fiche d’informations produits Nom du fournisseur Electrolux Identification du modèle EH7L5XDSP 948533584 Indice d’efficacité énergétique 81.2 Classe d’efficacité énergétique Consommation d’énergie avec charge standard, en mode 1.09 kWh/cycle conventionnel Consommation d’énergie avec charge standard, en mode... -
Page 72: Économie D'énergie
RENDEMENT ÉNERGÉTIQUE Volume 71 l Type de four Four encastrable Masse 40.5 kg IEC/EN 60350-1 - Appareils de cuisson domestiques électriques - Partie 1 : Cuisinières, fours, fours à vapeur et grils : Méthodes de mesure des performances. 13.2 Économie d'énergie Cet appareil est doté... -
Page 73: Structure Des Menus
STRUCTURE DES MENUS 14. STRUCTURE DES MENUS 14.1 Menu - sélectionnez pour accéder au Menu . Structure du Menu Cuisson assistée Nettoyage Configurations Étape 1 Étape 2 Étape 3 Étape 4 Étape 5 O1 - 10 Ajustez la valeur Sélectionnez le Confirmez la Sélectionnez la Confirmez la... -
Page 74: Garantie
STRUCTURE DES MENUS GARANTIE Service-clientèle Points de Service Industriestrasse 10 Le Trési 6 Via Violino 11 5506 Mägenwil 1028 Préverenges 6928 Manno Morgenstrasse 131 3018 Bern Langgasse 10 9008 St. Gallen Am Mattenhof 4a/b 6010 Kriens Schlossstrasse 1 4133 Pratteln Comercialstrasse 19 7000 Chur Points de vente de rechange Industriestrasse 10, 5506 Mägenwil,Tel. - Page 75 STRUCTURE DES MENUS Pour la Suisse: Où aller avec les appareils usagés ? Partout où des appareils neufs sont vendus, mais aussi dans un centre de collecte ou une entreprise de récupération officiels SENS. La liste des centres de collecte officiels SENS est disponible sous www.erecycling.ch Concerne la France uniquement : 75/148...
- Page 76 PENSIAMO A TE Grazie per aver acquistato un elettrodomestico Electrolux. Hai scelto un prodotto che ha alle spalle decenni di esperienza professionale e innovazione. Ingegnoso ed elegante, è stato progettato pensando a te. Quindi, in qualsiasi momento lo utilizzi, avrai la certezza di ottenere sempre i migliori risultati.
-
Page 77: Informazioni Di Sicurezza
INFORMAZIONI DI SICUREZZA 5. PRIMA DEL PRIMO UTILIZZO....86 10.3 Tabelle di cottura per gli istituti di test..........100 5.1 Pulizia iniziale........ 86 5.2 Preriscaldamento iniziale....86 11. PULIZIA E CURA........102 6. UTILIZZO QUOTIDIANO......87 11.1 Note sulla pulizia......102 11.2 Come eseguire la pulizia: 6.1 Come impostare: Goffratura cavità........ -
Page 78: Avvertenze Di Sicurezza Generali
INFORMAZIONI DI SICUREZZA dell’apparecchiatura e se hanno compreso i rischi coinvolti. I bambini che hanno meno di 8 anni e le persone con disabilità diffuse e complesse vanno tenuti lontani dall’elettrodomestico, a meno che non vi sia una supervisione continua. I bambini devono essere sorvegliati per assicurarsi che non •... -
Page 79: Istruzioni Di Sicurezza
ISTRUZIONI DI SICUREZZA Se il cavo di alimentazione è danneggiato, deve essere • sostituito dal produttore, da un centro di assistenza tecnica autorizzato o da una persona qualificata per evitare situazioni di pericolo elettrico. Il pannello di controllo deve essere collegato all'unità •... - Page 80 ISTRUZIONI DI SICUREZZA • Attenersi alle istruzioni fornite insieme all'apparecchiatura. • Prestare sempre attenzione in fase di spostamento dell'apparecchiatura, dato che è pesante. Usare sempre i guanti di sicurezza e le calzature adeguate. • Non tirare l’apparecchiatura per la maniglia. •...
-
Page 81: Collegamento Elettrico
ISTRUZIONI DI SICUREZZA 2.2 Collegamento elettrico AVVERTENZA! Rischio di incendio e scossa elettrica. • Tutti i collegamenti elettrici devono essere realizzati da un elettricista qualificato. • L'apparecchiatura deve disporre di una messa a terra. • Verificare che i parametri sulla targhetta siano compatibili con le indicazioni elettriche dell'alimentazione. -
Page 82: Pulizia E Cura
ISTRUZIONI DI SICUREZZA • Non appoggiare o tenere liquidi o materiali infiammabili, né oggetti facilmente infiammabili sull’apparecchiatura, al suo interno o nelle immediate vicinanze. AVVERTENZA! Vi è il rischio di danneggiare l'apparecchiatura. • Per evitare danni o lo scolorimento dello smalto: –... -
Page 83: Descrizione Del Prodotto
DESCRIZIONE DEL PRODOTTO 2.6 Assistenza • Per far riparare l'apparecchiatura, rivolgersi a un Centro di Assistenza Autorizzato. • Utilizzare solo ricambi originali. 2.7 Smaltimento AVVERTENZA! Rischio di lesioni o soffocamento. • Contattare le autorità locali per ricevere informazioni su come smaltire correttamente l’apparecchiatura. -
Page 84: Dell'apparecchiatura
ACCENSIONE E SPEGNIMENTO DELL'APPARECCHIATURA Lamiera dolci Per torte e biscotti. Leccarda Per cuocere al forno e arrostire o per raccogliere il grasso. Cassetto per la conservazione Il cassetto per la conservazione si trova sotto la cavità del forno. AVVERTENZA! Il cassetto conservazione può diventare molto caldo quando il forno è... -
Page 85: Manopole Delle Zone Di Cottura
ACCENSIONE E SPEGNIMENTO DELL'APPARECCHIATURA Ruotare la ma‐ Tasti sensore pannello dei comandi Premere nopola Per spegnere il forno, ruotare la manopola delle funzioni di riscaldamento fino a portarla in posi‐ zione off. Quando la manopola delle funzioni di riscalda‐ mento è in posizione off, il display passa in mo‐ dalità... -
Page 86: Manopola Incassabile
PRIMA DEL PRIMO UTILIZZO 4.4 Manopola incassabile Per utilizzare l'apparecchiatura, premere la manopola. La manopola fuoriesce. 4.5 Livelli di potenza Indicazione manopola Funzione Posizione spento Impostazione Mantieni caldo 1 - 9 Livelli di potenza Interruttore Zona doppia Ruotare la manopola per regolare un’impostazione del calore. 5. -
Page 87: Utilizzo Quotidiano
UTILIZZO QUOTIDIANO Preriscaldare il forno vuoto prima di utilizzarlo per la prima volta. Fase 3 Impostare la temperatura massima.per la funzione: Lasciare in funzione il forno per 15 minuti. Il forno può produrre un odore sgradevole e fumo in fase di pre-riscaldamento. Accertarsi che la stanza sia ventilata. -
Page 88: Funzioni Cottura
UTILIZZO QUOTIDIANO BakingPlus Preriscaldare il for‐ no vuoto per 10 mi‐ nuti per creare umidità. Mettere gli alimenti Impostare la in forno. temperatura. Selezionare la Riempire l’incavo della cavità con ac‐ Premere funzione riscal‐ qua di rubinetto. damento. La capacità massima della goffratura della cavità è 250 ml. Non riempire la goffratura della ca‐ vità... -
Page 89: Note Su: Cottura Ventilata Umida
UTILIZZO QUOTIDIANO Funzione cottura Applicazione Per aggiungere umidità durante la cottura. Per ottenere il giusto colore e una crosta croccante durante la cottura. Per ottenere una maggiore suc‐ cosità durante il riscaldamento. Per conservare frutta o verdura. BakingPlus Per cuocere la pizza. Per una doratura intensa e una base croccante. Funzione Pizza Per dorare torte con base croccante e per conservare gli alimenti. -
Page 90: Come Impostare: Cottura Guidata
UTILIZZO QUOTIDIANO Quando viene usata questa funzione, la lampada si spegne automaticamente dopo 30 secondi. Per le istruzioni di cottura rimandiamo al capitolo "Consigli e suggerimenti", Cottura ventilata umida. Per indicazioni generali sul risparmio energetico rimandiamo al capitolo "Efficienza energetica", Risparmio energetico. 6.4 Come impostare: Cottura guidata Ogni pietanza di questo sottomenu prevede funzione e temperatura consigliate. - Page 91 UTILIZZO QUOTIDIANO Piatto Peso Livello / Accessorio ripiano Durata Manzo Roast beef, al 40 min sangue 1 - 1,5 kg; 2 lamiera dolci Roast beef, pezzi spessi 50 min Friggere la carne per alcuni minuti in una cottura media 4-5 cm padella calda.
- Page 92 UTILIZZO QUOTIDIANO Piatto Peso Livello / Accessorio ripiano Durata Vitello Arrosto di vi‐ 0,8 - 1,5 kg; 80 min 2; pirofila su ripiano a filo tello (ad es. pezzi spessi Utilizzare le spezie preferite. Aggiungere spalla) 4 cm liquido. Arrosto coperto. Maiale Collo o spalla 1,5 - 2 kg...
- Page 93 UTILIZZO QUOTIDIANO Piatto Peso Livello / Accessorio ripiano Durata Mezzo pollo 0,5 - 0,8 kg 40 min 3; teglia da forno Utilizzare le spezie preferite. Pollo, petto 180 - 200 g 25 min 2; casseruola su ripiano a filo per pezzo Utilizzare le spezie preferite.
- Page 94 UTILIZZO QUOTIDIANO Piatto Peso Livello / Accessorio ripiano Durata Torta di mele 60 min 100 - 150 ml; lamiera dolci Crostata di 40 min 2; tortiera su ripiano a filo mele Torta di mele 60 min 100 - 150 ml tortiera da americana 22 cm su ripiano a filo...
-
Page 95: Funzioni Del Timer
FUNZIONI DEL TIMER Piatto Peso Livello / Accessorio ripiano Durata Lasagne di 1 - 1,5 kg 45 min 2 casseruola su ripiano a filo carne/verdure con piatti di pastasciutta Patate grati‐ 1 - 1,5 kg 50 min 1 casseruola su ripiano a filo nate (patate Ruotare il piatto a metà... -
Page 96: Come Impostare: Funzioni Orologio
FUNZIONI DEL TIMER Funzione Orologio Applicazione Timer. Il massimo è 23 ore 59 min. Questa funzione non ha nessun ef‐ fetto sul funzionamento del forno. Per accendere e spegnere Timer selezionare: Menu, Impostazioni. 7.2 Come impostare: Funzioni Orologio Come impostare: Imposta ora Passaggio 1 Passaggio 2 Passagio 3... -
Page 97: Come Usare: Accessori
COME USARE: ACCESSORI Come impostare: Tempo di cottura Passaggio 1 Passaggio 2 Passaggio 3 Passaggio 4 Il display vi‐ sualizza: 0:00 Selezionare una Impostare la du‐ Premere ripetu‐ funzione di cottura rata della cottu‐ Premere: e impostare la tamente: temperatura. Il timer inizia subito il conto alla rovescia. -
Page 98: Funzioni Aggiuntive
FUNZIONI AGGIUNTIVE Ripiano a filo: Spingere il ripiano fra le guide del suppor‐ Lamiera dolci / Teglia profonda: Spingere la lamiera tra le guide del sup‐ porto ripiano. 9. FUNZIONI AGGIUNTIVE 9.1 Blocco Questa funzione evita che si cambi per sbaglio la funzione dell’apparecchiatura. Attivarla quando l’apparecchiatura è... -
Page 99: Ventola Di Raffreddamento
CONSIGLI E SUGGERIMENTI UTILI (°C) (ora) 30 - 115 12.5 120 - 195 200 - 245 250 - massimo Lo spegnimento automatico non funziona con le funzioni: Luce forno, Ritardo. 9.3 Ventola di raffreddamento Quando l’apparecchiatura è in funzione, la ventola di raffreddamento si attiva in modo automatico per raffreddare le superfici. -
Page 100: Cottura Ventilata Umida - Accessori Consigliati
CONSIGLI E SUGGERIMENTI UTILI (°C) (min.) Pane bianco 190 - 200 55 - 70 10.2 Cottura ventilata umida - accessori consigliati Usare scatole e contenitori scuri e non riflettenti. Assorbono meglio il calore rispetto al colore chiaro e ai piatti riflettenti. Pirofile mo‐... - Page 101 CONSIGLI E SUGGERIMENTI UTILI COTTURA SU UN LIVELLO Biscotti Utilizzare la posizione del terzo ripiano. (°C) (min) Frollini al burro / Strisce di Cottura ventilata 25 - 40 pasta Frollini al burro / Strisce di Cottura convenzionale 20 - 30 pasta, preriscaldare il forno vuoto Tortine, 20 per teglia, preri‐...
-
Page 102: Pulizia E Cura
PULIZIA E CURA GRILL Preriscaldare il forno vuoto per 5 minuti. Grigliare con l'impostazione di temperatura massima. (min) Toast Grill 1 - 3 Manzo, bistecca, girare il piat‐ Grill 24 - 30 to a metà cottura 11. PULIZIA E CURA AVVERTENZA! Fare riferimento ai capitoli sulla sicurezza. -
Page 103: Come Eseguire La Pulizia: Goffratura Cavità
PULIZIA E CURA Pulire tutti gli accessori dopo ogni utilizzo e lasciarli asciugare. Utilizzare solo un panno in microfibra imbevuto di acqua tiepida e un detergente delicato. Non pulire gli accessori in lavastoviglie. Non pulire gli accessori anti-aderenti con agenti abrasivi o oggetti appuntiti. Accessori 11.2 Come eseguire la pulizia: Goffratura cavità... -
Page 104: Procedura Di Rimozione E Installazione: Porta
PULIZIA E CURA Pulire il forno con la pulizia catalitica Prima della pulizia catalitica rimuovere tutti gli accessori. Passaggio 1 Passaggio 2 Passaggio 3 Al termine della pulizia, viene Quando il forno è freddo, Selezionare Menu / Pulizia emesso un segnale acustico. Il pulire la cavità... -
Page 105: Come Sostituire: Lampadina
PULIZIA E CURA Pas‐ Tenere il rivestimento della saggio porta (B) sul bordo superiore della porta da entrambi i lati e spingere verso l'interno per sbloccare la guarnizione a clip. Pas‐ Rimuovere il rivestimento ti‐ saggio randolo in avanti. Pas‐ Afferrare uno ad uno i pannel‐... - Page 106 PULIZIA E CURA Lampadina superiore Pas‐ Girare il rivestimento di vetro per saggio toglierlo. Pas‐ Pulire il coperchio in vetro. saggio Pas‐ Sostituire la lampadina con una adatta, alogena, termoresistente fino a 300°C, 230 V, saggio 40 W. Pas‐ Installare il coperchio in vetro. saggio Lampadina laterale Pas‐...
-
Page 107: Risoluzione Dei Problemi
RISOLUZIONE DEI PROBLEMI 12. RISOLUZIONE DEI PROBLEMI AVVERTENZA! Fare riferimento ai capitoli sulla sicurezza. 12.1 Cosa fare se… Per tutti i casi non inclusi in questa tabella si prega di contattare un Centro di assistenza autorizzato. Il forno non si accende o non riscalda Problema Controllare se... -
Page 108: Dati Dell'assistenza
......... 13. EFFICIENZA ENERGETICA 13.1 Informazioni sul prodotto e scheda informativa sul prodotto Nome del fornitore Electrolux Identificazione modello EH7L5XDSP 948533584 Indice di efficienza energetica 81.2 Classe di efficienza energetica Consumo energetico con carico standard, modalità tradi‐ 1.09 kWh/ciclo zionale Consumo di energia con un carico standard, modalità... -
Page 109: Risparmio Energetico
EFFICIENZA ENERGETICA Fonte di calore Elettricità Volume 71 l Tipo di forno Forno da incasso inferiore Massa 40.5 kg IEC/EN 60350-1 - Apparecchiature elettriche per la cottura per uso domestico - Parte 1: Cucine, forni, forni a vapore e griglie - Metodi per la misura delle prestazioni. 13.2 Risparmio energetico L'apparecchiatura ha di funzioni che consentono di aiutarvi a risparmiare energia durante le operazioni di cottura di tutti i giorni. -
Page 110: Struttura Del Menu
STRUTTURA DEL MENU 14. STRUTTURA DEL MENU 14.1 Menu - selezionare per accedere alla Menu. Menu struttura Cottura guidata Pulizia Impostazioni Passaggio 1 Passaggio 2 Passaggio 3 Passaggio 4 Passaggio 5 O1 - 10 Regolare il valo‐ Selezionare il Confermare l'im‐ Selezionare l'im‐... -
Page 111: Garanzia
STRUTTURA DEL MENU GARANZIA Servizio clienti Servizio dopo vendita Industriestrasse 10 Le Trési 6 Via Violino 11 5506 Mägenwil 1028 Préverenges 6928 Manno Morgenstrasse 131 3018 Bern Langgasse 10 9008 St. Gallen Am Mattenhof 4a/b 6010 Kriens Schlossstrasse 1 4133 Pratteln Comercialstrasse 19 7000 Chur Vendita pezzi di ricambio Industriestrasse 10, 5506 Mägenwil,Tel. - Page 112 WE’RE THINKING OF YOU Thank you for purchasing an Electrolux appliance. You’ve chosen a product that brings with it decades of professional experience and innovation. Ingenious and stylish, it has been designed with you in mind. So whenever you use it, you can be safe in the knowledge that you’ll get great results every time.
-
Page 113: Safety Information
SAFETY INFORMATION 5.2 Initial preheating......122 10.3 Cooking tables for test institutes135 6. DAILY USE..........122 11. CARE AND CLEANING......137 6.1 How to set: Heating functions..122 11.1 Notes on cleaning...... 137 6.2 Heating functions......123 11.2 How to clean: Cavity 6.3 Notes on: Moist Fan Baking..125 embossment........ -
Page 114: General Safety
SAFETY INFORMATION be kept away from the appliance unless continuously supervised. Children should be supervised to ensure that they do not • play with the appliance. Keep all packaging away from children and dispose of it • appropriately. WARNING: The appliance and its accessible parts become •... -
Page 115: Safety Instructions
SAFETY INSTRUCTIONS The means for disconnection must be incorporated in the • fixed wiring in accordance with the wiring rules. WARNING: Ensure that the appliance is switched off before • replacing the lamp to avoid the possibility of electric shock. WARNING: The appliance and its accessible parts become •... -
Page 116: Electrical Connection
SAFETY INSTRUCTIONS Cabinet minimum height (Cabinet under the work‐ 762 (762) mm top minimum height) Cabinet width 550 mm Cabinet depth 605 (580) mm Height of the front of the appliance 757 mm Height of the back of the appliance 739 mm Width of the front of the appliance 549 mm... -
Page 117: Use
SAFETY INSTRUCTIONS • Use only correct isolation devices: line protecting cut-outs, fuses (screw type fuses removed from the holder), earth leakage trips and contactors. • The electrical installation must have an isolation device which lets you disconnect the appliance from the mains at all poles. The isolation device must have a contact opening width of minimum 3 mm. -
Page 118: Internal Lighting
SAFETY INSTRUCTIONS • Replace immediately the door glass panels when they are damaged. Contact the Authorised Service Centre. • Be careful when you remove the door from the appliance. The door is heavy! • Clean regularly the appliance to prevent the deterioration of the surface material. •... -
Page 119: Product Description
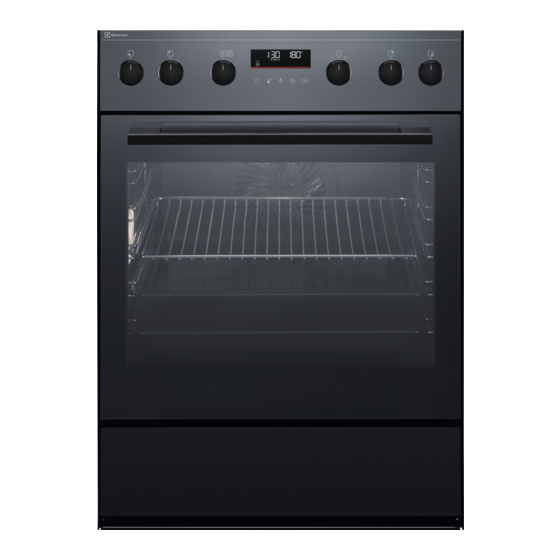
PRODUCT DESCRIPTION 3. PRODUCT DESCRIPTION 3.1 General overview Control panel Knobs for the cooking zones Knob for the heating functions Display Control knob Heating element Lamp Shelf support, removable Cavity embossment Drawer Shelf positions 3.2 Accessories Wire shelf For cookware, cake tins, roasts. Baking tray For cakes and biscuits. -
Page 120: How To Turn Appliance On And Off
HOW TO TURN APPLIANCE ON AND OFF Storage drawer The storage drawer is below the oven cavity. WARNING! The storage drawer can become hot when the oven operates. Do not store any flammable materials in the drawer. 4. HOW TO TURN APPLIANCE ON AND OFF 4.1 Retractable knobs To use the appliance press the knob. -
Page 121: Knobs For The Cooking Zones
BEFORE FIRST USE Display indicators Lock Assisted Cook‐ Cleaning Settings Fast Heat Up Timer indi‐ cators: Progress bar - for temperature or time. The bar is fully red when the oven reaches the set tempera‐ ture. Steam cooking indicator 4.3 Knobs for the cooking zones WARNING! Refer to Safety chapters in the hob user manual. -
Page 122: Initial Cleaning
DAILY USE 5.1 Initial cleaning Before first use clean the empty oven and set the time: 00:00 Set the time. Press 5.2 Initial preheating Preheat the empty oven before the first use. Step 1 Remove all accessories and removable shelf supports from the oven. Step 2 Set the maximum temperature for the function: Let the oven operate for 1 h. -
Page 123: Heating Functions
DAILY USE - press and hold to turn on the function: Fast Heat Up. It is available for some oven functions. BakingPlus Make sure that the oven is cold. Step 1 Step 2 Step 3 Step 4 Preheat the empty oven for 10 min to create humidity. - Page 124 DAILY USE Standard heating functions Heating function Application To bake on up to three shelf positions at the same time and to dry food. Set the temperature 20 - 40 °C lower than for Conventional Cooking. True Fan Cooking To bake and roast food on one shelf position. Conventional Cooking To add humidity during the cooking.
-
Page 125: Notes On: Moist Fan Baking
DAILY USE Heating function Application To enter the Menu: Assisted Cooking, Cleaning, Settings. Menu 6.3 Notes on: Moist Fan Baking This function was used to comply with the energy efficiency class and ecodesign requirements (according to EU 65/2014 and EU 66/2014). Tests according to: IEC/EN 60350-1 The oven door should be closed during cooking so that the function is not interrupted and the oven operates with the highest energy efficiency possible. - Page 126 DAILY USE Legend Preheat the oven before you start cooking. Shelf level. When the function ends check if the food is ready. Dish Weight Shelf level / Accessory Duration time Beef Roast Beef, 40 min rare 1 - 1,5 kg; 4 2;...
- Page 127 DAILY USE Dish Weight Shelf level / Accessory Duration time Fillet, rare 75 min (slow cooking) 2; baking tray 0,5 - 1,5 kg; Use your favourite spices or simply salt Fillet, medium 5 - 6 cm 90 min and fresh grounded pepper. Fry the meat (slow cooking) thick pieces for a few minutes on a hot pan.
- Page 128 DAILY USE Dish Weight Shelf level / Accessory Duration time Poultry Whole chick‐ 1 - 1,5 kg; 60 min 200 ml; casserole dish on fresh baking tray Use your favourite spices. Turn the chicken after half of the cooking time to get an even browning.
- Page 129 DAILY USE Dish Weight Shelf level / Accessory Duration time Fish fillet 20 min 3; casserole dish on wire shelf Use your favourite spices. Sweet baking / desserts Cheesecake 90 min 28 cm springform tin on wire shelf Apple cake 60 min 100 - 150 ml;...
- Page 130 DAILY USE Dish Weight Shelf level / Accessory Duration time Croquets, fro‐ 0,5 kg 25 min 3; baking tray Pommes, fro‐ 0,75 kg 25 min 3; baking tray Gratins, bread and pizza Meat / vegeta‐ 1 - 1,5 kg 45 min 2;...
-
Page 131: Clock Functions
CLOCK FUNCTIONS 7. CLOCK FUNCTIONS 7.1 Clock functions Clock Function Application Minute minder. When the timer ends, the signal sounds. Cooking time. When the timer ends, the signal sounds and the heating function stops. Time Delay. To postpone the start and / or end of cooking. Uptimer. -
Page 132: How To Use: Accessories
HOW TO USE: ACCESSORIES How to set: Cooking time Step 1 Step 2 Step 3 Step 4 The display shows: 0:00 Choose a heating Press repeated‐ Set the cooking function and set Press: time. the temperature. Timer starts counting down immediately. How to set: Time Delay Step 1 Step 2... -
Page 133: Additional Functions
ADDITIONAL FUNCTIONS Wire shelf: Push the shelf between the guide bars of the shelf support. Baking tray / Deep pan: Push the tray between the guide bars of the shelf support. 9. ADDITIONAL FUNCTIONS 9.1 Lock This function prevents an accidental change of the appliance function. Turn it on when the appliance works - the set cooking continues, the control panel is locked. -
Page 134: Cooling Fan
HINTS AND TIPS (°C) 30 - 115 12.5 120 - 195 200 - 245 250 - maximum The Automatic switch-off does not work with the functions: Light, Time Delay. 9.3 Cooling fan When the appliance operates, the cooling fan turns on automatically to keep the surfaces of the appliance cool. -
Page 135: Moist Fan Baking - Recommended Accessories
HINTS AND TIPS (°C) (min) White bread 190 - 200 55 - 70 10.2 Moist Fan Baking - recommended accessories Use the dark and non-reflective tins and containers. They have better heat absorption than the light colour and reflective dishes. Ramekins Pizza pan Baking dish... - Page 136 HINTS AND TIPS BAKING ON ONE LEVEL. Biscuits Use the third shelf position. (°C) (min) Short bread / Pastry strips True Fan Cooking 25 - 40 Short bread / Pastry strips, Conventional Cooking 20 - 30 preheat the empty oven Small cakes, 20 per tray, True Fan Cooking 20 - 35...
-
Page 137: Care And Cleaning
CARE AND CLEANING GRILL Preheat the empty oven for 5 minutes. Grill with the maximum temperature setting. (min) Toast Grill 1 - 3 Beef steak, turn halfway Grill 24 - 30 through 11. CARE AND CLEANING WARNING! Refer to Safety chapters. 11.1 Notes on cleaning Clean the front of the appliance only with a microfibre cloth with warm water and a mild detergent. -
Page 138: How To Clean: Cavity Embossment
CARE AND CLEANING Clean all accessories after each use and let them dry. Use only a microfibre cloth with warm water and a mild detergent. Do not clean the accessories in a dishwasher. Do not clean the non-stick accessories using abrasive cleaner or sharp-edged Accessories objects. -
Page 139: How To Remove And Install: Door139
CARE AND CLEANING Clean the oven with catalytic cleaning Before the catalytic cleaning remove all accessories. Step 1 Step 2 Step 3 When the cleaning ends the When the oven is cold, Select Menu / Cleaning signal sounds. The oven turns clean the cavity with a wet and press three times. -
Page 140: How To Replace: Lamp
CARE AND CLEANING Step 4 Hold the door trim (B) on the top edge of the door at the two sides and push inwards to release the clip seal. Step 5 Pull the door trim to the front to remove it. Step 6 Hold the door glass panels on their top edge one by one and... -
Page 141: Troubleshooting
TROUBLESHOOTING Top lamp Step 1 Turn the glass cover to remove it. Step 2 Clean the glass cover. Step 3 Replace the lamp with a halogen, 230 V, 40 W, 300 °C heat-resistant lamp. Step 4 Install the glass cover. Side lamp Step 1 Remove the left shelf support to get access to the lamp. -
Page 142: Service Data
TROUBLESHOOTING The oven does not turn on or does not heat up The oven does not heat up. The automatic switch-off is deactivated. The oven does not heat up. The fuse is not blown. The oven does not heat up. The Lock is off. -
Page 143: Energy Efficiency
Serial number (S.N.) ......... 13. ENERGY EFFICIENCY 13.1 Product Information and Product Information Sheet Supplier's name Electrolux Model identification EH7L5XDSP 948533584 Energy Efficiency Index 81.2 Energy efficiency class Energy consumption with a standard load, conventional 1.09 kWh/cycle mode Energy consumption with a standard load, fan-forced 0.69 kWh/cycle... -
Page 144: Menu Structure
MENU STRUCTURE Make sure that the appliance door is closed when the appliance operates. Do not open the appliance door too often during cooking. Keep the door gasket clean and make sure it is well fixed in its position. Use metal cookware to improve energy saving. When possible, do not preheat the appliance before cooking. -
Page 145: Guarantee
MENU STRUCTURE Settings Time of day Change Display brightness 1 - 5 Key tones 1 - Beep Buzzer volume 1 - 4 2 - Click 3 - Sound off Uptimer On / Off Light On / Off Fast Heat Up On / Off Demo mode Activation... -
Page 146: Environmental Concerns
16. ENVIRONMENTAL CONCERNS Recycle materials with the symbol . Put the packaging in relevant containers to recycle it. Help protect the environment and human health by recycling waste of electrical and electronic appliances. Do not dispose of appliances marked with the symbol with the household waste. - Page 148 www.electrolux.com/shop...
Need help?
Do you have a question about the EH7L5XDSP and is the answer not in the manual?
Questions and answers