Advertisement
- 1 PACKAGE CONTENTS
- 2 DEVICE OVERVIEW
- 3 QUICK START GUIDE
-
4
OPERATION
- 4.1 Knob functionality
- 4.2 Selecting zoom speed limit
- 4.3 Variable mode zoom
- 4.4 Customizing zoom direction
- 4.5 Customizing focus direction
- 4.6 Camera family selection
- 4.7 Factory reset
- 4.8 Standby mode
- 4.9 Knob mode selection
- 4.10 Push Auto Focus
- 4.11 Manual/Auto Focus Mode
- 4.12 Record start/stop
- 4.13 IRIS value control
- 4.14 IRIS Manual/Auto IRIS mode
- 4.15 IRIS Push Auto IRIS
- 5 PRECAUTIONS
- 6 OPERATING SPECIFICATIONS
- 7 Documents / Resources
PACKAGE CONTENTS

Verify that you received the following items:
- User manuals
- Videocamera Remote Control "pro"
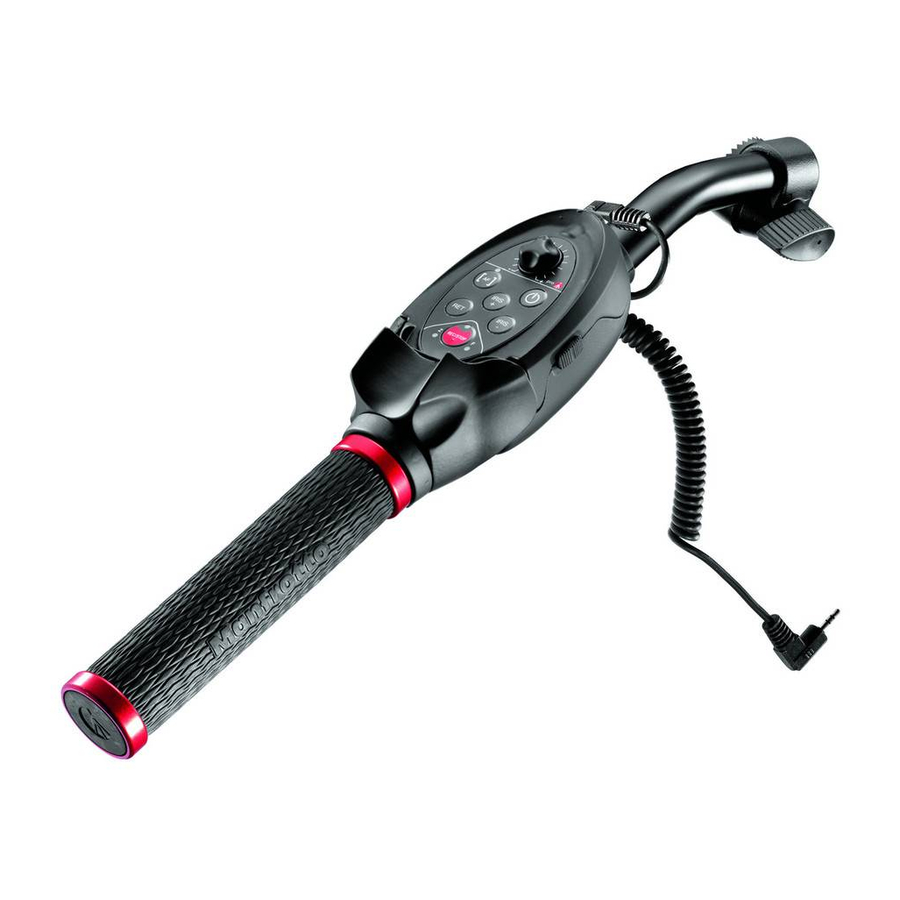
DEVICE OVERVIEW

The controller is a remote pan bar controller for all video cameras having the LANC jack, or 10-pin AVR connector (using adaptor cable code 522AV).
- LED indicator
- STAND-BY
- Zoom speed limit
- REC/STOP
- 2,5 mm stereo jack
- Focus control
- Knob mode (Zoom/Focus) selector
- Knob mode LEDs
- Zoom/Focus Knob
- RET
- IRIS controls
- Auto/Man Focus selector
- Focus Status LED
Features
- 8-steps, ultra-precise variable speed zoom (Sony SD/HD, Canon SD)
- 16-steps, ultra-precise variable speed zoom (Canon HD)
- Smooth zoom speed progression
- Stand-by push button
- Push Auto Focus function
- Manual focus with zoom knob (Sony SD, Canon SD)
- Variable speed manual focus with zoom knob (Sony HD, Canon HD)
- Manual/Auto focus
- Customisable zoom speed limit
- Customisable zoom direction
- Customisable focus direction
- LED indicators
- 140 cm spiral cable (when extended)
- IRIS/Lens aperture control (Sony HD, Canon HD)
- Play back the last 3-5 seconds of recording (RET)
- Manfrotto rosette attachment
- Compatibility with universal clamp MVR901APCL (not included in the package, range: round tube 19 to 25 mm, 0.75" to 0.98")
QUICK START GUIDE


Connecting to the support
Manfrotto rosette attachment
Compatibilty with universal clamp MVR901APCL (not included in the package, range: round tube 19 to 25 mm, 0.75" to 0.98")
Connecting to the camera
 Note! In order to avoid accidental short circuiting the camera connector, NEVER disconnect the cable from the controller.
- Switch the camera off
- Connect the other end of the cable to the camera LANC plug
Never connect controller to any other jack. It may even result in permanent controller and/or camera damage!
NOTE: LANC controller is designed as a standalone control system for video cameras - it is not designed to work simultaneously with other LANC control systems - Switch the camera on – now you may start using the controller
After switching the camera on, do not move zoom knob, as controller is calibrating knob neutral position. After approx. 2 sec., when LED indicator begins to light continuously calibration procedure is finished and you may start using the controller.
LED indicator not lighting at all means problem with power supply of the controller.
In this case check the LANC cable connections to camera and controller.
OPERATION
NOTE: Not all function may be available depending on camera working mode e.g. if using Sony camera Memory mode the "Record start/stop" functions are not working, Push Auto Focus will not work with Canon XL1, XL2 camcorders.
Knob functionality
The knob allows controlling zoom or focus rotating it right or left.
The more angle the knob is rotated the faster zoom/focus speed is.
The number of zoom/focus speed steps depends on the camera models.
Selecting zoom speed limit

Turn zoom speed limit clockwise to set higher zoom speed limit.
Turn it in opposite direction to set lower speed limit.
Variable mode zoom
Rotate the zoom knob right or left to zoom tele or wide (depending on the zoom direction set-up).
The more angle the knob is rotated the faster zoom speed is. Zoom speed is limited by the "zoom speed limit".
Customizing zoom direction

To change the zoom direction proceed as follow:
- switch the camera off.
- press the "REC/STOP" button and do not release it
- switch the camera on.
- wait for "LED indicator" to turn on and off
- release the "REC/STOP" button.
The whole operation takes about 6 seconds. The new set up information will be permanently stored in the controller's internal flash memory and restored after each power off. AF
Customizing focus direction

To change the focus direction proceed as follow:
- switch the camera off.
- press the "Focus control" button and do not release it
- switch the camera on.
- wait for "LED indicator" to turn on and off.
- release the "Focus control" button.
The whole operation takes about 6 seconds.
The new focus direction information will be permanently stored in the controller's internal flash memory and restored after each power off.
Camera family selection

Remote control's factory settings are configured to work with Sony HD, Canon SD / HD cameras. In RET this mode, the Focus feature is not compatible with the Sony SD cameras.
In order to work with Sony SD it is necessary to reconfigure the remote control manually as follows:
- switch the camera off.
- press the "Focus control" and "RET" buttons at the same time and do not release them
- switch the camera on.
- wait for "LED indicator" to turn on and off.
- release the buttons.
The whole operation takes about 6 seconds. The new set up information will be permanently stored in the controller's internal flash memory and restored after each power off.
NOTE: In Sony SD configuration, also using a Sony HD camcorder, the controls of multi-speed focus will not be operating. In orderto take advantage again those commands, you must reset the factory setting (see "Factory Reset").
Factory reset

To restore the factory settings of the remote control, proceed as follows:
- switch the camera off.
- press the "Focus control", "RET" and "REC/STOP" buttons at the same time and do not release them
- switch the camera on.
- wait for "LED indicator" to turn on and off.
- release the buttons.
The whole operation takes about 6 seconds. The new set up information will be permanently stored in the controller's internal flash memory and restored after each power off.
Standby mode

Press the button once to switch camera into standby mode. While camera in standby mode, press the button again to switch camera back into normal operation mode. Pressing this button while camera is switched off will have no effect on camera operation.
Knob mode selection

The knob allows controlling zoom or focus.
The "Knob mode LEDs" show which function is enabled.
To change the knob mode, switch the "Knob mode (Zoom/Focus)" selector.
Push Auto Focus
Keep the button pressed, for at least half a second, to put the camera temporarily into Auto Focus mode.
As soon as you release the button the camera returns into manual focus mode. This button has no effect, if the camera is already working in Auto Focus mode. This function may not work with all cameras – e.g. Canon XL1/XL2.
Manual/Auto Focus Mode

Switch the selector to change between manual and auto focusing modes. Focusing mode will be shown by camera display and the "Focus Status LED" (13). This functionality may not work with all videocameras - eg. Canon XL1/XL2
In some camcorder models it could be necessary to repeat the Man/Auto setting operation several times for a proper recognition of the settings. Each time the remote control is turned on, it performs a "focus alignment set-up".
In some camcorders this operation can take up to ten seconds, during which you will see "Focus Status LED" (13) blinking
Record start/stop
Press the button once to start recording.
Press the button again to stop recording.
The LED indicator will blink when that the camera is recording.
IRIS value control

Keep IRIS+or IRIS - pressed, for at least half a second, to change IRIS the camera aperture lens value. Camera IRIS value will usually be shown in the camera display.
IRIS Manual/Auto IRIS mode
Double click IRIS+or IRIS - to change the IRIS camera status IRIS + from Auto to Manual and viceversa (Sony HD).
IRIS Push Auto IRIS
Keep IRIS+ and IRIS- pressed together for at least half a second, IRIS to put the camera temporarily into + Auto IRIS mode (Sony HD)
NOTE: To enable IRIS control from the Remote, it is usually necessary to preset the camera in Manual IRIS mode For Sony HD and in Auto IRIS mode For Canon HD cameras.
 Press the button to execute RET function
PRECAUTIONS
Water resistivity:
We put a lot of attention on making the controller to be as much water resistant as possible, while maintaining its reasonable price. However we cannot guarantee 100% water resistance under all circumstances and you should avoid using the controller under heavy environment conditions like rain and over 70% humidity level.
High temperature:
Avoid temperatures exceeding +70°C – especially do not leave the controller exposed for direct contact with heavy sun shines, e.g. in the car parked in sunny place.
Electrical precaution:
The cable is always one of the most easy breakable element of any electronic system, especially when as exposed to mechanical wear off. Therefore to extend the life of your controller and make the basic "repair" as cheap as possible we decided to allow easy cable exchange. However, to avoid accidental short circuiting the camera connection, you must remember to always plug the cable to the controller first. We advise you to not to remove the cable from the controller, if it is not necessary.
OPERATING SPECIFICATIONS
Operation temperature range: -10°C (14°F) + 60°C (140°F)
Storage temperature range: -20°C (-4°F) + 70°C (158°F)
Humidity rel. (non condensing): max. 70%

Documents / ResourcesDownload manual
Here you can download full pdf version of manual, it may contain additional safety instructions, warranty information, FCC rules, etc.
Download Manfrotto MVR901EPLA - Pan Bar Remote for LANC Manual
Advertisement
Thank you! Your question has been received!


Need Assistance?
Do you have a question about the MVR901EPLA that isn't answered in the manual? Leave your question here.