Advertisement
- 1 Overview Gigaset DA610
- 2 Connecting the telephone
- 3 Safety precautions
- 4 Setting up the telephone for use
- 5 Operating the telephone
- 6 Telephoning
- 7 Using the phonebook
- 8 Using the call list (CLIP)
- 9 Using speed dialling numbers
- 10 Adjusting the telephone
- 11 Security settings
- 12 Network services
- 13 Operation on a PABX
- 14 Other settings
- 15 Standard characters
- 16 Documents / Resources
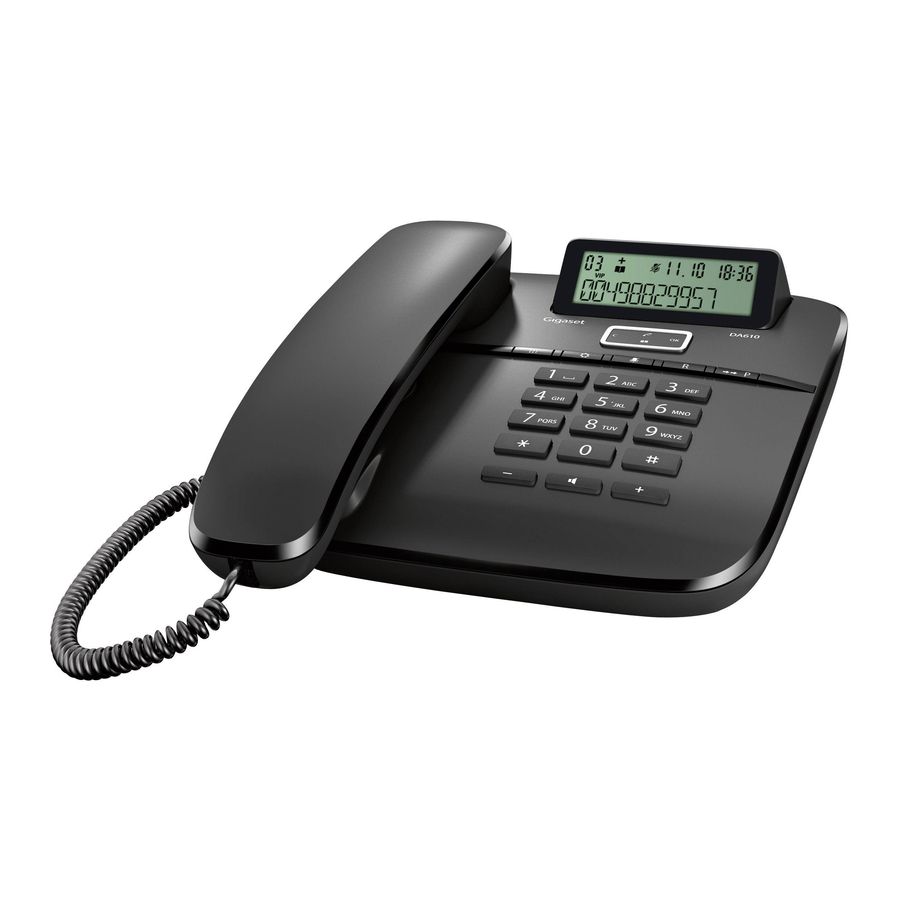
Overview Gigaset DA610
Display and keys

- Display
- Control key
- Speed dial key
- Set key
- Redial/pause key
- Recall key
- Mute key
- Star key, selecting/deselecting the ring tone (press and hold)
- Hash key, selecting/deselecting the key lock (press and hold)
- Hands-free key
- Keys for setting the volume of the handset, speaker and ring tone
- Microphone for hands-free use
LED
 Hands-free key
- flashes on incoming call
- lights up when the call is transferred to the speaker
Connecting the telephone

- Connect the telephone connector (1) to the main telephone socket. Use the telephone cable supplied. Power is supplied over the telephone line. A mains adapters is not necessary.
- Guide the cable through the cable channel (2).
 Notes:
- First use
- Lift the handset for 5 seconds and place it back in the cradle.
- Lift the handset again. You will hear the free tone and the device is now ready to be used.
The phone is connected to the power source via the phone line. In case of a power cut (e.g. if the PBX is switched off at night), the above mentioned steps need to be repeated. Phonebook entries and speed dialling destinations are stored indefinitely.
- The device is designed to be used as a single-line system (on the main extension or a telephone system).
It cannot be operated as a second phone on a line splitter. - Operation on a PBX or router The private branch exchange (PBX) or the router must supply the phone with continuous DC voltage, even when ringing. If this is not the case, the phone may switch off briefly when ringing. As a result, saved information may be lost. Refer to the operating manual for your PBX or router for information in this regard or contact the manufacturer.
Safety precautions
When installing, connecting and operating the telephone, always observe the following precautions:
- Only use the jacks and leads supplied.
- Only connect the connecting lead to the intended socket.
- Only connect the approved accessories
- Lay the connecting lead where it will not cause accidents.
- Position the telephone on a non-slip surface.
- For your safety and protection, the telephone may not be used in the bath or shower rooms (wet locations). The telephone is not splash proof.
- Never expose the telephone to sources of heat, direct sunlight or other electrical devices.
- Protect your telephone from moisture, dust, corrosive liquids and vapours.
- Never open up the telephone yourself.
- Do not touch the plug contact with pointed or metallic objects.
- Do not carry the telephone by the leads.
- If you give your Gigaset DA610 to someone else, make sure you also give them the operating manual. Your Gigaset DA610 has a permanent memory, so you may want to delete any stored numbers before passing it on.
Setting up the telephone for use
Recommended installation of telephone:
- Do not expose the telephone to direct sunlight or other sources of heat.
- Operate at temperatures of between + 5°C and + 40°C.
- Maintain a distance of at least one metre between the telephone and radio equipment, e.g. radio telephones, radio paging equipment or TV sets. Otherwise telephone communication could be impaired.
- Do not install the telephone in dusty rooms as this can limit the service life of the telephone.
- Furniture lacquer and polish can be adversely affected by contact with parts of the unit (e.g. feet).
Operating the telephone
The keypad and the display are available to operate your Gigaset DA610. All usage possibilities are described in the handbook.
Note: Some of your telephone's functions may only be available without restriction if they are supported by your and the caller's network provider, e. g. functions for which information on the caller's telephone number is required.
This applies for the following functions, for example:
- Displaying the number of an incoming call
- Indicating a caller with VIP melody
- Call list
Display
Depending on the operating situation the display shows different information, e.g. date and time. You can set the date and time and the format in which they are displayed.
Symbols provide information on the status of your telephone.

- Symbol bar: status, date and time
- Display of call duration, numbers, names, phonebook and list entries, settings
Display symbols
 Number of an entry in the phonebook or a call list or of a speed dial key
 Setting mode activated
 Flashes for a new entry in the call list if the caller's number transmission (CLIP) is active
 Phonebook open
 Key lock activated
 Ringer switched off
 Mute mode activated
 Flashes on incoming VIP call
Is indicated if at least one entry with activated VIP mode is present in the phonebook.
Display language
On delivery the display language is set to English. Other languages are available and you can change the language if you wish.
Control key
You activate the functions and navigate the menus using the control key. The functions offered depend on the operating situation.

In standby:

 Open the call list

 Open phonebook
 In lists:
Scrolls one entry upwards/downwards.
Hold down: Scrolls the list fast upwards/downwards.
While editing time setting:
Moves forwards/backwards one position.
 In menus and lists: Exits the menu or list.
While editing names and numbers:
Deletes the character to the left of the cursor.
Hold down: Deletes the line.
If the entry is empty: Exits the editing mode.
 Phone number entered: Dials the phone number.
In lists: Opens the context menu.
While editing entries: Saves the edits.
Writing and editing names and numbers
Text input

Enter text using the keypad.
Multiple letters and numbers are assigned to each key between  and
and  and
and  and
and  . You enter a specific character by pressing the corresponding key several times.
You will find a table of applicable characters below.
Moving the cursor
 To move the cursor to the left/right in the text, press the control key upwards/downwards.
Deleting/correcting characters
 Press the left-hand side
  of the control key. The character to the left of the cursor is deleted. Press and hold down to delete the whole line.
Telephoning
In addition to the handset, you can also call using the speaker (hands-free function). In the following instructions, the symbol  also always stands for
 .
.
Making a call
Entering the telephone number using the keypad
Lift the handset, dial the number.
Instead of lifting the handset:
 Press the hands-free key to make a call via the speaker.
You can switch over at any time during the conversation.
Dialling from the phonebook
If you have already saved numbers in your phonebook, you can make a call directly from the phonebook.
 Open the phonebook using the control key
  .
.
Searching for an entry
 Select an entry.
or
Enter letters. The first entry starting with this letter is displayed.
Dialling numbers
Lift the handset.
or
OK Open the context menu.
 Select DIAL ENTRY and confirm with OK.
The call is initiated via the speaker. To make the call using the handset, simply lift the handset.
Note: You can also first lift the handset before opening the phonebook.
Dialling from the call list
The call list contains the numbers of the last 50 incoming calls.
Requirement: Telephone number display is possible for incoming calls.
Multiple calls from one number are only displayed once (with the information of the last call). If the name is transmitted or the number is saved to the phonebook, the accompanying name is also displayed.
 Open the call list using the control key
  .
.
 Select the number or name.
either...
Lift the handset.
... or
OK Open the context menu.
Select CALL BACK and initiate the call using the speaker with handset. OK. To make the call using the handset, simply lift the handset.
Note: You can also first lift the handset before opening the call list.
Last number redial
The last five numbers dialled are automatically saved (each a max. of 32 digits).
Dialling the last saved number:
 Lift the handset, press the redial key.
Dialling one of the last five numbers saved:
 Press the redial key.
 Select the number.
Lift the handset.
or
 Initiate the call using the speaker with OK.
Deleting all redial numbers
 Press the key sequence.
 Press the set key or OK to confirm.
Speed dialling
10 numbers can be saved for speed dial on the number keys 0... 9.
 Press the speed dial key.
 Press the speed dial number key.
Lift the handset, the  key or initiate the call with OK .
The number stored on the number key is dialled.
Note: You can also first lift the handset before pressing the speed dial key.
Dialling pauses
One or more dialling pauses can be entered using  (not at 1st digit). Pauses are transferred to the memory and are necessary for certain extension systems (e.g. 0 2368).
The length of the pause can be set to 1, 3 or 6 seconds.
Incoming calls
Incoming calls are indicated by the ring tone and in the display.
For number displays, the number is visible in the display and the symbol flashes. This symbol disappears when you answer the call or (if you don't answer) by calling up the call list. The name is also displayed for callers who are stored in the phonebook with names.
If the VIP mode is activated the VIP symbol flashes in the display and the VIP ring tone signals the call.
Accepting a call
Lift the handset.
or
 Press the hands-free key to accept the call via the speaker.
Using open listening / hands-free
Switching open listening on/off
The persons present in the room can listen to the call over the speaker. During the call using the handset:
Press the hands-free key to switch open listening on or off.
When the speaker is switched on and the handset is picked up, open listening is switched on. In this case, the hands-free microphone is switched off.
When the speaker is switched on and the handset is in the cradle, handsfree via the hands-free microphone is switched on.
Switching from open listening to hands-free:
 Replace the handset while pressing the hands-free key.
Switching hands-free on/off
You can also make a call via the microphone with the handset in the cradle. The optimum distance from the microphone is approx. 50 cm.
Replace the handset while pressing the hands-free key.
Switching on hands-free prior to dialling
Hands-free key, wait for dial tone.
Switching off hands-free
 Lift the handset during the call. The call is transferred to the handset.
Ending a call
Press the hands-free key during a call via the speaker.
Settings during a call
Setting the handset volume
There are three adjustable levels.
 Set the volume using the volume up/volume down keys.
The set volume is shown in the display.
Setting the speaker volume
There are seven adjustable levels.
During hands-free speaking or open listening:
Set the volume using the volume up/volume down keys.
The set volume is shown in the display.
Mute
You can switch off the microphone or handset and microphone during a call according to the setting of the mute function
 Press the mute key to switch the mute function on or off.
During muting of the microphone, a melody can be played.
Once the telephone has been muted this is indicated in the display with the  symbol.
Changing the ringer and ringer volume
While the telephone is ringing, the volume and ringer can be changed.
Changing the volume
Set the ringer volume with the volume up/volume down keys (5 levels, 0=silent).
Changing the melody
 Select the ringtone with the numeric keys (choice of 10).
Using the phonebook
Your Gigaset DA610 contains a phonebook in which you can save up to 50 entries, each with a maximum of 32 digits for numbers and 14 characters for names.
You can make a call, add new entries and manage and modify entries using the phonebook.
You can manually enter numbers and names or transfer them from the call list. You can also allocate VIP mode to a number.
The  symbol is indicated in the display if the phonebook has been opened. The phonebook entry number is also visible (01... 50). If there is via the
  symbol.
The phonebook provides the following functions in a menu:

Opening the phonebook
In standby:
Press the control key  .
.
Searching for an entry
 Select an entry.
or
 Enter letters. The name of the first entry starting with this letter is displayed.
Note : If you press  , the entry is set as a VIP entry or the setting is deleted.
Showing the number of an entry
 Press the hash key to switch between number and name display.
Saving numbers
Open the phonebook.
The first entry in the list is displayed.
 Select NEW ENTRY and confirm with OK.
Enter number and confirm with OK.
Enter name and confirm with OK.
The entry is saved and shown in the display.
 Press the star key to turn the entry into a VIP entry. Press again to delete the setting.
Editing an entry
Open the phonebook.
The first entry in the list is displayed.
 Select the entry and open the context menu with OK.
Select EDIT ENTRY and confirm with OK.
Change the number and confirm with OK.
Change the name and confirm with OK.
OK Confirm the saving of the entry in the phonebook.
Deleting an entry / Deleting all entries
Open the phonebook.
The first entry in the list is displayed.
Select an entry and open the context menu with OK.
Select DELETE ENTRY to delete the selected entry or DELETE ALL to delete all entries and confirm with OK.
OK Press the control key to confirm the action.
Using the call list (CLIP)
Incoming calls are saved if the number is transmitted. Up to 50 calls are saved. If the number is the same, only the last incoming call is saved. The oldest call is automatically deleted when there are more than 50 calls. If transmitted, the caller's name is also displayed. If the are any missed calls in the list the  symbol flashes.
- Calling a number from the list.
- Saving a number in the phonebook.
The call list provides the following functions in a menu:
![]()

Opening the call list
You can open the call list in idle mode or when the handset is lifted.
 Press the control key
  .
.
Viewing an entry
 Select an entry.
If the number and name are available the name is shown first. To view the number:
 Press the hash key. Use this key to switch between the number and name display.
Transferring a number from the call list to the phonebook
Open the call list.
Select the entry and open the context menu with OK.
Select SAVE NUMBER and confirm with OK.
Change the number (if required) and confirm with OK.
Enter or edit the name and confirm with OK.
Deleting an entry / Deleting all entries
Open the call list.
Select an entry and open the context menu with OK.
Select DELETE ENTRY to delete the selected entry or DELETE ALL to delete all entries and confirm with OK.
OK Press the control key to confirm the action.
Using speed dialling numbers
You can save 10 numbers for speed dial on the number keys (each with max. 32 digits).
Storing a speed dial number
You can enter the number in idle mode or when the handset is lifted.
 Press the set key, press the speed dial key.
 Choose a speed dial key and press OK.
If the key is already allocated, the content is displayed.
either...
Enter the phone number for speed dial.
... or
Take over the phone number from the call or redial list
 Open the call/redial list.
Select the desired entry in the list and press OK.
Storing the speed dial entry
 Press the set key or OK.
Notes
When storing speed dial numbers, please note the following:
![]() and
and ![]() are saved regardless of the set dialling mode but are only dialled with tone dialling mode.
are saved regardless of the set dialling mode but are only dialled with tone dialling mode.- If the number entered is longer than 32 digits, only the first 32 digits are stored.
 and
and  are saved regardless of the set dialling mode but are only dialled with tone dialling mode.
A single speed dial number cannot be deleted but only overwritten.
Adjusting the telephone
To adjust the settings of your telephone you use the  set key. You can make settings in idle mode and when the handset is lifted.
Changing the language
You can change the language for display messages. There are six languages to choose from.
 Activate setting mode.
 Press the key code for setting the language.
Press the key for the desired language:
 English
 German
 French
 Spanish
 Italian
 Dutch
Dutch
 Save your settings and exit the setting mode.
Setting the date and time
You can adjust the current date manually and change the format of the display. The time is updated by incoming calls with telephone number displays. You can adjust this setting if necessary.
Setting the date and time
 Activate setting mode for the date and time. The date and time display becomes editable.
Enter a 4-digit date and a 4-digit time. Use the control key to move one position forwards/backwards.
 Save your settings and exit the setting mode.
The date setting format is according to the one currently set. The time setting format is always 24-hour, regardless of the set time format.
Setting the date format
 Activate setting mode.
 Press the key code for setting the date format.
Press the key code for the desired date format:
 for MM/DD e.g. 12/31 for 31 December
 for DD/MM e.g. 31/12
for MM.DD e.g. 12.31
for DD.MM e.g. 31.12
Save your settings and exit the setting mode.
Setting the time format
Activate setting mode.
 Press the key code for setting the time format.
Press the key for the desired time format:
12-hour format
24-hour format
Save your settings and exit the setting mode.
Setting the handset volume
The handset volume can be set using the setting mode or changed directly during the telephone conversation using the keys.
There are three adjustable levels.
 Activate setting mode for the handset volume.
Press the key code for the desired volume:
low
medium
high
Save your settings and exit the setting mode.
Setting the mute behaviour and music on hold
You can define the behaviour of the microphone and the handset when the telephone is muted and whether or not a melody is played.
 Activate setting mode.
 Press the key code for mute setting.
Press the key code for the desired behaviour:
 Microphone and receiver off, melody on.
While in mute mode, the person on the other end of the line hears a melody.
 Microphone, receiver and melody off. The telephone is completely muted.
 Microphone off, receiver on, melody off. You are still able to hear the person on the end of the line, however they cannot hear you.
Save your settings and exit the setting mode.
The mute function is activated according to these settings using the mute key during a call.
Setting the ringer
The following optional settings are available:
- Melody and volume
- VIP melody
- Switching the ringer off
Setting the ring tone and volume
You can set the ring tone and volume or switch the ringer off. There are 10 different ring tones available and the volume can be adjusted to 5 levels (0=silent).
Note: The ring tones are played over the speaker if you lift the handset before commencing with the settings.
You can also change both settings directly using the keys while the telephone is ringing.
Changing the ringer volume
 Activate setting mode for the ringer volume. If you lift the handset, you will hear the ringer at the currently set volume.
 Increase or decrease the volume for the ringer.
or
 Select the desired value using the number keys.
Press the set key or OK to save your settings and exit the setting mode.
Changing the ring tone
 Activate setting mode for the ring tone. If you lift the handset, you will hear the currently set ring tone.
 Select the required ring tone.
Press the set key or OK to save your settings and exit the setting mode.
Note: The ring tone can only sound perfectly when the ring pulse arriving from the telephone network is long enough. The length of the pulses may differ from network to network. It is therefore possible that some ring tones for selection may sound clipped. If this is the case please select another ring tone.
Setting the VIP ring tone and volume
You can set one of the ringers as a VIP ring tone. If you have assigned VIP status to a number from the phonebook, an incoming call from this number will be indicated by the VIP ring tone.
Changing the VIP ringer volume
 Activate setting mode for the VIP ringer volume. If you lift the handset, you will hear the VIP ringer at the currently set volume.
 Increase or decrease the volume for the ringer.
or
 Select the desired value using the number keys.
Press the set key or OK to save your settings and exit the setting mode.
Changing the VIP ring tone
 Activate setting mode for the VIP ring tone. If you lift the handset, you will hear the currently set VIP ring tone.
 Select the required ring tone.
Press the set key or OK to save your settings and exit the setting mode.
Switching the ringer off
If you do not wish to be disturbed, you can switch off the ringer. The following three settings are available: all tones off, VIP only on, all tones on.
 Hold down the key to switch all ring tones off.
or
 Press the key sequence to switch the ringer off for normal callers but leave it on for VIP contacts.
Pressing the key sequence again will switch off the ringer for all callers.
Once the ring tone has been switched off, the  symbol appears in the display.
Switching the ringer back on
 Hold down the key to switch all ring tones on.
Security settings
Locking the telephone
You can secure your telephone against unauthorised access by using the exception of the # key and the stored emergency number (see key lock. When the key lock is activated, all keys are locked, with the exception of the  key and the stored emergency number (see below).
Activating the key lock
When the telephone is on standby, press and hold down the lock key.
Once the key lock has been switched on, the  symbol and the KEYS LOCKED message appear in the display. If the handset is lifted, the key lock is indicated by
 ![]() .
.
Deactivating the key lock
 Hold down the lock key.
Emergency calls
There are two emergency numbers stored in the telephone by default (110, 112). You can store an additional emergency number with up to 32 digits. These emergency numbers can also be selected when the key lock is switched on.
Selecting an emergency number with activated key lock
 Lift the handset.
 ![]() is displayed.
is displayed.
 Enter the emergency number.
Saving the emergency number
 Activate setting mode for the emergency number. If an emergency number is already set, it is displayed. Hold down the
  key to clear the number.
 Enter the emergency number.
 Press the set key or [ to save your settings and exit the setting mode.
Direct calling (baby call)
When direct calling is activated, the stored number (max. 32 digits) is dialled by pressing any key (except for the key sequence  )
)
Activating direct calling
 Activate setting mode for direct calling.
 Enter the direct calling number.
Press the set key or OK to activate direct calling and exit the setting mode.
Deactivating direct calling
 Activate setting mode for direct calling.
 Hold down the
  key to clear the direct call number.
Press the set key or OK to deactivate direct calling and exit the setting mode.
Blocking numbers
You can block phone calls to specific dialling codes (e.g. chargeable codes), max. 3 numbers with 5 digits each.
 Activate setting mode for blocking numbers. If a dialling code is already set, it is displayed. Hold down the
  key to clear the entry.
 Enter the dialling code to be blocked (max. 5 digits).
To edit the next dialling code:
 Confirm with OK and continue.
To save the settings:
Save your settings and exit the setting mode.
Network services
Public telephone systemsoffer you – in some cases only on request – a range of helpful, additional services (e. g. call forwarding, callback when busy, withheld number, etc.). These services can be selected using specified key combinations, of which your network provider will notify you.
Caller display (CLIP)
If the caller display service is activated, an incoming call is shown on the display with the number and saved in the call list. Requirement: The network provider supports the following service features and the number transfer is not withheld by the caller:
- CLI (Calling Line Identification): The caller's number is transferred.
- CLIP (Calling Line Identification Presentation): The caller's number is displayed.
You can transfer this number to the phonebook and edit it.
If you have saved the local dialling code, a call with the same dialling code is automatically only displayed as the number without the dialling code.
Recall key
In public telephone systems the recall key (flash) is required for the use of various additional services; e.g. for "callback when busy". If necessary, the flash time on your telephone must be adjusted to the requirements of the telephone system.
Setting up a dialling code
If necessary you can change the default setting for the area code for your connection which is saved in the telephone. The number saved here is then used to display only the number of the person calling without the area code in the call lists, provided they have the same area code.
You can enter two area codes.
 Activate setting mode for the area code. The default number is displayed.
 Enter the new area code (max. 5 digits).
To edit the second area code:
 Confirm with [ and continue.
To save the settings:
Save your settings and exit the setting mode.
Note: The names of persons, whose numbers are stored in the phonebook with the area code defined here, are no longer displayed. Change the appropriate phonebook entries, where necessary.
Operation on a PABX
Special functions/Recall key
During an external call, you can make an enquiry or forward the call. To do this, press the recall key  . The subsequent procedure depends on your PABX. To set the recall key, the telephone's flash time must be set consistently with your PABX. Please refer to the operating instructions for your PABX.
Changing the dialling mode/flash time
The telephone supports the following dialling modes:
- Tone dialling
- Pulse dialling
Depending on your PABX, you may need to change your phone's dialling mode or the flash time. (Default setting: Tone dialling)
Changing the dialling mode
 Activate setting mode for the dialling mode.
Press the key code for the dialling mode:
 Tone dialling
 Pulse dialling
Save your settings and exit the setting mode.
Temporary switch to tone dialling in "Pulse" position
To use functions that require tone dialling (e.g. remote control of answering machine), you can set the telephone to tone dialling for the duration of the call.
After the connection is established:
 Press the star key.
After the connection is terminated, the setting reverts to pulse dialling.
Changing the flash interval
You can change the flash interval if the dialling mode is set to tone dialling (see above) (default setting 90 ms).
 Activate setting mode.
 Press the key code for setting the flash interval.
 Select the flash interval (ms): 0 = 90; 1 = 120; 2 = 270; 3 = 375; 4 = 600
Press the set key to save your settings and exit the setting mode.
Setting dialling prefixes
If your phone is connected to a PABX, you may have to use a dialling prefix to make external calls. You can save up to three prefixes in your telephone.
If a dialling prefix is recognised during dialling, a dialling pause will automatically be applied. You can adjust the time of the dialling pause if necessary.
 Activate setting mode for the dialling prefix.
The current setting of the first dialling prefix is displayed.
 Enter the dialling prefix (1 to 3 digits) and confirm with OK.
Enter the next prefix and confirm with OK.
 Hold down the control key
  to delete the current dialling prefix.
Save your settings and exit the setting mode.
Other settings
In addition to the options described in section Adjusting the telephone, you can perform further settings in setting mode (e.g. reset the factory settings). These are summarised in the following table.
Default settings are displayed in bold. If there is no bold value for a setting, the presetting is country-dependent.
 Press the set key and 1.
 Enter the key sequence for the setting.
 Confirm with [ to save the setting and stay in setting mode.
or
Press the set key to save the setting and exit the setting mode.
| Key sequence | Value | Description | |
| 02 | 0 1 2 | 1 s 3 s 6 s | Sets the length of the pause that can be inserted with the pause key. |
| 25 | 0 | Restores all settings to default (factory settings). | |
| 53 | 0 1 2 | Deactivate 500 ms/500 ms 30 ms/70 ms | Flash interval for the LED (handsfree key) on incoming call. |
| 70 | 0 1 | Deactivate Activate | Use only the FSK checksum for verifying the received CLIP information (FSK = Frequency Shift Keying). |
| 83 | 0 1 2 | Deactivate Activate Automatic | Withholds the first ringer. With this setting you can determine whether an incoming call is coming from a VIP number, and select a VIP ring tone instead of the normal ring tone. |
| 91 | 0 1 | 1.5: 1 2: 1 | Sets the pulse ratio for pulse dialling. |
| 98 | 0 1 2 | 23 - 54 Hz 15 - 75 Hz Frequency not evaluated | Defines the frequency for call detection. |
| #0 | 0 1 | Ringer AC detection | Start signal for CLIP recognition. If CLIP does not function with the default setting 0, select setting "1". |
| #1 | 0 1 | Deactivate Activate | Updates the time automatically according to CLIP information. |
| #2 | 0 1 | Deactivate Activate | Updates CLIP time according to system time if the CLIP information is not valid. |
Standard characters
The following characters can be entered using the keypad:
| Key | 1x | 2x | 3x | 4x | 5x | 6x |
 |  | 1 | - | < | > | |
 | A | B | C | 2 | ||
 | D | E | F | 3 | ||
 | G | H | I | 4 | ||
 | J | K | L | 5 | ||
 | M | N | O | 6 | ||
 | P | Q | R | S | 7 | |
 | T | U | V | 8 | ||
 | W | X | Y | Z | 9 | |
 | 0 | - | / | \ |  | + |
 | * | |||||
 | |
*) Space **) Shown as ![]() in the display.
in the display.

Documents / ResourcesDownload manual
Here you can download full pdf version of manual, it may contain additional safety instructions, warranty information, FCC rules, etc.
Advertisement


Need help?
Do you have a question about the DA610 and is the answer not in the manual?
Questions and answers