Advertisement
Available languages
Available languages
Quick Links
WS8056 Funkwecker – Bedienungsanleitung
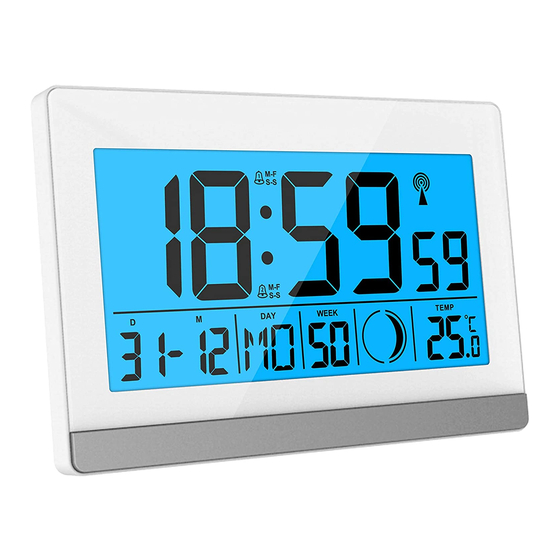
Übersicht:
1 – Alarm 1 Symbol
3 – Alarm 2 Symbol
5 – Wochentag
7 – Innentemperatur
9 – Kalenderwoche
2 – Uhrzeit
4 – Datum und Monat
6 – Funkzeit-Empfangssymbol
8 – Mondphasenanzeige
DE1
Advertisement

Related Manuals for Technoline WS8056


Summary of Contents for Technoline WS8056
- Page 1 WS8056 Funkwecker – Bedienungsanleitung Übersicht: 1 – Alarm 1 Symbol 2 – Uhrzeit 3 – Alarm 2 Symbol 4 – Datum und Monat 5 – Wochentag 6 – Funkzeit-Empfangssymbol 7 – Innentemperatur 8 – Mondphasenanzeige 9 – Kalenderwoche...
- Page 2 Inbetriebnahme: Öffnen Sie das Batteriefach und legen Sie 2 x AA Batterien entsprechend der korrekten +/- Polarität im Batteriefach ein. Schließen Sie das Batteriefach wieder. Das LCD zeigt für 2 Sekunden alle Symbole an und Sie hören einen Signalton, dann beginnt die Uhr mit dem DCF77-Empfang.
- Page 3 Hinweise Ein blinkendes Empfangssymbol zeigt an, dass der DCF77-Signalempfang durchgeführt wird. Ein dauerhaftes Empfangssymbol zeigt an, dass das DCF77-Signal erfolgreich empfangen wurde. Wenn die Uhr das DCF77-Signal nicht empfangen kann (weil die Entfernung zu groß ist, um ein Signal vom Sender in Deutschland zu empfangen), haben Sie die Möglichkeit, die Uhrzeit wie oben beschrieben manuell einzustellen.
- Page 4 Funkempfang durch folgende Einflüsse beeinträchtigt sein: lange Übertragungswege naheliegende Berge und Täler nahe Autobahnen, Gleisen, Flughäfen, Hochspannungsleitungen, etc. nahe Baustellen inmitten hoher Gebäude in Betonbauten nahe elektrischer Geräte (Computer, Fernseher, etc) und metallischer Gegenstände ...
- Page 5 Wochen- tage Sonntag Montag Dienstag Mittwoch Donners-...
- Page 6 Freitag Samstag Drücken Sie die “SET” Taste, um die Einstellung zu bestätigen und das Jahr 2015 blinkt. Drücken Sie die “UP” oder die “DOWN” Taste um das Jahr einzustellen. Drücken Sie die “SET” Taste, um die Einstellung zu bestätigen und das Datumsformat blinkt.
- Page 7 Drücken Sie die “UP” oder die “DOWN” Taste um die Stunde einzustellen. Drücken Sie die “SET” Taste, um die Einstellung zu bestätigen und die Minute blinkt. Drücken Sie die “UP” oder die “DOWN” Taste um die Minute einzustellen. Drücken Sie die “SET”...
- Page 8 Halten Sie die “UP” oder die “DOWN” Taste gedrückt, um die Einstellung zu beschleunigen. Einstellung der Alarme A1 und A2: Drücken Sie in der Zeitanzeige wiederholt die “ALARM” Taste, um die Alarmzeiten und die passenden Alarmsymbole A1, A2, AP anzuzeigen. ...
- Page 9 Einstellung des Alarms AP: Der Alarm AP ist ein Datumsalarm. Drücken Sie in der Zeitanzeige wiederholt die “ALARM” Taste, um die Alarmzeiten und die passenden Alarmsymbole A1, A2, AP anzuzeigen. Halten Sie während der Anzeige von AP die “ALARM” Taste für 2 Sekunden gedrückt und das Jahr des Alarmdatums blinkt.
- Page 10 Drücken Sie 30 Sekunden lang keine Taste um automatisch die Alarmeinstellung zu beenden und in die Zeitanzeige zu wechseln. Halten Sie die “UP” oder die “DOWN” Taste gedrückt, um die Einstellung zu beschleunigen. Alarm A1, A2 und AP ein- und ausschalten: ...
- Page 11 Während der Alarmzeit ist der Alarmton für 2 Minuten zu hören, wenn Sie diesen nicht durch das Drücken einer Taste stoppen. In diesem Fall wird der Alarm beim nächsten Mal automatisch wiederholt. Der Crescendo-Alarm ändert viermal die Lautstärke während das Alarmsignal ertönt. Schlummerfunktion: ...
- Page 12 Hiermit erklärt Technotrade, dass sich das Produkt WS 8056 in Übereinstimmung mit den grundlegenden Anforderungen und den übrigen einschlägigen Bestimmungen der Richtlinie 2014/53/EU und ROHS 2011/65/EG befindet. Die Original-EU-Konformitätserklärung finden Sie unter: www.technoline.de/doc/4029665080567 Vorsichtsmaßnahmen Dieses Gerät ist ausschließlich für den Gebrauch in Innenräumen gedacht.
- Page 13 Setzen Sie das Gerät nicht hohen Temperaturen, direktem Sonnenlicht, Staub und Feuchtigkeit aus. Tauchen Sie das Gerät nicht in Wasser. Vermeiden Sie den Kontakt mit ätzenden Materialien. Werfen Sie das Gerät nicht ins Feuer. Es könnte explodieren. ...
- Page 14 Verwenden Sie das Produkt ausschließlich für den vorgesehenen Zweck! Hinweispflicht nach dem Batteriegesetz Altbatterien gehören nicht in den Hausmüll. Wenn Batterien in die Umwelt gelangen, können diese Umwelt- und Gesundheitsschäden zur Folge haben. Sie können gebrauchte Batterien unentgeltlich bei ihrem Händler und Sammelstellen zurückgeben.
- Page 15 WS8056 Alarm clock – instruction manual Overview: 1 – Alarm 1 icon 2 – Time 3 – Alarm 2 icon 4 – Date and month 6 – RCC reception icon 5 - Weekday 7 – Indoor temperature 8 – Moon phase display...
- Page 16 Getting started: Open the battery compartment and insert 2 x AA batteries accordingly to the correct +/- polarity shown in battery compartment. Close the battery compartment again. LCD will display all symbols for 2 seconds and you will hear a signal tone, then the clock will enter DCF reception.
- Page 17 Notes A flashing radio mast icon indicates that the DCF signal reception has started. A continuously displayed radio mast icon indicates that the DCF signal was received successfully If the clock cannot receive the DCF signal (because the distance is too great to receive a signal from the transmitter in Germany), you have the option of setting the time manually as mentioned above.
- Page 18 long transmitting distance nearby mountains and valleys near freeway, railway, airports, high voltage cable etc. near construction site among tall buildings inside concrete buildings near electrical appliances (computers, TV’s, etc) and metallic structures ...
- Page 19 Weekday Sunday Monday Tuesday Wednes- Thursday...
- Page 20 Friday Saturday Press the “SET” button to confirm your setting, the Year display 2015 starts to flash. Press the “UP” or the “DOWN” button to set the correct year. Press the “SET” button to confirm your setting, the date format display starts to flash. Press the “UP”...
- Page 21 Press the “SET” button to confirm your setting, the minute displays starts to flash. Press the “UP” or the “DOWN” button to set the correct minute. Press the “SET” button to confirm your setting, the 12/24Hour display starts to flash. Press the “UP”...
- Page 22 Setting the alarms A1 and A2: To view the set alarm times, under the clock mode, press the “ALARM” button repeatedly, LCD display the A1, A2, AP icon. While viewing alarm A1 or A2, press and hold down the “ALARM” button for 2 seconds until hour display of the alarm time starts to flash.
- Page 23 While viewing alarm AP, press and hold down the “ALARM” button for 2 seconds until year display of the alarm date starts to flash. Use the “UP” and “DOWN” buttons to set the required hour. Press “ALARM” button to confirm your setting. ...
- Page 24 Activating/deactivating Alarm A1, A2 and AP: Press the “ALARM” button to select A1, A2 or AP. Use the “SET” button repeatedly to set a certain type of alarm. A1 / A2 alarm will be activated with corresponding alarm 1 / alarm 2 bell icon displayed together with icons M-F, S-S, M-F and S-S, or deactivated with no icon displayed.
- Page 25 Snooze function: While the alarm is sounding, press the “ ” button to activate snooze function and the “ ” icon appears on the display. This alarm stops and will sound again after 5 minutes. The snooze function can be interrupted by pressing any button but “ ”.
- Page 26 Press the “SET” button to return to normal display mode. Hereby, Technotrade declares that this product WS 8056 is in compliance with the essential requirements and other relevant provisions of Directive 2014/53/EU and ROHS 2011/65/EC. The original EU declaration of conformity may be found at: www.technoline.de/doc/4029665080567 Precautions ...
- Page 27 Install batteries correctly by matching the polarities (+/-). Always replace a complete set of batteries. Never mix used and new batteries. Remove exhausted batteries immediately. Remove batteries when not in use. Do not recharge and do not dispose of batteries in fire as the batteries may explode. ...
- Page 28 Consideration of duty according to the law of electrical devices This symbol means that you must dispose of electrical devices separated from the General household waste when it reaches the end of its useful life. Take your unit to your local waste collection point or recycling centre. This applies to all countries of the European Union, and to other European countries with a separate waste collection system.
- Page 29 Réveil WS8056 - Mode d’emploi Vue d’ensemble : 1 – Icône de l’alarme 1 2 – Heure 3 – Icône de l’alarme 2 4 – Date et mois 5 – Jour de la semaine 6 – Icône de réception RCC 7 –...
- Page 30 Mise en route : Ouvrez le compartiment à piles et insérez-y 2 piles AA en observant la bonne polarité +/- indiquée dans le compartiment. Refermez le compartiment à pile. L’écran LCD affiche tous les symboles pendant 2 secondes, puis vous entendez un signal sonore avant que l’horloge passe à...
- Page 31 du signal DCF. Si aucun signal n’est reçu dans les sept minutes, la recherche du signal DCF s’arrête (le symbole d’antenne radio disparaît) et recommencez à la prochaine heure pleine. Remarques Une icône d’antenne radio clignotante indique que la réception du signal DCF a démarré.
- Page 32 fenêtre. Lorsque l’horloge reçoit l’heure d’été, le symbole « DST » sera affiché au-dessus des secondes. Effets de réception dus à l’environnement Votre horloge obtient l’heure exacte grâce à la technologie sans fil. Comme pour tout appareil sans fil, la réception peut être affectée dans les cas suivants : ...
- Page 33 RÉGLAGE MANUEL DE L’HEURE : Mainnez enfoncée la touche « SET » pendant 2 secondes, l’affichage des langues se met à clignoter. Appuyez sur la touche « UP » ou « DOWN » pour sélectionner la bonne langue. Langue Anglais Alleman Italien...
- Page 34 Mardi Mecredi Jeudi Vendred Samedi Appuyez sur la touche « SET » pour confirmer votre sélection, l’année 2015...
- Page 35 commence à clignoter. Appuyez sur la touche « UP » ou « DOWN » pour sélectionner la bonne année. Appuyez sur la touche « SET » pour confirmer votre sélection, l’affichage du format de date commence à clignoter. Appuyez sur la touche « UP » ou « DOWN » pour sélectionner le bon format de date.
- Page 36 Appuyez sur la touche « SET » pour confirmer votre sélection, l’affichage du format 12/24H commence à clignoter. Appuyez sur la touche « UP » ou « DOWN » pour sélectionner le bon format 12/24H. Appuyez sur la touche « SET » pour confirmer votre sélection, l’affichage du fuseau horaire commence à...
- Page 37 Réglage des alarmes A1 et A2 : Pour afficher les heures d’alarme réglées, en mode horloge, appuyez à plusieurs reprises sur la touche « ALARM », l’écran LCD affiche l’icôneA1, A2, AP. Lors de l’affichage de l’alarme A1 ou A2, maintenez enfoncée la touche «...
- Page 38 Réglage de l’alarme AP : L’alarme AP est une alarme liée à la date. Pour afficher les heures d’alarme réglées, en mode horloge, appuyez à plusieurs reprises sur la touche « ALARM », l’écran LCD affiche l’icôneA1, A2, AP. ...
- Page 39 Les minutes de l’heure de l’alarme se mettent à clignoter. Appuyez sur les touches « UP » ou « DOWN » pour régler les minutes souhaitées. Appuyez sur la touche « ALARM » pour confirmer votre réglage et terminer la procédure de réglage. Remarques : ...
- Page 40 M - F et S - S = du lundi au dimanche L’alarme AP sera activée avec l’icône de la cloche d’alarme AP affichée, ou désactivée sans icône affichée. Remarques : Lorsque l’heure de l’alarme est atteinte, l’alarme retentit pendant 2 minutes si vous ne la désactivez pas en appuyant sur une touche.
- Page 41 Appuyez sur la touche « SET » pour revenir au mode d’affichage normal. Par la présente Technotrade déclare que l'appareil WS 8056 est conforme aux exigences essentielles et aux autres dispositions pertinentes de la directive 2014/53/EU et ROHS 2011/65/CE. déclaration conformité originelle disponible sur: www.technoline.de/doc/4029665080567 FR13...
- Page 42 Précautions Cet appareil n’est destiné qu’à une utilisation intérieure. Ne soumettez pas l’appareil à une force ou à un choc excessif. N’exposez pas l’appareil à la lumière directe du soleil, à des températures extrêmes, à l’humidité ou à la poussière. ...
- Page 43 Lorsque les piles sont déchargées, les retirer immédiatement de l’appareil. Retirez les piles lorsque vous n’allez pas utiliser l’appareil. N’essayez pas de recharger des piles qui ne sont pas rechargeables et ne jetez aucune pile au feu, elle risque d’exploser. ...
- Page 44 piles usagées aux revendeurs et aux points de collecte ! Respect de l’obligation de la loi sur les appareils électriques Ce symbole signifie que les appareils électriques ne doivent pas être jetés aux ordures ménagères à la fin de leur vie utile. Ramenez votre appareil à...
- Page 45 Despertador WS8056 – manual de instrucciones Vista genera: 1 – Icono de alarma 1 2 – Hora 3 – Icono de alarma 2 4 – Fecha y mes 5 – Día de la semana 6 – Icono de recepción RCC 7 –...
- Page 46 Primeros pasos: Abra el compartimento de las pilas e inserte 2 pilas AA conforme a la polaridad correcta +/- que se muestra en el compartimento de las pilas. Vuelva a cerrar el compartimento de las pilas. La pantalla LCD mostrará todos los símbolos durante 2 segundos y oirá un tono de señal;...
- Page 47 Mantenga pulsado el botón “DOWN” para iniciar manualmente la recepción de la señal DCF. Si no se recibe ninguna señal en siete minutos, entonces se detiene la búsqueda de la señal DCF (desaparece el símbolo del mástil de radio) y empieza de nuevo a la siguiente hora completa.
- Page 48 En tales circunstancias extremas, coloque el sistema cerca de la ventana. Cuando el reloj reciba la hora de ahorro energético, se mostrará el símbolo “DST” en la parte sARRIBAerior de los segundos. Efectos ambientales en la recepción El reloj obtiene la hora exacta usando tecnología inalámbrica. Y al igual que en el resto de los dispositivos inalámbricos, la recepción puede verse afectada por las circunstancias siguientes: ...
- Page 49 Ajuste manual de la hora: Mantenga pulsado el botón “SET” durante 2 segundos; empieza a parpadear la pantalla del idioma. Pulse el botón “UP” o el botón “DOWN” para configurar el idioma correcto. Idioma Inglés Alemán Italiano Francés Neerlandé Castellan Danés Día de...
- Page 50 Miércol Jueves Viernes Sábado Pulse el botón “SET” para confirmar su configuración; la pantalla del años 2015 empieza a parpadear. Pulse el botón “UP” o el botón “DOWN” para configurar el idioma correcto.
- Page 51 Pulse el botón “SET” para confirmar su configuración; la pantalla del formato de fecha empieza a parpadear. Pulse el botón “UP” o el botón “DOWN” para configurar el formato de fecha correcto. Pulse el botón “SET” para confirmar su configuración; la pantalla del mes empieza a parpadear.
- Page 52 hora 12/24 correcta. Pulse el botón “SET” para confirmar su configuración; la pantalla de la zona horaria empieza a parpadear. Pulse el botón “UP” o el botón “DOWN” para configurar la zona horaria correcta. Pulse el botón “SET” para confirmar su configuración; la pantalla de la función DCF “ON”...
- Page 53 Configurar las alarmas A1 y A2: Para ver las horas de la alarma, bajo el modo reloj, pulse de forma reiterada el botón “ALARM” M la pantalla LCD muestra el icono A1, A2, AP. Mientras se visiona la alarma A1 o A2, mantenga pulsado el botón “ALARM” durante 2 segundos hasta que la pantalla de la hora de la alarma empiece a parpadear.
- Page 54 Configurar la alarma AP: La alarma AP es una alarma relacionada con la fecha. Para ver las horas de la alarma configuradas, bajo el modo reloj, pulse de forma reiterada el botón “ALARM”; la pantalla LCD muestra el icono A1, A2, AP. ...
- Page 55 La pantalla de los minutos de la hora de la alarma empieza a parpadear. Use los botones “UP” o “DOWN” para configurar los minutos requeridos. Pulse el botón “ALARM” para confirmar su configuración y finalizar el procedimiento de configuración. Notas: ...
- Page 56 S – S= Sábado a domingo M – F y S – S= Lunes a domingo La alarma AP se activará con el icono de campana de la alarma que se muestra o se desactivará sin que se muestre ningún icono. Notas: ...
- Page 57 Presentación de la temperatura °C/°F: La temperatura se muestra bien en °C o °F. Pulse el botón “UP” para cambiar la unidad de la pantalla de temperatura a °C o °F. Modo temporizador: Mantenga pulsado el botón “ ”...
- Page 58 ROHS 2011/65/CE. El original de la declaración de conformidad UE se puede encontrar en: www.technoline.de/doc/4029665080567 Precauciones Esta unidad está diseñada para usarse únicamente en el interior. No golpee la unidad ni la someta a una fuerza excesiva.
- Page 59 Nunca mezcle baterías usadas y nuevas. Quite las pilas agotadas de inmediato. Quite las pilas cuando no se utilicen. No las recargue ni las deseche en el fuego, ya que pueden explotar. Asegúrese de que las pilas estén almacenadas lejos de objetos metálicos, ya que el contacto con ellos puede causar un cortocircuito.
- Page 60 otros puntos de recogida! Consideración de obligaciones según las leyes sobre dispositivos electrónicos Este símbolo indica que no debe deshacerse de los aparatos eléctricos en la basura doméstica general cuando lleguen al final de su vida útil. Lleve su unidad a su punto de recogida selectiva de basura o al centro de reciclaje de su localidad.
- Page 61 WS8056 Wekker - handleiding Overzicht: 1 – Alarm 1 pictogram 2 – Tijd 3 – Alarm 2 pictogram 4 – Datum en maand 5 – Dag van de week 6 – RCC ontvangstpictogram 7 – Binnentemperatuur 8 – Weergave maanfase...
- Page 62 Aan de slag: Open het batterijvak en plaats 2 x AA-batterijen overeenkomstig de juiste +/- polariteit zoals weergegeven in het batterijvak. Sluit het batterijvak weer. De LCD toont alle symbolen gedurende 2 seconden en u hoort een signaaltoon, waarna de klok naar de DCF-ontvangstmodus gaat.
- Page 63 DCF-signaalscan stoppen (radiomasticoontje verdwijnt) en om het volgende volle uur weer starten. Opmerkingen Een knipperend radiomasticoontje betekent dat de DCF-signaalontvangst is gestart. continu weergegeven radiomasticoontje betekent DCF-signaalontvangst is geslaagd. Indien de klok het DCF-signaal niet kan ontvangen (omdat de afstand te groot is om een signaal van de zender in Duitsland te ontvangen) kunt u de tijd handmatig instellen zoals hierboven aangegeven.
- Page 64 zichtbaar. Omgevingseffecten op de ontvangst De klok ontvangt de exacte tijd d.m.v. draadloze technologie. Zoals met alle draadloze apparatuur, kan de ontvangst in de volgende gevallen worden aangetast: Grote afstand tot de zender Nabij bergen en valleien Nabij snelwegen, treinsporen, vliegvelden, hoogspanningkabels, enz.
- Page 65 Druk op de toets “UP” of “DOWN” om de correcte taal te selecteren. Taal Engels Duits Italiaan Frans Nederlan Spaans Deens Weekda Zondag Maanda Dinsdag Woensd...
- Page 66 Donderd Vrijdag Zaterdag Druk op de toets “SET” om uw keuze te bevestigen; het jaardisplay 2015 gaat knipperen. Druk op de toets “UP” of “DOWN” om het correcte jaar te selecteren. Druk op de toets “SET” om uw keuze te bevestigen; het datumdisplay gaat knipperen.
- Page 67 knipperen. Druk op de toets “UP” of “DOWN” om de correcte maand te selecteren. Druk op de toets “SET” om uw keuze te bevestigen; het datumdisplay gaat knipperen. Druk op de toets “UP” of “DOWN” om de correcte datum in te stellen. ...
- Page 68 Opmerkingen: Na 30 seconden zonder op een knop te drukken, keert de klok automatisch terug naar de normale weergavemodus. Druk in de normale tijdmodus op de toets “DOWN” om naar de zonemodus te gaan. Hou de toets “UP” of “DOWN” ingedrukt om het instellen van de waarden te versnellen.
- Page 69 instelling te bevestigen en de procedure voor het instellen te beëindigen. Opmerkingen: Na 30 seconden zonder op een knop te drukken schakelt de klok automatisch van de alarminstellingsmodus over naar de normale weergavemodus. Hou de toets “UP” of “DOWN” ingedrukt om het instellen van de waarden te versnellen.
- Page 70 te bevestigen. De datum van de alarmtijd gaat knipperen. Gebruik de toetsen “UP” of “DOWN” om de gewenste datum in te stellen. Druk op de toets “ALARM” om uw instelling te bevestigen. De uren van de alarmtijd zullen beginnen te knipperen. Gebruik de toetsen “UP” of “DOWN”...
- Page 71 toets “SET” om een bepaald type alarm te selecteren. De alarmen A1 / A2 worden geactiveerd als het overeenkomstige alarm 1/alarm 2 bel-pictogram zichtbaar is samen met de pictogrammen M-F, S-S, M-F en S-S, of uitgeschakeld indien er geen pictogram zichtbaar is. M - F= van maandag tot vrijdag S –...
- Page 72 Sluimerfunctie: Druk als het alarm afgaat op de toets “ ” om de snooze-functie in te schakelen; het pictogram “ ” wordt terug op het display zichtbaar. Dit alarm stopt, en klinkt terug na 5 minuten. De snooze-functie kan worden onderbroken door op om het even welke toets te drukken behalve “...
- Page 73 Hierbij verklaart Technotrade dat het toestel WS 8056 in overeenstemming is met de essentiële eisen en de andere relevante bepalingen van richtlijn 2014/53/EU en ROHS 2011/65/EG. De oorspronkelijke EU-verklaring van overeenstemming is te vinden op: www.technoline.de/doc/4029665080567 Voorzorgsmaatregelen Dit apparaat is alleen bedoeld voor gebruik binnenshuis.
- Page 74 Open de behuizing niet, en wijzig geen enkel onderdeel van dit apparaat. Veiligheidswaarschuwingen batterijen Gebruik uitsluitend alkaline batterijen, geen herlaadbare batterijen. Neem bij het plaatsen van de batterijen de juiste polariteit in acht (+/-). Vervang altijd alle batterijen tegelijk. ...
- Page 75 Neem wettelijke heffingen in verband met de afvoer van batterijen in aanmerking Oude batterijen behoren niet tot huishoudelijk afval, omdat deze schadelijk zijn voor de volksgezondheid en het milieu. U kunt gebruikte batterijen kosteloos inleveren bij uw dealer of inzamelpunten. U bent als eindgebruiker wettelijk verplicht verbruikte batterijen in te leveren bij distributeurs of andere inzamelpunten! Houd rekening met heffingen in het kader van wetgeving m.b.t.
- Page 76 Sveglia WS8056 – Manuale di istruzioni Panoramica: 1 – Icona Sveglia 1 2 – Orario 3 – Icona Sveglia 2 4 – Data e mese 5 – Giorno della settimana 6 – Icona ricezione RCC 7 – Temperatura interna 8 – Visualizzazione fase lunare...
- Page 77 Inizio: Aprire il vano batteria e inserire 2 batterie AA secondo la polarità +/- corretta mostrata nel vano batteria. Chiudere nuovamente il vano batteria. LCD mostrerà tutti i simboli per 2 secondi e si sentirà un segnale acustico, quindi l'orologio entra in ricezione DCF.
- Page 78 Note L'icona dell'antenna radio lampeggiante indica che la ricezione del segnale DCF è avviata. L'icona dell'antenna radio lampeggiante di continuo indica che il segnale DCF è stato ricevuto con successo Se l'orologio non può ricevere il segnale DCF (poiché la distanza è eccessiva per ricevere un segnale dal trasmettitore in Germania), c'è...
- Page 79 Prossimità di montagne e valli Prossimità di autostrade, stazioni, aeroporti, cavi di alta tensione e così via. Prossimità di cantieri Collocazione tra edifici alti Collocazione all'interno di edifici in cemento Prossimità di apparecchiature elettriche (computer, TV e altro) e strutture metalliche ...
- Page 80 Giorno della settiman Domenic Lunedì Martedì Mercoled ì...
- Page 81 Giovedi Venerdì Sabato Premere “SET” per confermare la propria impostazione, l'indicazione dell'anno 2015 inizia a lampeggiare. Premere il pulsante “UP” o “DOWN” per impostare l'anno corretto. Premere il pulsante “SET” per confermare la propria impostazione, l'indicazione del formato data inizia a lampeggiare. Premere il pulsante “UP” o “DOWN” per impostare il formato data corretto.
- Page 82 Premere il pulsante “SET” per confermare la propria impostazione, l'indicazione del giorno inizia a lampeggiare. Premere il pulsante “UP” o “DOWN” per impostare la data corretta. Premere il pulsante “SET” per confermare la propria impostazione, l'indicazione dell'ora inizia a lampeggiare. Premere il pulsante “UP” o “DOWN” per impostare l'ora corretta. ...
- Page 83 Dopo 30 secondi senza premere alcun pulsante l'orologio ritorna automaticamente in modalità di visualizzazione normale. In modalità di orario normale, premere il pulsante “GIÙ” per accedere alla modalità fuso orario. Premere e tenere premuto il pulsante “UP” o “DOWN” per accelerare l'impostazione dei valori.
- Page 84 Dopo 30 secondi di inattività l’orologio passa automaticamente dalla modalità di impostazione della sveglia alla modalità orologio normale. Premere e tenere premuto il pulsante “UP” o “DOWN” per accelerare l'impostazione dei valori. Impostazione della sveglia AP: La sveglia AP è un allarme collegato alla data. ...
- Page 85 confermare l'impostazione. L'indicazione dell'ora dell'orario della sveglia inizia a lampeggiare. Utilizzare i pulsanti “UP” o “DOWN” per impostare l'ora richiesta. Premere il pulsante “ALARM” per confermare l'impostazione. L'indicazione dei minuti dell'orario della sveglia inizia a lampeggiare. Utilizzare i pulsanti “UP”...
- Page 86 icona visualizzata. M - F= Lunedì a Venerdì S – S= Sabato a Domenica M – F e S – S= Lunedì a Domenica La sveglia AP sarà attivata con l'icona della campanella della sveglia AP visualizzata o disattivata con nessuna icona visualizzata. Note: ...
- Page 87 La funzione Snooze può essere interrotta premendo qualsiasi pulsante tranne “ ”. Visualizzazione temperatura °C/°F: La temperatura è visualizzata in °C o °F. Premere il pulsante “SU” per modificare l'unità di visualizzazione della temperatura in °C o °F. Modalità...
- Page 88 2014/53/EU e ROHS 2011/65/CE. La dichiarazione di conformità UE originale si trova a: www.technoline.de/doc/4029665080567 Precauzioni L'unità è intesa solo per uso in interni. Non esporre l'unità a forza eccessiva o shock.
- Page 89 Rimuovere le batterie inutilizzate. Non ricaricare e non smaltire le batterie nel fuoco in quanto possono esplodere. Assicurarsi che le batterie siano conservate lontano da oggetti metallici in quanto il contatto può causare un corto circuito. Evitare di esporre le batterie a temperatura o a umidità...
- Page 90 Questo simbolo indica che i dispositivi elettrici alla fine del loro ciclo di vita devono essere smaltiti separatamente dai rifiuti domestici generali. Portare l'unità al proprio punto di raccolta rifiuti locale o a un centro per la raccolta differenziata. Questa disposizione si applica a tutti i paesi dell’Unione europea e agli altri paesi europei in cui viene praticata la raccolta differenziata.
- Page 91 Budík WS8056 – návod k obsluze Přehled: 1 – ikona budíku 1 2 – čas 3 – ikona budíku 2 4 – datum a měsíc 5 – den v týdnu 6 – ikona příjmu RCC 7 – vnitřní teplota 8 – fáze Měsíce...
- Page 92 Začínáme: Otevřete bateriový prostor a vložte 2× baterie AA. Dbejte přitom na dodržení správné polarity +/− vyznačené v bateriovém prostoru. Opět zavřete bateriový prostor. Na displeji LCD se krátce po dobu 2 sekund zobrazí všechny ikony a uslyšíte tón signálu.
- Page 93 v příští celou hodinu. Poznámky Blikající ikona rádiového příjmu značí, že začal příjem signálu DCF. Trvale zobrazená ikona rádiového příjmu značí, že signál DCF byl úspěšně přijat. Pokud nelze v budíku signál DCF přijmout (kvůli příliš velké vzdálenosti pro příjem signálu z vysílače v Německu), lze budík nastavit ručně...
- Page 94 bezdrátových zařízení může být příjem negativně ovlivněn následujícími podmínkami: Dlouhá přenosová vzdálenost Blízkost hor a údolí Blízkost dálnic, železnic, letišť, vedení vysokého napětí apod. Blízkost staveniště Umístění mezi vysokými stavbami Umístění uvnitř betonových staveb ...
- Page 95 Všedn í den Neděl Pondě lí Úterý Středa Čtvrte...
- Page 96 Pátek Sobot Stisknutím tlačítka „SET“ potvrďte nastavení. Začne blikat zobrazení roku 2015. Stisknutím tlačítka „UP“ nebo „DOWN“ nastavte správný rok. Stisknutím tlačítka „SET“ potvrďte nastavení. Začne blikat zobrazení formátu data. Stisknutím tlačítka „UP“ nebo „DOWN“ nastavte správný formát data. ...
- Page 97 Stisknutím tlačítka „UP“ nebo „DOWN“ nastavte správnou hodinu. Stisknutím tlačítka „SET“ potvrďte nastavení. Začne blikat zobrazení minut. Stisknutím tlačítka „UP“ nebo „DOWN“ nastavte správnou minutu. Stisknutím tlačítka „SET“ potvrďte nastavení. Začne blikat zobrazení 12- a 24hodinového formátu. Stisknutím tlačítka „UP“ nebo „DOWN“ nastavte 12- nebo 24hodinový...
- Page 98 zrychlíte. Nastavení budíku A1 a A2: Chcete-li zobrazit časy nastavení buzení v režimu hodin, stiskněte opakovaně tlačítko „ALARM“. Na displeji se zobrazí ikona A1, A2, AP. Během zobrazení budíku A1 nebo A2 stiskněte tlačítko „ALARM“ a podržte jej stisknuté...
- Page 99 Nastavení budíku AP: Budík AP je budík nastavený pro určité datum. Chcete-li v režimu hodin zobrazit časy nastavení budíku, stiskněte opakovaně tlačítko „ALARM“. Na displeji LCD se zobrazí ikona A1, A2, AP. Během zobrazení budíku AP stiskněte tlačítko „ALARM“ a podržte jej stisknuté po dobu 2 sekund, dokud nezačne blikat zobrazení...
- Page 100 nastavte požadovanou minutu. Stisknutím tlačítka „ALARM“ potvrďte nastavení a ukončete proces nastavování. Poznámky: Po 30 sekundách bez stisknutí jakéhokoli tlačítka se budík automaticky přepne z režimu nastavení budíku do režimu normálního zobrazení. Stisknutím tlačítka „UP“ nebo „DOWN“ a jeho podržením nastavování hodnot zrychlíte.
- Page 101 Budík AP je aktivován v případě, že se zobrazuje ikona zvonku budíku AP. Budík je deaktivován v případě, že se nezobrazuje žádná ikona. Poznámky: Nastane-li čas buzení, bude budík vyzvánět po dobu 2 minut, dokud jej nevypnete stisknutím jakéhokoli tlačítka. V tomto případě se budík automaticky zopakuje v příštím nastaveném čase.
- Page 102 Stisknutím tlačítka „SET“ se vrátíte do režimu normálního zobrazení. Technotrade tímto prohlašuje, že tento WS 8056 je ve shodě se základními požadavky a dalšími příslušnými ustanoveními směrnice 2014/53/EU a ROHS 2011/65/ES. Originál EU prohlášení o shodě lze nalézt na: www.technoline.de/doc/4029665080567 CZ12...
- Page 103 Bezpečnostní opatření Toto zařízení je určeno k používání pouze ve vnitřních prostorách. Nevystavujte zařízení působení nadměrné síly ani otřesům. Nevystavujte zařízení extrémním teplotám, přímému slunečnímu svitu, prachu či vlhkosti. Neponořujte do vody. Vyhněte se kontaktu s jakýmkoliv korozivním materiálem. ...
- Page 104 Jestliže zařízení nepoužíváte, vyjměte z něj baterie. Baterie nenabíjejte a nevhazujte je do ohně – mohou explodovat. Baterie skladujte mimo dosah kovových předmětů, kontakt s nimi může způsobit zkrat. Nevystavujte baterie extrémním teplotám, vlhkosti či přímému slunečnímu svitu. ...
- Page 105 Povinnosti dle zákona o elektrických zařízeních Tento symbol znamená, že elektrická zařízení na konci jejich životnosti je třeba likvidovat odděleně od běžného domácího odpadu. Zařízení vraťte do místního sběrného místa nebo centra pro recyklaci. To platí pro všechny země Evropské unie a ostatní evropské země se samostatným systémem shromažďování...
- Page 106 Budzik WS8056 – instrukcja obsługi Przegląd: 1 – Ikona budzika 1 2 – Czas 3 – Ikona budzika 2 4 – Data i miesiąc 5 – Dzień tygodnia 6 – Ikona odbioru sygnału RCC 7 – Temperatura w pomieszczeniu 8 – Ikona fazy księżyca...
- Page 107 Rozpoczęcie: Otwórz komorę baterii i umieść 2 baterie AA, zwracając uwagę na prawidłową orientację biegunów +/-, oznaczoną w komorze. Zamknij ponownie komorę baterii. Na wyświetlaczu LCD przez 2 sekundy wyświetlane będą wszystkie symbole i wyemitowany zostanie sygnał, następnie zegar przełączy się na odbiór sygnału DCF.
- Page 108 wyszukiwanie sygnału DCF zostanie zatrzymane (symbol masztu radiowego zniknie) i rozpocznie się ponownie o kolejnej pełnej godzinie. Uwagi Migająca ikona masztu radiowego oznacza, że rozpoczął się odbiór sygnału DCF. Jeżeli wyświetlana ikona masztu radiowego nie miga, oznacza to, że sygnał DCF został...
- Page 109 Wpływ środowiska na odbiór Zegar zawdzięcza dokładny odczyt czasu technologii bezprzewodowej. Podobnie jak w przypadku wszystkich urządzeń bezprzewodowych, odbiór może być zakłócony następującymi czynnikami: duża odległość przekazu; góry i doliny znajdujące się w pobliżu; autostrada, kolej, porty lotnicze, kable wysokiego napięcia itd. znajdujące się w pobliżu;...
- Page 110 Ręczne ustawianie czasu: Naciśnij i przytrzymaj przycisk „SET” przez 2 sekundy. Wyświetlacz języka zacznie migać. Naciśnij przycisk „UP” lub przycisk „DOWN”, aby wybrać język. Język Włoch Duński Anglik Niemiec Francuski Holender Hiszpani Dzień powszedn Niedziela Poniedział Wtorek...
- Page 111 Środa Czwartek Piątek Sobota Naciśnij przycisk „SET”, aby potwierdzić ustawienia. Ustawienie roku 2015 zacznie migać. Naciśnij przycisk „UP” lub przycisk „DOWN”, aby ustawić rok. Naciśnij przycisk „SET”, aby potwierdzić ustawienia. Ustawienie formatu daty zacznie migać. Naciśnij przycisk „UP” lub przycisk „DOWN”, aby wybrać format...
- Page 112 daty. Naciśnij przycisk „SET”, aby potwierdzić ustawienia. Ustawienie miesiąca zacznie migać. Naciśnij przycisk „UP” lub przycisk „DOWN”, aby ustawić miesiąc. Naciśnij przycisk „SET”, aby potwierdzić ustawienia. Ustawienie daty zacznie migać. Naciśnij przycisk „UP” lub przycisk „DOWN”, aby ustawić datę. ...
- Page 113 wyłączyć funkcję DCF. Naciśnij przycisk „SET”, aby potwierdzić ustawienia, zakończyć konfigurację i przejść do trybu zegara. Uwagi: Jeżeli przez 30 sekund nie zostanie naciśnięty żaden przycisk, zegar automatycznie powróci do zwykłego trybu wyświetlania. W zwykłym trybie wyświetlania czasu, naciśnij przycisk „DOWN”, aby przejść do trybu stref. ...
- Page 114 Wyświetlacz minut czasu alarmu zacznie migać. Ustaw minuty za pomocą przycisków „UP” i „DOWN”. Naciśnij przycisk „ALARM”, aby potwierdzić ustawienia i zakończyć konfigurację. Uwagi: Jeżeli przez 30 sekund nie zostanie naciśnięty żaden przycisk, zegar automatycznie przełączy się z trybu konfiguracji budzika na zwykły tryb wyświetlania.
- Page 115 potwierdzić ustawienie. Zacznie migać ustawienie miesiąca budzenia. Ustaw miesiąc za pomocą przycisków „UP” i „DOWN”. Naciśnij przycisk „ALARM”, aby potwierdzić ustawienie. Zacznie migać ustawienie daty budzenia. Ustaw datę za pomocą przycisków „UP” i „DOWN”. Naciśnij przycisk „ALARM”, aby potwierdzić ustawienie. ...
- Page 116 przewijanie wartości. Włączanie/wyłączanie budzika A1, A2 i AP: Naciśnij przycisk „ALARM”, aby wybrać A1, A2 lub AP. Ustaw wybrany typ budzika za pomocą przycisku “SET”. Budzik A1 / A2 jest włączony, jeżeli odpowiednia ikona dzwonka budzika 1 / budzika 2 jest wyświetlana łącznie z ikonami M-F, S-S, M-F i S-S.
- Page 117 Coraz głośniejszy dźwięk alarmu (narastający, czas trwania: 2 minuty) zmienia głośność 4 razy, gdy sygnał alarmu jest słyszalny. Funkcja drzemki: Gdy wybrzmiewa sygnał budzika, naciśnij przycisk „ ”, aby włączyć funkcję drzemki. Na ekranie pojawi się ikona „ ”.
-
Page 118: Środki Ostrożności
Naciśnij przycisk „SET”, aby powrócić do zwykłego trybu wyświetlania. Niniejszym Technotrade oświadcza, że WS 8056 jest zgodny z zasadniczymi wymogami oraz pozostałymi stosownymi postanowieniami Dyrektywy 2014/53/EU i ROHS 2011/65/EC.Kopię pełnej deklaracji zgodności można pobrać pod adresem: www.technoline.de/doc/4029665080567 Środki ostrożności Niniejsze urządzenie... - Page 119 słoneczne, kurz czy wilgoć. Nie zanurzać w wodzie. Unikać kontaktu z materiałami korodującymi. Urządzenia nie wolno utylizować w ogniu, ponieważ może wybuchnąć. Nie otwierać tylnej obudowy wewnętrznej ani nie ingerować w żadne komponenty urządzenia. Ostrzeżenia bezpieczeństwa dotyczące baterii ...
- Page 120 ponieważ zetknięcie z nimi może spowodować zwarcie. Unikać wystawiania baterii na działanie ekstremalnych temperatur, wilgoć czy światło słoneczne. Baterie należy trzymać w miejscu niedostępnym dla dzieci. Stwarzają one zagrożenie udławienia się. Produkt należy używać tylko zgodnie z przeznaczeniem! Zobowiązania według przepisów prawa dotyczących baterii Stare baterie nie należą...
- Page 121 Zobowiązania według przepisów prawa dotyczących urządzeń elektrycznych Ten symbol oznacza, że użytkownik musi utylizować urządzenia elektryczne z dala od ogólnych odpadów domowych, kiedy osiągną one koniec okresu eksploatacji. Swoje urządzenie najlepiej jest oddać w lokalnym punkcie zbiórki odpadów lub centrum recyklingu. Dotyczy to wszystkich państw Unii Europejskiej oraz innych państw europejskich, w których obowiązuje system zbierania odpadów segregowanych.
Need help?
Do you have a question about the WS8056 and is the answer not in the manual?
Questions and answers