Advertisement
Quick Links
Advertisement

Related Manuals for Vicoustic VicSpacer


Summary of Contents for Vicoustic VicSpacer
- Page 1 VicSpacer Assembling Manual...
- Page 3 MATERIAL NEEDED Included K_Silicone Drop L_VicFix Mini Hex key Flexi Glue Ultra F_Gauge X_XXL Gauge Not Included Screwdriver Caulking Gun Wall Plugs and Screws Measuring Tape Rubber Hammer Level Drill...
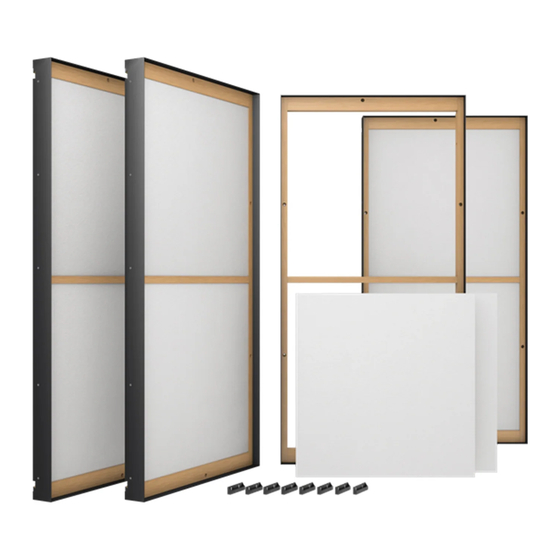
- Page 4 Attach the side metal plates to the plywood strips as shown in the diagrams. Position the plywood strips on a flat surface, so that when you lean the metal plates, they stay as aligned as possible with each other. Steps Material 2x A 2x B Steps Material...
- Page 5 Repeat the previous step. Steps Material 2x F Steps Material 5x K Steps Material 3x L...
- Page 6 Fit the pieces together and press them to form a frame. Tighten the fixing screws in the indicated places. Steps Material 6x L...
- Page 7 You can fine tune the adjustment of the metal side plates by loosening the tightening screws. When the plates have been aligned, tighten the screws permanently.
- Page 8 Turn the VicSpacer on its back and apply the silicone drops as indicated in the diagram. Steps Material...
- Page 9 VicFix Corner using VicFix Corner and VicFix J Profile 80mm (sold separately) ii) Ceiling Installation i) Wall Installation iii) Corner Installation For information about the various possibilities of installing the product, please consult the manual available on our website: www.vicoustic.com...
- Page 12 Rua Quinta do Bom Retiro Nº 16, Armazém 9 2820-690 Charneca da Caparica, Portugal T (+351) 212 964 100 Info and Sales E sales@vicoustic.com www.vicoustic.com © Vicoustic, 2022 | V7 No parts of this document might be copied and/or published without written consent of Vicoustic.
Need help?
Do you have a question about the VicSpacer and is the answer not in the manual?
Questions and answers