Advertisement
23801 E. La Palma Ave., Yorba Linda, CA 92887 Ph. 714.692.8180 Fax. 714.692.5016
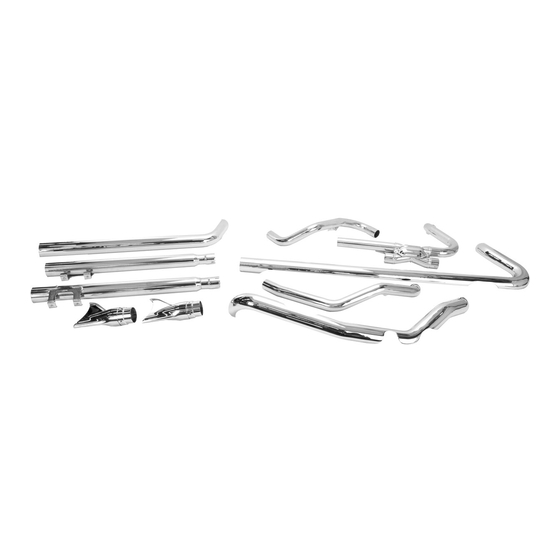
Items Supplied >
1 – FRONT HEADPIPE AND HEATSHIELD
1 – REAR HEADPIPE COLLECTOR ASSEMBLY AND HEATSHIELD
1 – LEFT REAR CROSSOVER PIPE AND HEATSHIELD
2 – FISHTAIL TIPS
1 - RIGHT MUFFLER
4 – 1/4-20 X 3/8 BUTTONHEAD BOLTS
1 - LEFT MUFFLER
1 – BRACKET, FRONT HEADPIPE SUPPORT
1 – BRACKET, CROSSOVER WITH GROMMET PIPE SUPPORT
1 – FLOORBOARD MOUNT SPACER PLATE
1 – CLAMP, FRONT HEADPIPE SUPPORT
8 – CLAMP, HOSE HS-24
2 – CLAMP, HOSE HS-28
1 – THICK 3/8" WASHER
1 – 3/8" X 1" CARRIAGE BOLT
1 – THIN 3/8" WASHER, 2 - 1/4 & 2 - 5/16 LARGE FLAT WASHERS
Instruction Manual >
PRIOR TO INSTALLATION, MAKE SURE YOUR STOCK HEADPIPE GASKETS ARE IN GOOD CONDITION.
IF YOU HAVE ANY DOUBTS AS TO THEIR CONDITION, REPLACE THEM.
Read all instructions carefully and completely before installing your new exhaust system!
1. Remove the saddle bags, right side cover, and right front floorboard from the frame.
2. Unplug the O
sensors on the front and rear headpipes from the motorcycle wire harness.
2
3. Remove the stock exhaust system being careful not to damage the headpipe gaskets. If the headpipe
gaskets are in good condition they do not need to be removed from the cylinders. Remove and save the
flanges, nuts, retaining rings, muffler clamps, muffler mount bolts, crossover bracket bolts, and O
from the stock exhaust. Label the O
headpipe.
4. Remove the stock exhaust mount bracket.
5. Install the supplied headpipe support bracket using the stock nut. On 2017-2020 models route the hydraulic
clutch line behind the bracket. On 2021 models route the clutch cable in front of the bracket. See
FIGURES 1 & 2. Lightly snug the nut but DO NOT TIGHTEN so the bracket can be adjusted. The bracket
should be positioned at a slight angle.
FIGURE 1
2017 – 2020
MODELS
DISCLAIMER: NOT LEGAL FOR SALE OR USE IN CALIFORNIA ON ANY POLLUTION CONTROLLED MOTOR VEHICLE. THE SALE, USE, OR
INSTALLATION OF THIS PRODUCT MAY ALSO BE ILLEGAL NATIONWIDE UNDER THE FEDERAL CLEAN AIR ACT (42 U.S.C.§ 7522(A)(3)).
DOCUMENT NO. 0017
REV. A
09/21
2– FISHTAIL TIPS
1 – 3/8" NYLOCK NUT
2 - 1/4 SHOULDER BOLTS
4 – CLAMP, 27-61 MSC
sensors front and rear to ensure they will be installed on the proper
2
STOCK NUT
COBRA HEADPIPE
SUPPORT BRACKET
Continued on Page 2
Application(s) >
HARLEY:
DRESSER
6975
1
www.cobrausa-vtwin.com
'17 - '21
Page 1 of 6
sensors
2
FIGURE 2
2017 – 2020
MODELS
Advertisement
Table of Contents

Related Manuals for Cobra Ride Loud


Summary of Contents for Cobra Ride Loud
- Page 1 On 2021 models route the clutch cable in front of the bracket. See FIGURES 1 & 2. Lightly snug the nut but DO NOT TIGHTEN so the bracket can be adjusted. The bracket should be positioned at a slight angle. STOCK NUT COBRA HEADPIPE SUPPORT BRACKET FIGURE 1 FIGURE 2 2017 –...
- Page 2 23801 E. La Palma Ave., Yorba Linda, CA 92887 Ph. 714.692.8180 Fax. 714.692.5016 www.cobrausa-vtwin.com Instruction Manual > Page 2 of 6 6975 6. Install the stock flanges, retaining rings and O sensors onto the supplied front and rear headpipes. Be sure to install the front O sensor on the front headpipe and the rear O sensor on the rear headpipe.
- Page 3 23801 E. La Palma Ave., Yorba Linda, CA 92887 Ph. 714.692.8180 Fax. 714.692.5016 www.cobrausa-vtwin.com Instruction Manual > Page 3 of 6 6975 NOTE: Arrows point to the position of the hex head of the clamps. REAR CROSSOVER PIPE 27-61 MSC FRONT HEADPIPE FIGURE 5 CLAMP...
- Page 4 23801 E. La Palma Ave., Yorba Linda, CA 92887 Ph. 714.692.8180 Fax. 714.692.5016 www.cobrausa-vtwin.com Instruction Manual > Page 4 of 6 6975 COBRA CROSSOVER SUPPORT BRACKET WITH GROMMETS STOCK BOLTS SUPPLIED SHOULDER CROSSOVER BOLTS AND WASHERS PIPE FIGURE 7 14. Slide the supplied clamps over the inlets of the right and left mufflers. Position them as shown in FIGURE 8 with the hex head facing inward and towards the ground.
- Page 5 23801 E. La Palma Ave., Yorba Linda, CA 92887 Ph. 714.692.8180 Fax. 714.692.5016 www.cobrausa-vtwin.com Instruction Manual > Page 5 of 6 6975 22. Install the right rear heatshield over the rear headpipe by first sliding the rear portion of the heatshield over the muffler.
- Page 6 30. IMPORTANT: Before starting your engine remove all fingerprints from chrome with a quality wax or chrome polish. Failure to do so can cause chrome discoloration. Due to fluctuations in fuel delivery settings, timing, etc., Cobra Engineering does not warrant against chrome discoloration. DOCUMENT NO. 0018 REV.
Need help?
Do you have a question about the Ride Loud and is the answer not in the manual?
Questions and answers