
Related Manuals for Hikki Sotiga


Summary of Contents for Hikki Sotiga
- Page 1 Sotiga grytan How to assemble the Sotiga grytan hot tub and how to make a fi re Monterings och eldningsanvisning för badkaret Sotiga grytan...
- Page 2 Exclusive simplicity Det exklusiva i det enkla...
- Page 3 Please note especially the maintenance instructions regarding the product’s wooden details and how to operate the fireplace and it’s parts. Hikki will not be liable for any product or personal damages arising from the buyer’s or any other person’s use of the product for other purposes than the expected or failure to follow the instructions relating to the product’s use.
- Page 4 Hikki ansvarar inte för fel på produkten eller personskador som uppkom mer som en följd av att köparen eller annan som brukar produkten gör det för annat ändamål än det förutsatta eller att produkten brukas på...
- Page 5 Assembly Montering...
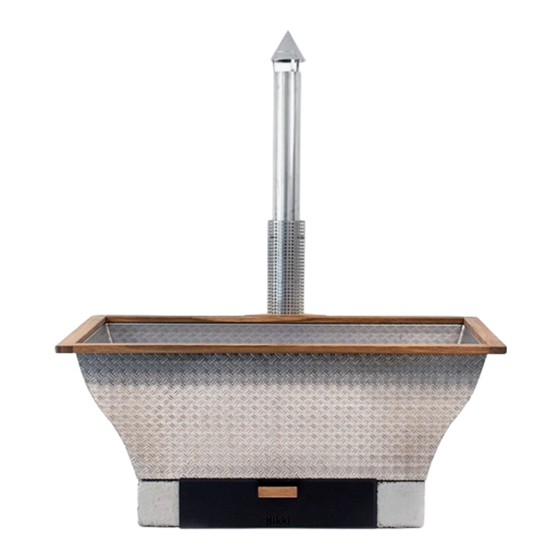
- Page 6 Inside the package Inuti paketet Sotiga grytan Sotiga grytan Bottenplåten Bottom plate Bottentrallen Oak deck...
- Page 7 Kaminrörshållaren Wooden chimney pipe holder Nedre kaminrör Bottom chimney pipe Beröringsskydd Heat guard Övre kaminrör Upper chimney pipe Kaminrörshatt Chimney hat Röklåda Smoke box G Trör G Tpipe Lock Hatch Gummiplugg Rubber plug...
- Page 8 Kratta till en fin och jämn yta. Underlaget måste vara brandsäkert. Rake until you get a smooth surface. The ground must be fireproof.
- Page 9 Lägg ut lecablocken. Notera att Lecablocken inte följer med sotiga grytan, utan måste köpas separat från ditt närmsta byggvaruhus. Place the leca blocks. Note that the tub does not come with leca blocks, but you can get a pair from your local department store.
- Page 10 Montera ihop tröret med röklådan. Intagen för röken ska vara uppåt. Lecablocken har dimensionerna 19x19x59 cm. Du kan måla eller putsa ytan om du vill få en annan karaktär på blocken. Attach the tpipe to the smoke box. The inlets for the smoke must be positioned upwards.
- Page 11 Använd ett vattenpass för att se att lecablocken ligger vågrätt över kortsidan... Use a spirit level to make sure that the blocks lays flat without any tilt.
- Page 12 Och att dom ligger vågrätt längs långsidan. And also for the long side.
- Page 13 Se till att distansen mellan lecablocken motsvarar distansen på skorstenens sida. Check that the distance between the blocks is equal.
- Page 14 Se till att lecablocken ligger vågrätt även här. Also, make sure that there’s no tilt for this side.
- Page 15 Passa in luckan. Om du har ett mjukt underlag kan du gräva en luftkanal för bättre drag vid eldning. Fit the hatch. If you have a soft foundation, then you can dig a small passage under the hatch to let extra air in during firing.
- Page 16 Lyft bort röklådan och lägg ut ett 6mm grovt eldfast garn (av typen som man har runt fönster på kaminer). Tätar mot eventuellt tjuvdrag. Kan även fungera utan om du passar in rökgasdelarna noggrant. Remove the smoke box. Place a thick (6mm) fireproof rope on top of the blocks and let them hang down as the picture shows.
- Page 17 Ställ tillbaka röklådan och lägg på ytterligare ett eldfast snöre ovanpå själva röklådan för extra tätning. Put the smoke box back in place. Place an additional piece of rope on top of the box for a tight air seal.
- Page 18 Du kan också bygga en stenbädd att elda på. Fördelen med en stenbädd är att den är enklare att rengöra från kol och skräp. You could also build a stone bed to make your fire on top of. The ben efit of a stone bed is that it’s easier to clean up from soot and debris.
- Page 19 Tippa upp karet så att långsidan med de förborrade hålen blir lätt åtkomlig. Kaminrörhållarens beslag är förmonterade, så du behöver bara passa in de mot de förborrade hålen och skruva fast den. Tilt the tub so that the long side with the predrilled holes are easily accesible.
- Page 20 Skruva sedan löst på det böjda beslaget som ska kroka i beröringsskyddet runt skorstenen. Du kommer att dra åt det hårdare senare. Then screw the bent fitting onto the rim of the tub. Leave a little give so you can move the fitting back and forward. You will fasten it tightly in a later step.
- Page 21 Placera karet på lecablocken. Place the tub on top of the blocks.
- Page 22 Lägg i bottenplåten. Den fördelar det varma vattnet ut mot kanterna av karet så att det inte stiger upp rakt under rumpan! Place the bottom plate in the tub. It distributes the hot water along the sides of the tub instead of having it go straight up and risking burning of your precious butt.
- Page 23 Lägg i bottentrallen. Place the oak deck.
- Page 24 Gör en enkel knut som du lätt kan knyta upp senare. Knuten håller trallen på plats så att den inte flyter upp. Make a simple knot on both sides in the first gap in the oak deck. This prevents the deck from floating up.
- Page 25 Skruva i pluggen i badkarets tapp. Om du istället vill leda bort vatten via slang vid tömning beskrivs hur du gör på sid 32. Screw the rubber plug into the spigot of the tub. If you prefer to direct water from the tub using a hose, then you could read more on page 32.
- Page 26 Så här ska den iskruvade pluggen sitta. This is how the mounted plug should sit in the spigot.
- Page 27 Placera det korta röret på rökstosen med flänsen uppåt. Mount the short piece of the chimney pipe on the tpipe part of the smoke box. spigot with the flange upward.
- Page 28 Trä det långa röret på det korta och trä över beröringsskyddet. Dra inte åt skruvarna på beröringsskyddet ännu. Mount the long piece of the chimney pipe onto the short piece of the chimney pipe. Lower the heat guard over the finished chimney. Leave the mounted screws in the heat guard loose for now.
- Page 29 Beslaget som du monterade i steg 15 kommer att hålla beröringsskyddet på plats mot hållaren. The fitting you mounted in step 15 will hold the heat guard and chimney in place against the wooden holder.
- Page 30 Den böjda delen på beslaget ska kroka fast i beröringsskyddet. Dra sedan in det mot badkarets kropp så långt det går, och dra sedan åt skruven så att beslaget sitter fast. Dra sedan åt de förmonterade skruvarna i beröringsskyddet så att det fixeras mot kaminröret. See that the fitting hooks into the heat guard.
- Page 31 Trä på den spetsiga hatten. Den minskar gnistor i luften och ger karaktär åt Sotiga grytan. Mount the chimney hat. It decreases sparks and gives a nice char acter to the tub.
- Page 32 Fyll på vatten minst 1 decimeter över bottentrallen innan du börjar elda, annars riskerar aluminiumet i karet att ta skada. Låt elden slockna innan du tömmer karet. Fill the tub with water. Make sure that the water measures at least 1 decimeter over the oak deck before you light the fire, otherwise you risk to damage the aluminium in the tub.
- Page 33 Tänd brasan. Light a fire.
- Page 34 När elden har tagit sig gör du en bred eldbädd som täcker hela utrymmet. When the fire is going, place wood over the whole space between the blocks.
- Page 35 Ställ dit locket. Om du behöver mera drag kan du ställa det med lite lutning så att det lämnas en glipa på kortsidorna. Place the hatch. If the fire need more air, then you can tilt the hatch a little bit in order to let air in on the sides.
- Page 36 Skulle underlaget vara för ojämnt för att luckan står av sig själv kan du tälja en lite pinne som stöd. Should the foundation be too unewen for the hatch to stand by itself, carve a small stick for support.
- Page 37 Tips: om du lägger liggunderlag på vattenytan förkortar du upp värmningstiden. Tip: if you lay a couple of sleeping pads on top of the water you reduce the heating time.
- Page 38 Viktigt! Om du lägger den heta luckan åt sidan var noga med att lägga den så att det inte finns någon risk att någon trampar på den och bränner sig, det är särskilt viktigt när barn badar. Important! If you put the hot hatch aside, be sure not to put it where there’s any risk for anyone stepping on it.
- Page 39 Om du vill leda bort vattnet via slang kan du använda en kulventil istället för gummipluggen (se sid 18). Den invändiga gängan på badkarstappen tillåter montering av en 3/4” (R20) kulventil. Kulventilen följer ej med utan måste köpas från lämplig VVShandel. If you want to empty the tub through a hose, first attach a 3/4”...
- Page 40 En sexkantsnippel med 3/4” passar för kulventilen,därefter kan du göra en övergång som passar en slang. Then attach a hose connector. It must fit the thread on the ball valve.
- Page 41 Trä slangen över tappen på din anslutning. Fäst slangen ordentligt med en slangklämma. Attach the hose to the hose connector, and secure it in place using a hose clamp.
- Page 42 Du kan montera en slang direkt på karets tapphål med en slang klämma. Tappen på badkaret har en yttre diameter på 30mm. You could also connect a hose directly to the spigot of the tub...
- Page 43 Om du vill montera en slang direkt mot badkarets tapp har du ändå möjlighet att montera en kulventil längre ut längs slangen..and put a ball valve as a connection between two hoses.
- Page 44 Maintenance & info Skötsel & information...
- Page 45 The Hikki Sotiga grytan hot tub is Två års garanti utgår för Hikki covered by a two year warranty, Sotiga grytan förutsatt att följande providing that the following rules of regler för handhavande efterföljts. maintenance are met. • Badkaret är tillverkat av alumini...
- Page 46 • The nonremovable wooden • Den fasta träsargen på badkaret frame on the tub should be oiled with bör oljas in med lämplig olja för trä. an appropriate type of oil. Make sure Du bör själv ta reda på att du inte that you are not allergic to the oil you är allergisk mot den olja som du choose.
- Page 47 • For the first year of usage of a • Under första årets bruk av nytt new Hikki hot tub, the water must badkar skall vattnet tappas ur efter be drained within 24 hours after varje bad inom ett dygn.
-
Page 48: Product Specifications
Height with blocks 75cm Höjd med lecablock 75cm Total weight 72 kg Totalvikt 72 kg Capacity 380 litre Badklart 380 liter Time to heat 1,2–2 hour Uppvärmningstid 1,2–2 timmar Design protection at PRV No. 80830 © Hikki 2012. All rights reserved. - Page 49 Designed by Per Enoksson Hikki, Sweden Made in Latvia by highly skilled artisans www.hikki.se...
Need help?
Do you have a question about the Sotiga and is the answer not in the manual?
Questions and answers