Hikki Bohemen How To Assemble
Hide thumbs
Also See for Bohemen:
- Assembly instructions manual (26 pages) ,
- Instruction manual (20 pages) ,
- Manual (13 pages)

Related Manuals for Hikki Bohemen


Summary of Contents for Hikki Bohemen
- Page 1 Bohemen How to assemble the Bohemen hot tub and how to make a fire Monterings- och eldningsanvisning för badkaret Bohemen...
- Page 2 © Hikki 2012. All rights reserved. Design protection at PRV No. 80830...
- Page 3 Hikki ansvarar inte för fel på produkten eller personskador som uppkommer som Hikki will not be liable for any product en följd av att köparen eller annan som or personal damages arising from the brukar produkten gör det för annat än- buyer’s or any other person’s use of...
- Page 4 Assembly Montering Assembling the tub is really easy, it just Att montera karet är väldigt enkelt, det takes a couple of minutes and you can’t tar bara ett par minuter och du kan i go wrong, basically. Each part fits it’s princip inte göra fel.
-
Page 5: Interior Parts
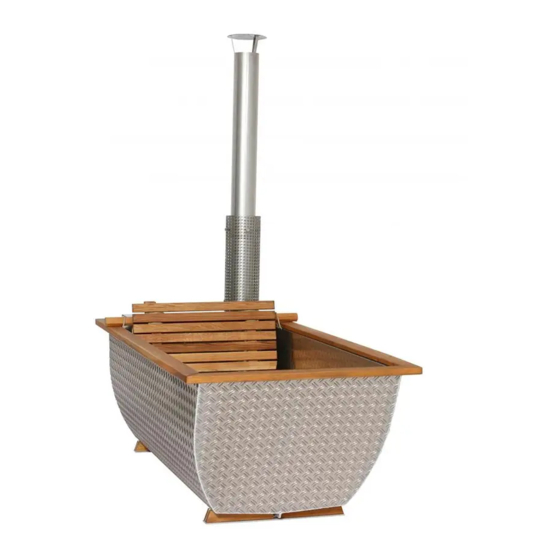
Interior parts Badkarets delar Stove Kamin Chimney pipes (2 parts) Kaminrör (2 delar) Touch guard Beröringsskydd Chimney hat Rörhatt Stove lid Kaminlock Back support 1 Ryggstöd 1 Back support 2 Ryggstöd 2 Bottom deck Bottentrall Back support holder Stödpinne för ryggstöd... - Page 6 This is what the assembled tub should look like. Assemble in this order: Insert the stove (A), insert the first backrest (B), the bottom deck (C) and the second backrest (D), using the wooden rod (E) as a supoort. Såhär ska det färdiga badkaret se ut. Montera det i följande ordning: Sätt i kaminen (A), sätt i det första ryggstödet (B), därefter bottentrallen (C) och till sist det andra ryggstödet (D) där du använder trästaven (E) som stöd.
- Page 7 Place the hot tub on a flat, solid surface. Bohemen will become quite heavy when it is filled with water and people bathing, so make sure that the sur- face can withstand the weight. Placera karet på stabilt underlag. Bohemen blir ganska tung när den är full av vatten och badande människor.
- Page 8 Use the supplied bolts to fasten the backrest to the bolt brackets. Place it so that the head of the bolt sits on the inner side of the bracket, the head prevents the bottom deck from floating up. There’s noo need for a screw-nut on the opposite side.
- Page 9 Since wood is a living material that expands/contracts over time depend- ing on humidity, you might have to make a notch in the bottom deck in order for it to fit. This doesn’t apply to a brand new tub, but might be the case after a years use or so.
- Page 10 Slide the support rod in through the rope loops. Make sure the support rod reaches all the way through to the opposite side and rests in a secure position. Skjut in stödpinnen genom repöglorna. Se till att stödpinnen är helt i läge och vilar mot karets båda sidor.
- Page 11 Mount the shortest piece of the chimney pipe on the stove spigot with the flange upward. Then slide the heat shield over the pipe - but don’t fasten the bolts yet. Placera det korta röret på rökstosen med flänsen uppåt. Trä sedan på värmeskölden, men vänta med att dra åt skruvarna.
- Page 12 Place the long pipe on top of the short pipe. Then lift up the heat shield and tighten the screws. The shield should sit at a position so that it protects you if you would lean back or move your arm back over the backrest. Placera det långa röret ovanpå...
- Page 13 Unscrew the left drain pipe plug to empty the tub of water. The connection is threaded so that you can connect a valve or a tube with a ISO G20 (3/4”) connection, or a thread a tube over it and securing it with a hose clamp. Skruva ur den vänstra pluggen för att tömma karet på...
- Page 14 If you don’t want to empty the tub where it stands, simply attach a hose and a valve. This allows you to empty the water wherever you prefer. The outer dimension of the protruding connection is 30mm. If you have trouble threading the hose over the connection, use a heat gun to soften the hose.
- Page 15 You can purify the water by attaching a sand filter or by hanging a filter pump over the edge of the tub. Only use chlorine free purification, since chlorine might discolour the aluminum. Only use acid proof stainless steel hose clamps. Man kan rena vattnet med ett sandfilter eller en liten filterpump som man hänger över kanten.
- Page 17 Some notes on aluminum Kort om aluminium The body of this tub is made from salt Metallen i detta badkar består av water resistant aluminum. When the tub saltvattenbeständig aluminium. När is new the metal has a shine to it and is a karet är nytt är metallen blank och lite bit more sensitive to corrosion, therefore känsligare för korrosion, lämna därför...
- Page 18 SAND FILTER PUMP SAND FILTER HOSE DRAIN HOSE This is what a solution for external purification and electric heating of the water can look like. Dirt and colder water are sucked from the tub through the center connection, goes through the sand filter and the heater, and then is released back in the tub underneath the bottom deck.
- Page 19 Insulation for the tub’s sides Floating water insulation Isolering för badkarets sidor Flytande vattenisolering If it’s cold outside, you might need to complement your electric heater with the insulations that we sell as accessories. The body insulation protects the tub from cold winds and prevents heat from evaporating from the body of the tub while the floating insulation prevents heat from evaporating upwards.
- Page 20 Remove the stove and the interior when cleaning the tub. Flush the tub with cold water and use a soft sponge to clean the tub. Give it a final rinse and empty the tub of water by tipping it over. Lyft ut kaminen och träinredningen när du rengör karet.
- Page 21 Making a fire Elda i kaminen Making a fire is just as easy as assem- Att elda i kaminen är lika enkelt som bling the tub, but since you’re dealing att montera karet, men eftersom det är with fire, it’s good to take some things frågan om eld så...
- Page 22 circulation pipes Before you make a fire in the stove, you must ensure that the water reaches at least 4 inches (10 cm) above the stove’s three circulation pipes. The stove is made of aluminum, and may be damaged if not cooled by the water when there’s a fire going.
- Page 23 Place the stove lid in this position to give the stove maximum air flow, and close/open it when you want to adjust the size of the fire. Never use the stove without the lid, and don’t open the lid more than the picure shows. Placera locket i detta läge för att ge kaminen maximalt drag när du tän- der en eld.
- Page 24 MIN. WATER LEVEL First of all - fill the tub with water. Fill it at least 4 inches / 10cm above the circulation pipes or a few inches below the inner stove pipe. Always have water in the tub when there’s a fire or glowing embers in the stove. Först av allt - fyll karet med vatten.
- Page 25 Set fire to a piece of birch bark or a firestarter. Do not use lighter fluid. Place the birch bark or firestarter in the stove, as close to the cirkulation pipes as possible. Let it burn for a minute before adding more tinder. The arrows shows the flow af air through the stove.
- Page 26 1. Add small logs and tinder sticks horisontally in the stove. Put the big logs to the sides and the smaller tinder in the middle. 2. Add another pieace of burning birch bark/firestarter close to the burn plate. The flames should always escape the stove through the chimney pipe, not the stove opening.
- Page 27 When the fire is going, fill the stove with logs. Add logs every 20 minutes or so. Keep a strong fire in the stove. Close the stove lid completely when the wa- ter have reached a pleasant temperature. If the water gets cold - open the lid again to allow for more draught.
- Page 28 1. Never leave the hatch off the stove, since this may result in flames es- caping the stove and scorching the wooden frame of the tub, or parts of the interior. 2. Don’t fill the stove with to much wood and make sure that the draught doesn’t run the wrong way, making the flames escape through the stove opening.
- Page 29 And lastly - make sure that the fire and embers have died out com- pletely before emptying the tub, otherwise the stove might warp from the heat. Och till sist - se till att all eld och glöd har slocknat helt innan du töm- mer karet, annars riskerar kaminen att skadas av värmen.
- Page 30 Tilt the backrest forward when you’re heating the water, this allows for more water to circulate around the stove, which gives you a shorter warm up time. Don’t forget to put the rod back (see step 5) to support the back rest before taking your bath.
- Page 31 Stir the water every time you add more logs to the fire. Use the wooden rod as a paddle. This mixes the water and shortens the warm up time even more. Rör om i vattnet när du lägger på mer ved, använd stödpinnen som hör till ryggstödet som paddel.
- Page 32 Never leave the hatch off the stove when there’s a fire going, since you might risk burning the wooden frame of the tub. Instead you have to adjust the draft by opening or closing the hatch, as shown in step 15 and 19. Elda aldrig i kaminen utan att ha locket på, annars riskerar du att bränna träsargen på...
- Page 33 When you need to empty the stove of ashes, simply lift it out of the hot tub, turn it upside down and shake it. Make sure that the fire has died out com- pletely before emptying the stove or the tub. När du ska tömma kaminen på...
- Page 34 Some notes on wood Kort om trä Wood is a living material that reacts Trä är ett levande material som rea- to temperature, moisture and sunlight. gerar på temperatur, fukt och solljus. Each type of wood has it’s own unique Varje träslag har sina egna unika set of properties, which can also differ egenskaper, och dom kan skilja även...
- Page 35 We recommend that you leave the wood untreated if you want a really eas- ily maintained tub. The wood will get it’s beautiful silver grey color over time, during this time it might develop stains and some discoloration, but these will eventually fade and leavy you with a beatiful silver grey color.
- Page 36 Remove the interior when storing it for longer periods. If you want to keep the color of the wood a golden brownyellow we advice you to store it in a garden shed or similiar. If you on the other hand prefer a silver grey color, lean it against a wall so that the suns UV-rays can bleach the wood.
- Page 37 After each bath, and especially before storing the tub and interior for a long time, it is important that you clean the parts thoroughly with a mild soap or dish soap, preferably a eco-friendly one. Don’t apply oil before storing the interior, instead apply oil at the start of the bathing season. Vi rekommenderar att du rengör badkaret och inredningen noga efter varje användning, och i synnerhet innan du ska förvara karet en längre tid.
-
Page 38: General Maintenance
General maintenance Allmänna skötselråd The Hikki Bohemen hot tub is covered by Två års garanti utgår för Hikki Bohe- a two year warranty, providing that the men förutsatt att följande regler för following rules of maintenance are met. handhavande efterföljts. - Page 39 Wood maintenance Skötselråd för trädelarna • Oiling the wood is not necessary. If •Det är inte nödvändigt att olja träet. you decide not to oil the wood, it will Låter du bli får det med tiden en vackert turn silver grey with time. During this silvergrå...
-
Page 40: Rengöring Och Förvaring
• be sure to wipe off drops of oil that •var noga med att torka bort droppar have been spilled on the aluminum as it av olja som har spillts på aliminiumet can cause stains. eftersom det kan orsaka fläckar. •... - Page 41 •If you store the tub outdoors for a • Vill du förvara karet utomhus över prolonged time: remove all the interior längre tid plockar du ur alla lösa delar. parts. Clean all parts thoroughly Rengör alla delar grundligt och låt and let them dry completely.
- Page 42 Product specifications Produktspecifikationer Hot tub and stove Badkar och kamin Salt water resistant aluminum Saltvattensbeständigt aluminium (alloy 5754) (legering 5754) Chimney, touch guard, chimney Rökrör, beröringsskydd, skor- hat, bolts and screws stenshatt, bultar och skruvar Acid proof steel Syrafast stål Wooden interior Träinredning Rope loops...
- Page 44 Designed by Per Enoksson Hikki, Sweden Made in Latvia by highly skilled artisans www.hikki.se Manual v.6 | March 2021...
Need help?
Do you have a question about the Bohemen and is the answer not in the manual?
Questions and answers