Table of Contents
Advertisement
Available languages
Available languages
Quick Links
USA office: Fontana
AUS office: Truganina
GBR office: Ipswich
If you're having difficulty, our friendly
customer team is always here to help.
FRA office: Saint Vigor d'Ymonville
USA:cs.us@costway.com
AUS:cs.au@costway.com
GBR:cs.uk@costway.com
FRA:cs.f r @costway.com
Ice Maker
Machine à Glaçons
FP10221US
THIS INSTRUCTION BOOKLET CONTAINS IMPORTANT SAFETY INFORMATION. PLEASE READ AND KEEP FOR FUTURE REFERENCE.
Advertisement
Table of Contents

Subscribe to Our Youtube Channel
Related Manuals for Costway FP10221US


Summary of Contents for Costway FP10221US
- Page 1 GBR office: Ipswich FRA office: Saint Vigor d'Ymonville USA:cs.us@costway.com If you're having difficulty, our friendly AUS:cs.au@costway.com GBR:cs.uk@costway.com customer team is always here to help. THIS INSTRUCTION BOOKLET CONTAINS IMPORTANT SAFETY INFORMATION. PLEASE READ AND KEEP FOR FUTURE REFERENCE. FRA:cs.f r @costway.com...
-
Page 2: Safety Information
Before You Start Please read all instructions carefully. Retain instructions for future reference. Separate and count all parts and hardware. READ ALL INSTRUCTIONS BEFORE USING Read through each step carefully and follow the proper order. IMPORTANT SAFETY INFORMATION READ ALL We recommend that, where possible, all items are assembled near to the area in INSTRUCTIONS BEFORE USING which they will be placed in use, to avoid moving the product unnecessarily once... - Page 3 ●This product must be properly installed and located in accordance ● Do not use with water that is microbiologically unsafe or of with the Installation instructions before it is used. unknown quality. ●When using electrical appliances,basic safety precautions should ● To avoid risk of injury, place power cord in such a way it cannot be be followed to reduce the risk of fire,electric shock and injury to pulled on by children or cause a tripping hazard.
-
Page 4: Quick Introduction
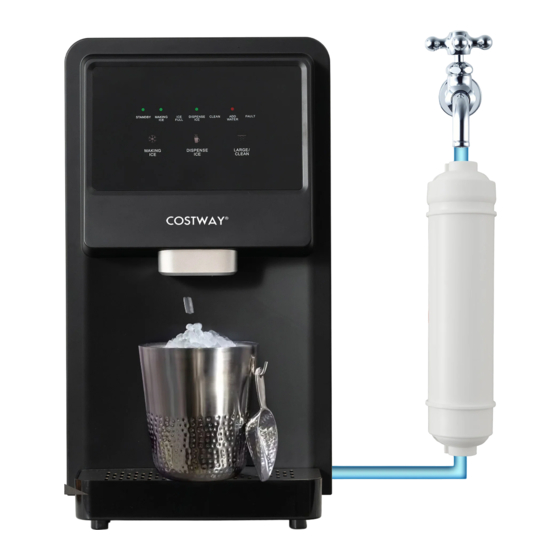
Quick introduction: Installation and setup Caution: Installation must be installed by professionals. Top cover Touch screen Connect to tap Side panel Dispense ice Front panel Bucket Filter Drip tray Water intake Anti-slip feet pipe 1/4”(0.6cm) Power cord Intake pipe Earthed socket Top cover Warning: Back panel... -
Page 5: Prepare For Use
Product is designed to be installed indoors. Do not use your ice maker outdoors. ■ Product must be installed upright on a flat, level surface that is able to support the total weight when full of water. ■ Ensure a minimum of 50cm/20inches clearance around the side and back walls of the ice maker for proper air circulation. -
Page 6: Understanding The Display
(1)Use tap water as water source Control board The filter you received is assembled, plug the water intake pipe (1)Standby: Plug the power cord into the socket will make the firmly into the connector at the back of the machine until you can’t machine enter standby mode. -
Page 7: Clean And Care
Common malfunction analysis Issues Check items Possible causes Solutions Power cord The plug didn’t plug into socket Plug into socket The fuse of PCB The fuse is broken Replace the fuse Broken Replace the PCB Ice full Ice full Take out some ice machine doesn’t Proximity switch is broken... - Page 8 Water pressure Lower water pressure Check the water source Nugget ice maker Harmful substance Water Change to a water source of Water temperature is high temperature lower temperature Category Accessories Take too Cr(VI) PBDE long to make ice Ambient temperature Ambient Change to a place of lower is too high or too low...
-
Page 9: Informations De Sécurité
● Ce produit doit être correctement installé et situé conformément aux instructions d'installation avant d'être utilisé. ● Lors de l'utilisation d'appareils électriques, des précautions de sécurité de base doivent être respectées afin de réduire les risques d'incendie, d'électrocution et de blessures aux personnes ou aux biens. Lisez toutes les instructions avant d'utiliser un appareil. - Page 10 ● Ne laissez pas les enfants grimper, se tenir ou s'accrocher à la machine à Introduction Rapide glaçons. Ils pourraient se blesser gravement. ● Ne pas utiliser avec de l'eau qui n'est pas microbiologiquement sûre ou de qualité inconnue. Couvercle supérieur ●...
-
Page 11: Installation Et Mise En Place
Installation et Mise en Place Le produit est conçu pour être installé à l'intérieur. N'utilisez pas votre machine à glaçons à l'extérieur. Attention : L'installation doit être réalisée par des professionnels. ■ Le produit doit être installé à la verticale sur une surface plane, de niveau et capable de supporter le poids total lorsqu'il est rempli d'eau. -
Page 12: Comprendre L'affichage
(1) Utiliser l'eau du robinet comme source d'eau Le filtre que vous avez reçu est assemblé, branchez fermement le tuyau d'arrivée d'eau dans le connecteur à l'arrière de la machine jusqu'à ce que vous ne puissiez plus l'insérer, et l'autre côté se connecte au robinet d'eau. -
Page 13: Nettoyage Et Entretien
Panneau de commande (1) STANDBY (MODE VEILLE) : Branchez le cordon d'alimentation dans la prise pour que l'appareil passe en mode veille. (2) Touchez l'icône « MAKING ICE », « DISPENSE ICE », « CLEAN » en mode veille, l'indicateur sélectionné clignote. (3) MAKING ICE (FABRICATION DE GLACE) : Appuyez sur l'icône «... - Page 14 Analyse des Défauts Courants Il faut trop de Pression de l'eau Faible pression d'eau. Vérifiez la source d'eau. Problèmes Éléments à vérifier Causes possibles Solutions temps pour Température de l'eau La température de l'eau est Changez pour une source Cordon La fiche n'a pas été...
- Page 15 Machine à Glaçons Substance nocive Catégorie Accessoires Return / Damage Claim Instructions Cr(VI) PBDE DO NOT discard the box / original packaging. In case a return is required, the item must be returned in original box. Without this Composant ○ ○...
Need help?
Do you have a question about the FP10221US and is the answer not in the manual?
Questions and answers