Table of Contents

Related Manuals for Camp Chef PGSBXXL


Summary of Contents for Camp Chef PGSBXXL
- Page 1 OWNER’S MANUAL MODEL PGSBXXL A MAJOR CAUSE OF FIRES IS FAILURE TO MAINTAIN REQUIRED CLEARANCES (AIR SPACES) TO COMBUSTIBLE MATERIALS. IT IS OF UTMOST IMPORTANCE THAT THIS PRODUCT BE INSTALLED ONLY IN ACCORDANCE WITH THESE INSTRUCTIONS.
- Page 2 IMPORTANT SAFETY WARNINGS READ AND FOLLOW ALL INSTRUCTIONS BEFORE INSTALLING AND USING THE APPLIANCE Please read this entire manual before installation and use of this pellet fuel-burning appliance. Failure to follow these instructions could result in property damage, bodily injury, or even death. Contact local building or fire officials about restrictions and installation inspection requirements in your area.
- Page 3 WARNING CLEANING: • Normal use will create a buildup of prior to turning the smoker to high. ash, grease, and creosote inside Excessive buildup of grease and the smoker. The smoker must be creosote may result in a grease fire. thoroughly cleaned after every 50 If a grease fire does occur, turn off hours of use or if a buildup of grease or...
-
Page 4: General Warnings
GENERAL WARNINGS PRE-USE INSPECTION: • Do not operate appliance under • Use only on a level, stable non- ANY overhead construction. Keep a combustible surface like bricks, concrete minimum clearance of 36 inches (0.9 or dirt. Do not use this appliance on any m) from the sides, front and back surface that will burn or melt like wood, of appliance to ANY construction. - Page 5 CLEANING: • Creosote – Formation and need for • Ashes should be placed in a metal removal. When wood pellets are container with a tight fitting lid. The burned slowly, they produce tar and closed container of ashes should be other organic vapors that combine with placed on a non-combustible floor expelled moisture to form creosote.
-
Page 6: Table Of Contents
WELCOME TO THE FAMILY Being a part of the Camp Chef family means more than just using our products, it also provides a sense of community. We know every good time starts with an invitation, and there’s no better enticement than great-tasting food. And the best food, we believe, is cooked with a flame and kissed by smoke. -
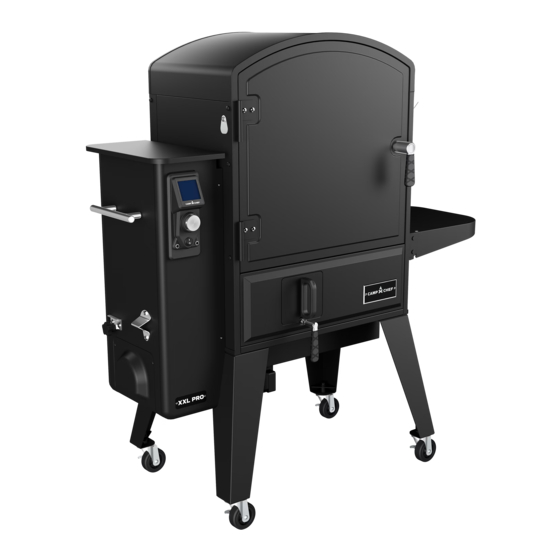
Page 8: Xxl Pro Overview
Monitor the grill and food contents using a smart phone and the Camp Chef Connect app. Set timers, change temperature settings, and even tailor smoke levels from 1-10 using Smoke Control. RACKS + HOOKS... - Page 9 MORE SMOKE, MORE FLAVOR...
- Page 10 USING THE SMOKE BOX HOW TO USE THE SMOKE BOX 1. Slide the Smoke Box out the front of the smoker by pulling on the handle. 2. Add your desired fuel of hardwood chunks, hardwood chips, or charcoal. 3. Push the Smoke Box back in until the gasket seals the front of the slide chamber.
-
Page 11: Controller Overview
CONTROLLER OVERVIEW Menu Navigation Fahrenheit /Celsius Indicator Probe 1 Temperature WiFi Indicator Probe 2 Temperature Bluetooth Indicator CONTROLLER FUNCTION OVERVIEW To navigate, rotate the dial to scroll through menus and press the dial to select. Main menu: Push the controller dial to enter the main menu. The main menu allows you to set the temperature of your smoker, initiate fan mode, feed pellets through the auger, change from Fahrenheit to Celsius, Connect the device to WiFi,... -
Page 12: Quick Start Guide
Before you start your first cook, you’ll need to burn-in your smoker, which will burn off any residual oils left over from the manufacturing process. 1. Fill the hopper with pellets. For best results we recommend using Camp Chef Premium Hardwood Pellets. Use only food grade hardwood pellets, NOT softwood or heating pellets. - Page 13 4. Allow FEED cycle to finish running. Once the feed cycle has finished, as shown on the countdown, the controller will return to the main menu and the auger tube will be filled with pellets. 5. Empty the burn cup and replace it. Empty out the burn cup by pulling the clean-out knob on the side of the smoker.
- Page 14 QUICK START GUIDE CONTINUED 7. Select SET TEMP and set the temperature to 350°F. 8. Set the smoke setting to 1. For the initial burn-in you should just a smoke number of 1 since you aren’t cooking any food. To learn more about smoke settings, see page 26. 9.
- Page 15 10. Allow the smoker to reach 350°F. Once the feed cycle has finished, the controller will return to the main menu and the auger tube will be filled with pellets. 11. Allow the smoker to cook for 30 minutes. This burns off any residual oils used in the manufacturing process.
-
Page 17: Using Your Smoker
Now that your new smoker has been properly seasoned you are ready for your first cook. Follow these instructions every time you operate your smoker: 1. Fill the hopper with pellets. For best results we recommend using Camp Chef Premium Hardwood Pellets. Use only food grade hardwood pellets, NOT softwood or heating pellets. - Page 18 USING YOUR SMOKER CONTINUED 4. Plug in your smoker and turn it on by pressing the power switch. If controller does NOT turn on, check to make sure the outlet has power by testing another appliance or by checking the breaker and/or GFCI switch. For further help see the troubleshooting section of this manual on page 35.
- Page 19 7. Open the smoker door (leave open during entire startup cycle) The startup cycle lasts 6 minutes ALWAYS start the smoker with the door open and leave open during the entire startup cycle, not just for the initial burn-in. 8. Place your food on the smoker. 9.
- Page 20 USING YOUR SMOKER CONTINUED 10. Insert the probe through the stainless flap on the side of the chamber. 11. Insert the probe into your food. To get the most accurate temperature readings make sure to insert the probe tip into the thickest part of the meat and not touching any bone.
- Page 21 13. Select SHUTDOWN from the main menu. During SHUTDOWN the fan will remain on for 20 minutes to finish burning any pellets in the burn cup and cool the smoker down. After 20 minutes the screen will turn off and the grill can be unplugged.
-
Page 23: Using Your Wifi Controller
USING YOUR WIFI CONTROLLER CONTROLLER FUNCTION OVERVIEW We will walk you through the basic functions of your controller in the next few pages. To navigate, rotate the dial to scroll through menus and press the dial to select. Main menu: Push the controller dial to enter the main menu. - Page 24 USING YOUR WIFI CONTROLLER CONTROLLER FUNCTION OVERVIEW CONT. Set temperature: Use this setting to set your temperature (150 - 350˚F). Rotate the dial to the desired temperature and press to confirm. After setting your temperature you will be prompted to set your smoke level.
- Page 25 Switch between Fahrenheit and Celsius. About: 1. Program: Check your program firmware version, your grill ID, or connection status. 2. Grill ID: Add your smoker to your devices in the Camp Chef Connect App. 3. Connection: Verify your connection status Reset: Reset your WiFi and Bluetooth history from the controller.
- Page 26 USING YOUR WIFI CONTROLLER Set smoke level: Use this setting to adjust the smoke level. Rotate dial to the desired smoke setting and press to confirm. The smoke setting can be adjusted from 1-10. A smoke setting of 1 will produce less smoke and maintain a more even temperature.
- Page 27 Bypass: Use bypass in the case of power failure/accidentally outage or you need to restart the grill and it is still hot. Use only if grill has been off for less than 3-4 minutes. This method is used to bypass the normal startup, ignite new pellets, and get back to cooking.
-
Page 28: Camp Chef Connect App
3. Turn the smoker controller on using the main power switch on the controller. 4. Open the Camp Chef Connect app and follow the setup instructions to set up an account. 5. Click on devices, then select add a new device. - Page 29 CAMP CHEF CONNECT APP FUNCTIONS The Camp Chef Connect app lets you do everything the controller can do and more. Probes: Your smoker comes with two probe ports. Organize your probes by naming them within the app and assigning them target temperatures.
- Page 30 If you’re a pellet head like Disposing of ash: we are at Camp Chef, you’ll find yourself doing this If the ash is completely cool, it can be wrapped up routine more often. Luckily, it’s quite simple.
- Page 31 Use something with a flat edge (a properly, pellets are the first thing to check. paint stick, pan scraper, etc.) to dislodge and The use of Camp Chef pellets is recommended remove it. but not required. Camp Chef pellets are 100%...
- Page 32 FREQUENTLY ASKED QUESTIONS Do you need to use pellets all the Pellets are the main source of fuel on this pellet smoker. time? Even if you are not wanting to smoke the food? Can I use other brands of pellets? Yes, however some flavors and brands of pellets burn differently than others.
- Page 33 Why is my smoker fluctuating in Temperature variation is normal. Your smoker will not have temperature? the same temperature readout like an oven (even though your oven at home has a similar temperature fluctuation.) It is programmed to let the flame go out and smolder, creating more smoke.
- Page 34 Smoke Numbers from the controller itself. Can I add multiple smokers to the Yes. After you’ve set them up within your Camp Chef account app? you can easily switch between smokers within the app. Can I run one smoker with multiple Yes.
-
Page 35: Troubleshooting
TROUBLESHOOTING Why does my smoker not turn on Make sure the smoker is plugged into a powered outlet. Check after switching the power button to the circuit breaker and/or GFCI switch, or test the outlet using the on position? another appliance. Unplug the smoker and check the fuse located by the power cord inlet, on the back side of the hopper. - Page 36 • In your phone settings, click the ‘show password’ icon to review your network password to ensure there are no typos in the Camp Chef app. Note: WiFi hidden networks and open networks are not supported. What do the Bluetooth and WiFi 1.
- Page 37 TROUBLESHOOTING - ERROR CODES SENSOR This is an error code that occurs with the meat probe. Check to – – – see if you have your meat probe inserted into the port on the faceplate. If you have your meat probe inserted, try unplugging the probe and then plugging it back in.
-
Page 38: Service And Warranty
(iii) excessive humidity, (iv) chlorine, (v) industrial fumes, (vi) fertilizers, (vii) lawn pesticides, (viii) salt, (ix) other substances, (x) normal wear and tear; and warping of the drip tray or heat baffle. Camp Chef takes every precaution to utilize materials and finishes that retard rust and stand up to normal use. - Page 40 REPLACEMENT PARTS MODEL PGSBXXL Item Part Number Description Quantity Item Part Number Description Quantity SMV-45 Jerky rack PGXXL-17 XXL Door Handle SSG24 Sausage rack PGSBXXL-12 XXL Folding Shelf SMV-38 Cooking rack PGSBXXL-13 Outer hook PGSBXXL-1 Grease Tray PGSBXXL-14 Shelf bracket...
- Page 41 HOPPER REPLACEMENT PARTS Item Part Number Description Quantity Item Part Number Description Quantity PGSBXXL-17 Hopper lid PG24-25 Auger pin with w/ nut PGSBXXL-18 Auger Guard PGC24-8 Auger PGC24-18 Lid magnet PG24-21 Heating rod PGSBXXL-20 Hopper body PG24-78 Burn cup PGXXL-22WF...
- Page 42 CONTROLLER WIRING DIAGRAM CAUTION This device complies RTD Sensor with Part 15 of the FCC rules. Operation is subject to the following two conditions: 1 this Controller device may not cause harmful interference, and 2 this device must accept any interference received, including interference that may cause...
- Page 44 #FEED YOUR SIDE www.CampChef.com | 1.800.650.2433 • Camp Chef is a registered trademark of Logan Outdoor Products ©2022 • Patent Pending • 301 Camp Chef Way, Hyde Park, UT 84318, USA • 1122_PGSBXXL_Booklet...
Need help?
Do you have a question about the PGSBXXL and is the answer not in the manual?
Questions and answers