Advertisement
Quick Links
=
Furniture Solutions
Imported by Furniture Solutions (Aust) Pty Ltd New South Wales, Australia.
For any assistance with assembly or for missing parts please contact:
Place of purchase or Furniture Solutions on below
Customer Service (Australia) Phone-1300 794 188
Email-customerservice@furnituresolutions.com.au
=
INSTRUCTION MANUAL
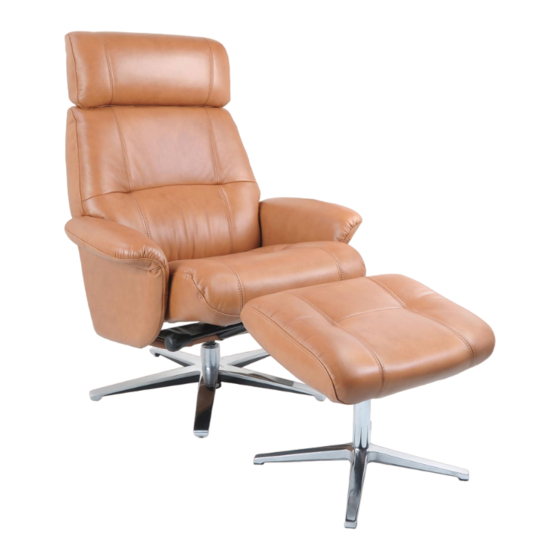
HENRI
RECLINER CHAIR & FOOTSTOOL
CODE: 19HEN
1 of 13
Advertisement

Related Manuals for Furniture Solutions Henri 19HEN


Summary of Contents for Furniture Solutions Henri 19HEN
- Page 1 HENRI RECLINER CHAIR & FOOTSTOOL CODE: 19HEN Imported by Furniture Solutions (Aust) Pty Ltd New South Wales, Australia. For any assistance with assembly or for missing parts please contact: Place of purchase or Furniture Solutions on below Customer Service (Australia) Phone-1300 794 188 Email-customerservice@furnituresolutions.com.au...
-
Page 2: Pre-Assembly Preparation
7.Do not over tighten the screws and bolts as this may damage the threads MINUTES ALLOW TIME PEOPLE REQUIRED For any assistance with assembly or for missing parts please contact: Place of purchase or Furniture Solutions Customer Service (Australia) Phone - 1300 794 188 Email- customerservice@furnituresolutions.com.au 19HEN... -
Page 3: Parts List
PARTS LIST 4PCS 3PCS M8X35 M6X20 6PCS M6X20 Footstool post Knob/Shaft Chair post 1.Seat Cushion 2.Backrest Cushion 3.Armrest Pads 5.Chair Base 6.Footstool base 4.Footstool Cushion 19HEN... - Page 4 Please prepare work area as instructed in page 2: To Assemble Footstool: Identify required hardware before you start assembly. Note do not over tighten any bolts, tighten only until feels firm. Take footstool cushion [4], place upside down as per diagram. Next take footstool stem [B] and aline all 4 holes as indicated in diagram.
- Page 5 To Assemble Chair, chair base assembly You will need the help of another person thru this stage. As indicated on diagram place chair base [5] on a flat level surface. Take chair stem [C] insert thicker end into chair base, check that it is square. With help of another person pickup chair seat cushion and frame [1], locate hole in middle of frame under cushion, insert squarely onto chair and stem as indicated in diagram, check that it is fitted correctly should be no movement in lower frame.
- Page 6 To Assemble Chair, Backrest assembly You will need the help of another person thru this stage. Next is to fit backrest [2] to seat cushion. You will note that seat cushion can move forward and backward, please position seat cushion so you have a clear view of threaded bolt hole in black frame at back of cushion, you may need to move leather to view holes.
- Page 7 To Assemble armrest pads: To fit armrest pads [3] you will be required to pull backrest back to be as flat as possible. Please position armrest pad as per diagram, aline holes in chair frame to threaded holes in armchair pads, insert bolt [E] into hole of frame and into threaded hole of arm pads, turn 2-3 times to seat thread correctly.
- Page 8 ASSEMBLY IS COMPLETE 19HEN...
- Page 9 FEATURE’S AND OPERATING OF RECLINER Operation of Recliner: Locking of backrest in desired position. The locking mechanism is design for variable recline positions, so you can find the preferred angle for siting. Turn knob (locking arm) clockwise to lock and anti clockwise to loosen. FEATURE: Swivel base.
- Page 10 FEATURE’S AND OPERATING OF RECLINER Feature of Recliner: Adjustment of head rest: Internal Adjustable head rest for variable positions. Please review diagrams below before operating headrest function. 19HEN...
-
Page 11: Care And Maintenance
CARE AND MAINTENANCE Varieties of materials are used in construction of “Recliner” furniture range, Such as Stainless Steel; Nickel plated steel; Chrome plated steel; Powder coated steel; Timber, Leather, PU synthetic fabric & a variety fabrics. All will require some form of maintenance to extend the life of finishes and general appearance. Please see below instruction unique to your chosen model. -
Page 12: Safety Warnings And Advice
SAFETY WARNINGS AND ADVICE Notices and Advice Please be advised that products are limited in design for residential use only and are not suitable for commercial use. Please be advised that materials used in your furniture are not impervious to neglect, acts of god, abuse, alcohol spills, improper use of chemicals such as bleach or any solvent based products. - Page 13 To make a warranty claim, customers can either contact the retailer where the purchase was made or Furniture Solutions on contact details on page one. Proof of purchase will be required before proceeding with any claim. In the case of product defects providing photos may be able to speed up processing of the claim.
Need help?
Do you have a question about the Henri 19HEN and is the answer not in the manual?
Questions and answers