
Subscribe to Our Youtube Channel
Related Manuals for Vmac A800185


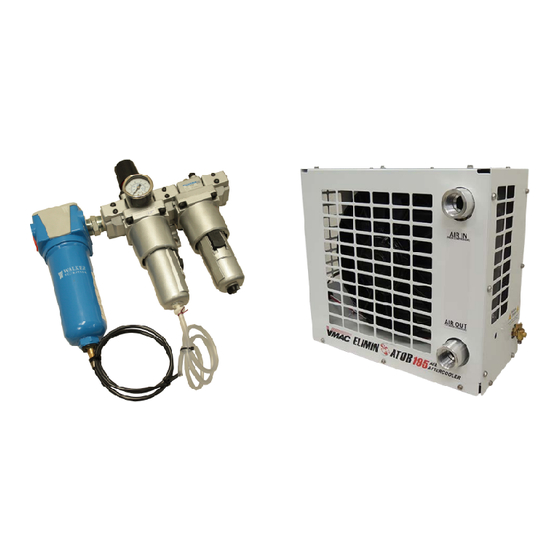
Summary of Contents for Vmac A800185
- Page 1 ® Installation and Owner’s Manual for VMAC Accessory A800185 Air Aftercooler (185 cfm) www.vmacair.com www.vmacair.com...
-
Page 3: Table Of Contents
Operation ............16 VMAC - Vehicle Mounted Air Compressors VMAC Technical Support: 888-241-2289 VMAC Knowledge Base: kb.vmacair.com... - Page 4 Copyright © 2023 VMAC Global Technology Inc. All Rights Reserved. These materials are provided by VMAC for informational purposes only, without representation or warranty of any kind, and VMAC shall not be liable for errors or omissions with respect to the materials. The only warranties for VMAC...
-
Page 5: Safety
VMAC will not be held responsible for any liability, consequential damages, injuries, loss or damage to individuals or to equipment as a result of the failure of anyone to properly adhere to the procedures set out in this manual or standard safety practices. -
Page 6: Warranty
Warranty registration for VMAC systems can be completed online or by filling in the form at the back of each system installation manual. Warranty registration must be completed and sent to VMAC at the time the system is put into service for any subsequent warranty claim to be considered valid. - Page 7 VMAC will provide direction for repair or replacement of the failed components. If requested, failed parts must be returned to VMAC for evaluation. 4) Dealers may login to the VMAC website to view the "VMAC Labour Time Guide" (under “Agreements”) to see the allowable warranty labour times.
-
Page 8: General Information
Please contact VMAC for replacement hoses and further information. Ordering Parts To order parts, contact a VMAC dealer. The dealer will ask for the VMAC serial number, part number, description and quantity. Locate the nearest dealer online at www.vmacair.com/dealer-locator or call 1-877-912-6605. - Page 9 All fasteners must be torqued to specifications. Use manufacturers’ torque values for OEM fasteners. The torque values supplied in Table 1 are intended for VMAC supplied components, or for use as a guide in the absence of a torque value provided by an OEM.
-
Page 10: Illustrated Parts List
Illustrated Parts List ×2 ×34 ×6 ×4 ×6 ×6 ×4 ×4 ×4 ×2 ×2 ×2 VMAC - Vehicle Mounted Air Compressors VMAC Technical Support: 888-241-2289 VMAC Knowledge Base: kb.vmacair.com... - Page 11 O-RING, VITON, ORB-16 5830116 HARNESS, FAN, A800185 3550891 COOLER, #16 ORB PORTS 3600124 FAN, 11” PUSHER 12V 3501070 WASHER, FLAT, 3/16 1570163 NUT, NYLOCK, 10-32 1550524 VMAC - Vehicle Mounted Air Compressors VMAC Technical Support: 888-241-2289 VMAC Knowledge Base: kb.vmacair.com...
- Page 12 NIPPLE, HEX, 1 NPT 4900205 ASSEMBLY, FRL, 185 CFM 3600161 HOSE, BRAKE BLACK, 1/4 1700055 36” HOSE, DRAIN, 1/4” ID 1700630 36” HOSE CLAMP, 3/8, ZINC 2200251 VMAC - Vehicle Mounted Air Compressors VMAC Technical Support: 888-241-2289 VMAC Knowledge Base: kb.vmacair.com...
-
Page 13: System Specifications
6.15 in 4.0 in (mount holes) 8.9 in 12.9 in 4.7 in 4.7 in (×2) R 0.24 in 14.6 in 14.0 in Figure 1 — Mounting dimensions VMAC - Vehicle Mounted Air Compressors VMAC Technical Support: 888-241-2289 VMAC Knowledge Base: kb.vmacair.com... - Page 14 1 1/2 in Table 2 — Minimum hose size Recommended Wire Gauge VMAC does not recommend installing the system in a location that would require a combined wire length greater than 50 ft (15.5 m). Combined length of power and ground wires...
-
Page 15: Installation
Installation Install the VMAC Air Aftercooler 70 CFM in a location that provides adequate air flow and easy accessibility. The unit should have a minimum of 8 in of clearance on all sides. Ensure there is sufficient space to: remove the front panel, connect the air lines, connect the wiring, and access to the manual drain. - Page 16 Place the aftercooler in position and drill the mounting holes (Figure 1 on page 11). ☐ Fasten the rubber mount feet securely. If using the optional VMAC mounting brackets (P/N: A700143), install the aftercooler unit onto the brackets and fasten securely.
- Page 17 Connect the white wire from the aftercooler to the white clutch wire coming from the VMAC compressor (Figure 3). Green White Figure 3 — Aftercooler wiring to VMAC Underhood systems Universal Connection ☐ Connect the red wire from the aftercooler to a 12 V source (see page 12).
-
Page 18: Operation
Leave the valve open until the compressor is started again. Manual Drain The VMAC air aftercooler has a manual drain valve to purge water from the ‘Air-In’ line entering the aftercooler. VMAC - Vehicle Mounted Air Compressors VMAC Technical Support: 888-241-2289 VMAC Knowledge Base: kb.vmacair.com... - Page 20 Manufactured by ® 888-241-2289 tech@vmacair.com 877-740-3202 warranty@vmacair.com www.vmacair.com kb.vmacair.com 1333 Kipp Road, Nanaimo, B.C., V9X 1R3 Canada...
Need help?
Do you have a question about the A800185 and is the answer not in the manual?
Questions and answers