Advertisement
Quick Links
Advertisement

Subscribe to Our Youtube Channel
Related Manuals for NAUTICA AERO N100

Summary of Contents for NAUTICA AERO N100
- Page 1 AERO N100 NTDR01...
- Page 3 Thank you for purchasing an original Nautica Aero - N100 You are getting a high-quality product that’s built to combine technology and design for your everyday use. Please read the below info carefully to get the most out of your new product.
-
Page 4: What's In The Box
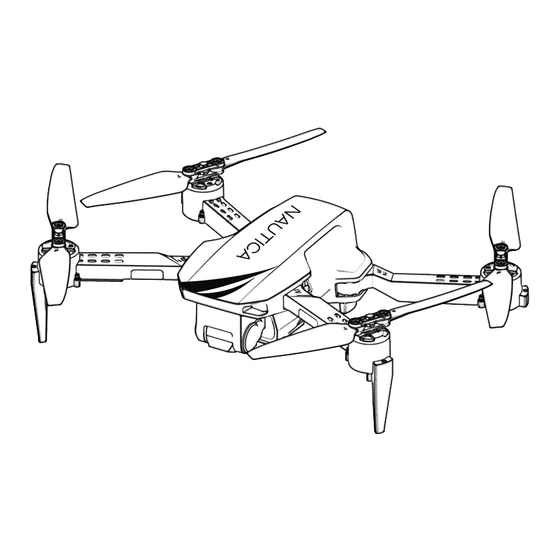
WHAT’S IN THE BOX NAUTICA REMOTE 1 M / 3.3 FT MICRO USB TO PROPELLERS AERO N100 CONTROLLER USB-A CHARGING CABLE (X4) PROPELLER PROPELLER REPLACEABLE CARRYING USER’S GUARDS (X4) MOUNTING TOOL BATTERY (X2) MANUAL... - Page 5 HOW TO USE AERO N100 AIRCRAFT DIAGRAM Front LEDs Propellers Propellers Motors Motors Camera Landing Gears Landing Gears...
- Page 6 Rear LEDs Landing Gears Vents Wifi Antenna Battery Latch Battery Downward Vision System Power ON/OFF Landing Gears Battery Level LED...
- Page 7 REMOTE CONTROLLER DIAGRAM Automatic Takeoff / Trim Forward Landing Button L1 Button R1 Button Photo shooting Mode switch / and video recording R2 Button L2 Button Changing speed Headless mode Callback Trim Left Trim Right Button Button Antenna Joystick Joystick Emergency Trim Backward Landing Button...
- Page 8 Incorrect placement propellers will hinder your drone’s ability for flight. Your Nautica Aero N100 comes with 4 extra propellers to ensure that you will be able to replace them in a situation of breakage or loss.
- Page 9 Installing and Recharging the Battery Installing the Remote Controller 1. Open the battery compartment of the remote Your Nautica Aero N100 comes with the battery pre-installed and fully charged. When you need to controller by turning the screw counterclockwise. 2. Insert the 3*1.5V alkaline batteries (not included) to recharge the battery, follow the steps below.
- Page 10 Connecting Your Drone With Remote Controller • Make sure that you have authorization to pilot the Aero N100 in the area you intend to fly. In some areas flying a drone is not permitted, such as When you turn your Nautica Aero N100 and its military bases, parks, cities and airports.
- Page 11 After the sound beep, the LEDs of the drone will flash for 2 seconds, indicating that your Nautica Aero N100 has been calibrated and is ready to takeoff. When taking off, the rear should be faced towards you, while the front should direct forward.
- Page 12 Automatic Takeoff and Landing Movements and Trim 1. Place Nautica Aero N100 on a flat and dry surface. Auto Takeoff: Drone will 2. Push the automatic takeoff/landing button on the takeoff from the ground for remote control. Your drone will takeoff and hover at about up to 5 ft/1.5 m high...
- Page 13 Right joystick pushed Trim Forward: Drone will trim upward: Drone will move forward while moving forward. Right joystick pulled back: backward. Drone will move backward. Trim Backward: Drone will Right joystick pushed trim backward while moving forward. left or right: Drone will move left or right.
- Page 14 Mode Switch / movements. Changing Speed The default speed mode of Nautica Aero N100 is 30%. The R1 button pushed once, the speed increases to 60%, with the device delivering two beep-sound notifications. Pushed once more, the R1 button enhances the speed to maximum of 100%, notifying the pilot with a three beep sounds.
- Page 15 How to use Nautica Aero App If you wish to fly and navigate your Nautica Aero N100 with your smartphone rather than the remote controller, follow these guidelines. Make sure you installed the Nautica AERO app on your smartphone, as explained in the “Downloading application”...
- Page 16 Gravity Switch Turn ON / OFF Control Auto Takeoff / Landing Video Panel Back to Main Menu Photo Speed Reverse the Switch shoot Gallery Mode camera Settings Lens Voice Control System Headless Mode Forward / Backward Throttle & Trimming Rotation Emergency Landing Direction...
- Page 17 Photo and Video Shoot With Hand Sense Turn ON the autopilot function by tapping TURN ON The Hand Sense system of Nautica Aero N100 enables AUTOPILOT button. Auto takeoff and landing you to take photos and videos with your hand...
- Page 18 Gyro Another way of controlling your drone’s movements is activating “Gyro” by tapping on the related button on the application screen. It enables to control drone movement by tilting your smartphone.
-
Page 19: Technical Specifications
TECHNICAL SPECIFICATIONS Input 4.2V / 0.6A Battery Capacity 1800 mAh Max Flight Time Up to 14 min Video Resolution HD 1080p Max Speed 11.1 mph (5 m/s) Camera Resolution Max Transmission Distance Up to 230 ft / 70 m Max Video Transmission Distance 65.6 ft / 20 m Autopilot Take Off and Landing Emergency Landing... -
Page 20: Safety And Maintenance
SAFETY AND MAINTENANCE 10. Battery life may be reduced if not used for a long WARNING time. 11. DO NOT allow the batteries to come into contact Not suitable for ages with any kind of liquid. 12. Remove your battery when you are not using your 16 and under. - Page 21 WARNING 11. Do not fly near areas with magnetic or radio 1. Keep your product packaging for reference. interference. 2. Always fly the drone below 400 feet. 12. Do not fly the drone in restricted airspace, near 3. This product is composed of plastic, hardware and other aircraft and near airports.
-
Page 22: Warranty Information
Warranty You must have purchased the product from a Nautica applies to the USA only. or Technofashion authorized dealer. We will make every effort to replace limited edition... - Page 23 SUPPORT For any questions, email us at If this device does cause harmful interference to radio support@technofashion.com or television reception, which can be determined by turning the device off and on, the user is encouraged FCC ID: 2AZBO-N00014 to try to correct the interference by one or more of the following measures: This device complies with Part 15 of the FCC Rules.
- Page 24 designed, manufactured, distributed by © 2021 Technofashion, Inc. All Rights Reserved. Designed in USA. Made in China. May be patented. See technofashion.com/patents...
Need help?
Do you have a question about the AERO N100 and is the answer not in the manual?
Questions and answers