
Subscribe to Our Youtube Channel
Related Manuals for Diamond Products HDS60


Summary of Contents for Diamond Products HDS60
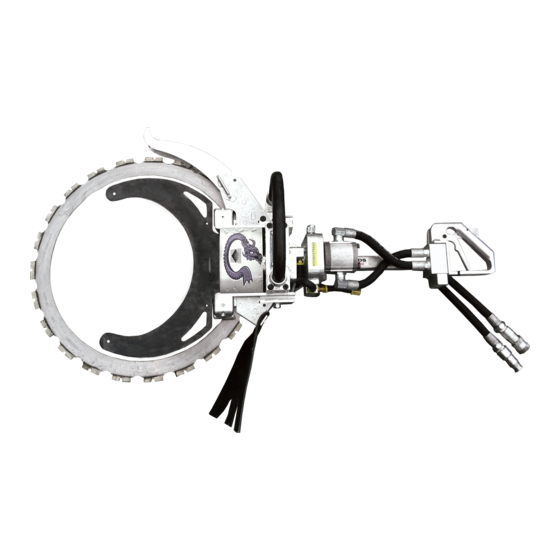
- Page 1 DIAMOND P R O D U C T S CONCRETE SAW PARTS LIST OPERATOR MANUAL MODEL HDS60 RING SAW June 2011 (Rev.2) Part No: 1802010...
- Page 2 We sell worldwide for the brands: Genie, Terex, JLG, MultiQuip, Mikasa, Essick, Whiteman, Mayco, Toro Stone, Diamond Products, Generac Magnum, Airman, Haulotte, Barreto, Power Blanket, Nifty Lift, Atlas Copco, Chicago Pneumatic, Allmand, Miller Curber, Skyjack,...
-
Page 3: Proposition 65 State Of California
Proposition 65 State of California Warning ! Engine exhaust and some its constituents are known to the State of California to cause cancer, birth defects, and/or other reproductive harm. Notification of Spark Arrester Requirement for State of California It is a violation of Section 4442 or 4443 to use or operate the engine on any forest-covered, brush-covered, or grass-covered land unless the engine is equipped with a spark arrester, as defined in Section 4442, maintained in effective working order or the engine... -
Page 4: Safety Precautions
WARNING Concrete cutting produces dust and fumes Refer to the HDS60 Parts List in this manual known to cause illness, death, cancer, respiratory disease, birth defects, and/or other for additional information and part reproductive harm. -
Page 5: General Safety
Keep all body parts away from rotating Always use diamond blades manufactured machinery. specifically for the HDS60 saw. Replace all guards and access panels Never cut dry. Without an adequate water (unless stated otherwise) prior to operating supply to properly lubricate the blade, the the saw. -
Page 6: Blade Guard Safety
Wear gloves and be alert to the surrounding environment when handling DO NOT install or remove the blade guard blades. with the saw running. When installing the blade, always fit the groove in the blade to the main drive wheel. ... -
Page 7: Technical Information
Technical Information Weight (without blade) -------------------------- 29.8 lbs. / 12.5 kg Width ------------------------------------------------ 10-1/4 in. / 260 mm Height (without the blade) --------------------- 19 in.. / 483 mm Length (without the blade) --------------------- 26 in. / 660 mm Power Requirement ----------------------------- Hydraulic Maximum flow ------------------------------------ 8 GPM / 30 l/min. - Page 8 Blade removal and installation Step 1: Remove blade guard and splash flap using 9/16” wrench provided (figure Figure 1 Step 2: Remove adjustable arm assembly (figure 2). Figure 2...
- Page 9 Blade removal and installation Step 3: Relieve transmission assembly tension by pulling t-handle out and turning 90 degrees (figure 3) Figure 3 Step 4: Disassemble upper drive roller by locking roller and removing allen screw with the ¼” allen wrench provided (figure 4). Figure 4...
- Page 10 Blade removal and installation Step 5: Hold transmission in neutral position and remove upper drive wheel and blade (figure 5). Figure 5 Step 6: Remove water injection plate with the 5/32” allen wrench provided. Note location of water injection holes prior to removing plate. Install new plate with water injection holes matching previous mounted location (outer right side opposite from drive wheel)(figure 6).
- Page 11 Blade removal and installation Step 7: Inspect lower drive roller for wear on lip. Replace if lip is worn to half the original width (.200”)(figure 7). Figure 7 Step 8: Install new blade, matching groove in blade to lip on the lower drive roller.
- Page 12 Blade removal and installation Step 9: With the transmission assembly in neutral position, reinstall upper drive roller using the ¼” allen wrench provided. Tighten securely by locking drive wheel in position (figure 9). Figure 9 Step 10: Using 5/32” allen wrench provided, remove guide roller cover and inspect both guide rollers for wear or damage.
- Page 13 Blade removal and installation Step 11: Reinstall adjustable arm assembly, blade guard and splash flap on saw. Hand tighten bolts. Place ring saw on flat surface (figure 11) so that the adjustable arm assembly is sitting with the weight of the saw on it. Tighten bolts using the 9/16”...
- Page 15 Diagram Part Quantity Number Number Required Description BLADE GUARD ASSEMBLY (INCLUDES 1, 2, 3, 4) 6061241 6061188 BLADE GUARD 6061189 SPRING 6061190 UPPER GUARD 3a** 2903244 DOWEL PIN, 1/4" DIA X 1/2" 6061191 6061191 CLAMPING BLOCK CLAMPING BLOCK ADJUSTABLE ARM ASSEMBLY (INCLUDES 5, 6, 7, 8, 9, 10, 39, 55) 6061242 6061192 ROLLER ARM...
- Page 17 Diagram Part Quantity Number Number Required Description 6061226 COVER-GEAR BOX 6061227 STEM 6061228 VALVE CAP 6061229 SPRING 6061230 STEM BLOCK 2505125 2505125 O RING O-RING 2505126 SEAL-QUAD 2706791 SEAL-QUAD 2902985 SCREW, FLAT HEAD 1/4-20 X 1-1/4" 6061231 GEAR SMALL 6061232 GEAR LARGE 6061233 HOSE ASSEMBLY # 2...
- Page 18 EQUIPMENT AND PARTS WARRANTY Discount-equipment warrants all equipment sold by it against defects in workmanship or materials for a period of one (1) year from the date of shipment to Customer. The responsibility of Discount-equipment under this Warranty is limited to replacement or repair of defective parts, of such parts as shall appear to us upon inspection at such parts, to have been defective in material or workmanship, with expense for transportation and labor borne by Customer.
- Page 19 We sell worldwide for the brands: Genie, Terex, JLG, MultiQuip, Mikasa, Essick, Whiteman, Mayco, Toro Stone, Diamond Products, Generac Magnum, Airman, Haulotte, Barreto, Power Blanket, Nifty Lift, Atlas Copco, Chicago Pneumatic, Allmand, Miller Curber, Skyjack,...
Need help?
Do you have a question about the HDS60 and is the answer not in the manual?
Questions and answers