
Related Manuals for DM&P Group DMP EBOX-3300A Series


Summary of Contents for DM&P Group DMP EBOX-3300A Series
- Page 1 EBOX-33xxA Series User Manual EBOX-3300A / 3310A series User’s Guide DMP Electronics Inc.
- Page 2 EBOX-33xxA Series User Manual Copyright The information in this manual is subject to change without notice for continuous improvement in the product. All rights are reserved. The manufacturer assumes no responsibility for any inaccuracies that may contain in this document, and makes no commitment to update or to keep current information contain in this manual.
- Page 3 EBOX-33xxA Series User Manual Trademarks Acknowledgment is the registered trademarks of DMP Electronics Inc. Other brand names, product names or trade names appearing in this document are the properties and registered trademarks of their respective owners. All names mentioned herewith are served for identification purpose only. DMP Electronics Inc.
- Page 4 EBOX-33xxA Series User Manual Safety Information WARNING Do not expose EBOX-3300A/ 3310A series to rain or moisture, in order to prevent shock and fire hazard. Never install EBOX-3300A/ 3310A series in wet locations. Do not open the cabinet to avoid electrical shock. Refer to your nearest dealer for qualified personnel servicing.
- Page 5 EBOX-33xxA Series User Manual Regulatory FCC Class A Note This equipment has been tested and found to comply with the limits for a Class A digital device, pursuant to Part 15 of the FCC Rules. These limits are designed to provide reasonable protection against harmful interference when the equipment is operated in a commercial environment.
- Page 6 EBOX-33xxA Series User Manual Purchase Agreement Purpose: In accordance to the general commercial conduct of Trust and Fair Trade, herewith below is the agreement for the protection for both parties, DMP and Users in pursuant of trading. Product Description: With this product, herewith also known as EBOX-3300A/ 3310A series which is a simplified & an economical design of an embedded device for Special Purpose Personal Computing.
-
Page 7: Table Of Contents
EBOX-33xxA Series User Manual Contents Chapter 1 02 Unpacking your EBOX Mini PC Chapter 2 05 EBOX-3300A/ 3310A series Overview 06 System Specifications 07 Peripherals Connecting Chapter 3 11 BIOS Reconfiguring Debian / Ubuntu Linux Installation Guide Chapter 4 16 Technical Specifications Chapter 5 18 Onboard Connectors Summary 20 Pin Assignments... - Page 8 EBOX-33xxA Series User Manual Chapter DMP Electronics Inc.
-
Page 9: Unpacking Your Ebox Mini Pc
EBOX-33xxA Series User Manual Unpacking Your EBOX Mini PC Congratulation! You have just acquired EBOX-3300A/ 3310A series, please check the following items. Packing List: Q’ty Item No. Description EBOX-3300A/ 3310A series VESA PC Max. 10 - watts External Power Adaptor, Vin: 100~240VAC 50/ 60Hz, 0.45A/ Volt: +5.0 VDC @ 2.0A Max. - Page 10 EBOX-33xxA Series User Manual Preface EBOX-3300A/ 3310A series: VESA PC The EBOX-3300A/ 3310A series is a revolutionary device which is especially designed for limited physical space and temperature concerns. No matter you are in a jammed office, a crowded place, or public transportation, it can be easily integrated with a VESA LCD to bring you EBOX-3300A/ 3310A series access at any time.
- Page 11 EBOX-33xxA Series User Manual Chapter DMP Electronics Inc.
-
Page 12: Ebox-3300A/ 3310A Series Overview
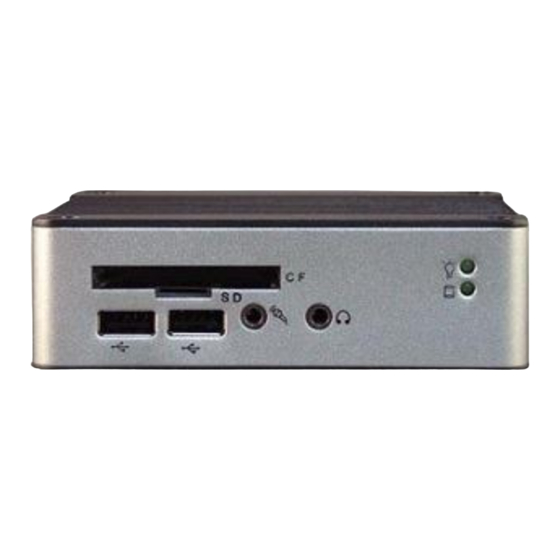
EBOX-33xxA Series User Manual EBOX-3300A/ 3310A series Overview Front Panel Power LED The power LED lights up when system is turn on. HDD LED LED flashes when the system is accessing Hard Drive. Audio Line Out Audio output to speaker Audio Mic In For Microphone Input CF &... -
Page 13: System Specifications
EBOX-33xxA Series User Manual System Specification Supported Operating System Vortex86DX (600MHz) Windows XP Home/ Pro Windows XP Embedded Main Memory Windows Embedded CE 256 MB DDR2 512 MB DDR2 Supported Linux Distribution list: ( 512MB DDR2 version called 3310A series ) 1. - Page 14 EBOX-33xxA Series User Manual Peripherals Connecting the Power Adaptor DC Power Jack To use EBOX-3300A/ 3310A series immediately, please attach the supplied adapter for the power source. See the left diagram for visual connection. Connect the DC power jack of the power adaptor to the DC Input of EBOX-3300A/ 3310A series.
- Page 15 EBOX-33xxA Series User Manual Peripherals Connecting the USB port provide Three external USB ports with (Two at the front, One at the EBOX-3300A/ 3310A series rear) and one internal USB port. Micro-SD and CF Slot For connecting to Device with Compact Flash Card and Micro-SD (T-flash).
- Page 16 EBOX-33xxA Series User Manual Connecting the Keyboard and Mouse PS/2 Keyboard or Mouse (6-pin) This PS/2 Port is shared for connecting Keyboard and/ or Mouse by using Split Y-Cable (not included). Connecting Serial port Serial port (Optional) The serial port is usually connected to a serial device like modem or terminal devices.
- Page 17 EBOX-33xxA Series User Manual Chapter DMP Electronics Inc.
-
Page 18: Bios Reconfiguring
EBOX-33xxA Series User Manual BIOS Reconfiguring Take note that AMI BIOS is used in the EBOX-3300A/ 3310A series. To reconfigure the EBOX-3300A/ 3310A series, press or hit the <Del> key to enter your BIOS setup main menu. Select from the menu, the desired setup for change. Press <Esc>... -
Page 19: Debian / Ubuntu Linux Installation Guide
EBOX-33xxA Series User Manual Debian / Ubuntu Linux Installation Guide In the DX platform, with the newer IDE and Ethernet controller, both of the two controllers just start supported from kernel 2.6.28.3. Please refer to the guide to help you complete the installation. How to install Linux on Vortex86DX platform? Preparation: 1. - Page 20 EBOX-33xxA Series User Manual D. To unpack the kernel package and update. # dpkg -i xxx.deb # update-initramfs –k 2.6.30-vortex86mx -c # update-grub E. When these three procedures completed, type reboot to reboot system. # reboot Step3: Moving the storage installed Linux, back to VortexDX platform. Step4: Turn on the power to boot.
- Page 21 EBOX-33xxA Series User Manual For Ubuntu When it start booting, press the Esc key when it boot. Confirm the Grub list first. There should has an option 2.6.30-vortex86mx, and then to boot. For Debian Please press the Esc key to confirm Grub list and press E key to confirm and modify the storage’s codename. Note: The Grub list parameters you can modify in the file /boot/grub/menu.lst.
- Page 22 EBOX-33xxA Series User Manual Chapter DMP Electronics Inc.
-
Page 23: Technical Specifications
EBOX-33xxA Series User Manual Technical Specification 3300A 3300A-H 3300A-M 3300A-JSK 3300A-L2 Model Type 3310A 3310A-H 3310A-M 3310A-JSK 3310A-L2 Processor Vortex86DX (600 MHz) Memory Onboard 256MB DDR2/ Onboard 512 MB DDR2 BIOS AMI BIOS XGI Z9s with 32MB DDR2/ D-Sub 15 Pin Ethernet 10/100 Mbps LAN Built-in PXE diskless boot function LAN x 2... - Page 24 EBOX-33xxA Series User Manual Chapter DMP Electronics Inc.
-
Page 25: Onboard Connectors Summary
EBOX-33xxA Series User Manual Onboard Connectors Summary Summary Table for CPU Board Description Type of Connections Pin nbrs. IDE connector Box Header 22 x 2 2.0mm 44-pin USB (Front) USB connector 8pin USB (Front) USB connector 8-pin USB (Front) USB connector 8-pin JTAG connector Wafer 1.25mm... - Page 26 EBOX-33xxA Series User Manual Rear Connectors Outline DC Power Jack PS/2 KB/Mouse RJ-45 LAN USB 2.0 Power Switch Serial Ports Wireless ANT (Optional) DC Power Jack RJ-45 LAN USB 2.0 Power Switch Serial Ports (Optional) Wireless ANT (Optional) DMP Electronics Inc.
-
Page 27: Pin Assignments
EBOX-33xxA Series User Manual Pin Assignments J8: PS/2 Keyboard or Mouse – 6-pin Mini-Din connector Pin # Signal Name KBCLK PMCLK KBDAT PMDAT SB5V J13: Power SW – Push Button Switch Pin # Status J12: DC-IN (5V) – 3-pin Mini-Din Lock Pin Socket Pin # Signal Name ) –... - Page 28 EBOX-33xxA Series User Manual J15: VGA – 15-pin D-Sub connector Pin # Signal Name Pin # Signal Name Pin # Signal Name HYSYNC VSYNC J4, J5: USB 2.0 (USB2) 4-pin USB Type 1 Connector (H) Pin # Signal Name USB2- USB2+ J9, J11: COM - 9-pin D-Sub connector (RS-485/ RS422 optional) Pin #...
- Page 29 EBOX-33xxA Series User Manual Chapter DMP Electronics Inc.
-
Page 30: Taking Care Your Ebox Vesa Pc
EBOX-33xxA Series User Manual Taking Care of your EBOX This section gives you some guidelines on using EBOX-3300A/ 3310A series – Safe using, Storing and Handling. Storing Do not place EBOX-3300A/ 3310A series in a location that is subject to: ... -
Page 31: Cleaning Your Ebox Vesa Pc
EBOX-33xxA Series User Manual Cleaning Your VESA PC Clean the VESA PC with a soft, dry cloth or a soft cloth lightly moistened with a mild detergent solution. Do not use any type of abrasive pad, scouring powder, or solvent such as alcohol or benzene, as these may damage the finish of EBOX-3300A/ 3310A series. -
Page 32: Troubleshooting
EBOX-33xxA Series User Manual Troubleshooting This section describes the techniques of resolving some basic problems that you encounter when using EBOX-3300A/ 3310A series. For more troubleshooting guidelines, please contact your nearest dealer for technical support. Troubleshooting Your VESA PC A. VESA PC does not start Make sure the EBOX-3300A/ 3310A series is properly secured and plugged into a power source before it is turned on. - Page 33 EBOX-33xxA Series User Manual (BIOS Setup menu “Exit”) C. “Operating System Not Found” – A message indicating that “Operating system not found” appear when my VESA PC starts (Windows won’t start) Enter your BIOS setup main menu by pressing <DEL> key, be sure that the C: drive is enable. If Windows still does not start, follow these steps to initialize the BIOS: Turn off the EBOX-3300A/ 3310A series.
- Page 34 EBOX-33xxA Series User Manual Chapter DMP Electronics Inc.
-
Page 35: Terms And Condition
EBOX-33xxA Series User Manual Terms and Conditions Warranty The warranty terms for EBOX-3300A/ 3310A series are twelve (12) months from the beginning on the date of invoice. During the warranty period, DMP Electronics Will repair replace the product covered under this limited warranty. Service and Support DMP Electronics Inc.
Need help?
Do you have a question about the DMP EBOX-3300A Series and is the answer not in the manual?
Questions and answers