Table of Contents
Advertisement
Quick Links
Advertisement
Table of Contents

Related Manuals for DM&P Group DMP EBOX-336 Series


Summary of Contents for DM&P Group DMP EBOX-336 Series
- Page 1 EBOX-336x Series Mini PC User’s Guide...
- Page 2 EBOX-336x Series User Manual Copyright This manual is subject to change without notice for continuous improvement in the product. All rights are reserved. Manufacturer assumes no responsibility for any inaccuracies that may contain in this document, and makes no commitment to update or to keep current information in this manual. No part of this manual may be reproduced, copied, translated or transmitted, in whole, in part, or in any form or by any means without the prior written permission of the DMP Electronics Inc.
- Page 3 EBOX-336x Series User Manual Regulatory FCC Class A Note This equipment has been tested and found to comply with the limits for a Class A digital device, pursuant to Part 15 of the FCC Rules. These limits are designed to provide reasonable protection against harmful interference when the equipment is operated in a commercial environment.
- Page 4 EBOX-336x Series User Manual Purchase Agreement Purpose: In accordance to the general commercial conduct of Trust and Fair Trade, herewith below is the agreement for the protection for both parties, DMP and Users in pursuant of trading. Product Description: EBOX-336x Series is a simplified and economical design of an embedded device for Special Purpose PC. It is comprised of the x86 technology design with onboard 1GB/2GB DDR3 System memory, VGA or HDMI display, USB, COM ports, and LAN Interfaces.
-
Page 5: Table Of Contents
EBOX-336x Series User Manual Contents Chapter 1 07 Unpacking EBOX Mini PC Chapter 2 10 EBOX-336x Series Overview 12 System Specifications 13 SD card recommendation Chapter 3 15 BIOS Reconfiguring 16 mPCIe signal setting 17 Boot setting 18 PXE Diskless Boot setting 21 Drivers Installation 24 Additional information 24 Disable TRIM function... - Page 6 EBOX-336x Series User Manual Chapter DMP Electronics Inc.
-
Page 7: Unpacking Ebox Mini Pc
EBOX-336x Series User Manual Unpacking EBOX Mini PC Component List: Item No. Description Quantity EBOX-336x Series Mini PC Power Adaptor 22.5W; Vin: 100~240V AC 50~60Hz Power plug (available US, UK, EU, AU types) VESA screw Note: The accessories are subject to change without immediate notice. Check before Use 1. - Page 8 EBOX-336x Series User Manual Preface EBOX-336x Series Mini PC EBOX-336x Series is a revolutionary device especially designed for limited physical space and temperature concerns. No matter you are in a jammed office, a crowded place, or public transportation, EBOX-336x can be easily integrated with a VESA monitor to access at any time.
- Page 9 EBOX-336x Series User Manual Chapter DMP Electronics Inc.
-
Page 10: Ebox-336X Series Overview
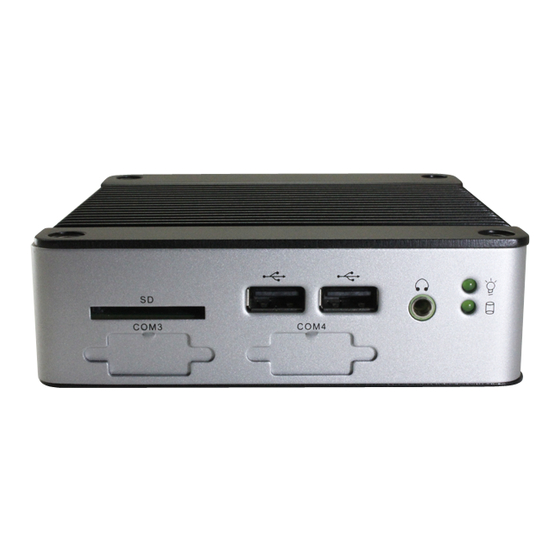
EBOX-336x Series User Manual EBOX-336x Overview Front Panel A: Power LED LED lights up when the system is turned on B: SD Card LED Green flashing LED indicates SD Card activity C: Line Out Speaker output D: USB 2.0 ports External USB devices use E: SD Card slot SD Card use, support system bootable from SD Card... - Page 11 EBOX-336x Series User Manual Back Panel A: Power Jack Volt: DC +8V~+24V B: VGA port VGA display output C: Power switch With On "-" and Off "o" symbols D: USB 2.0 ports External USB devices use E: RJ-45 LAN Jack RDC R6040 10/100 Mbps LAN F: RJ-45 LAN Jack Realtek 8111F GbE 1 Gbps LAN...
-
Page 12: System Specifications
EBOX-336x Series User Manual EBOX-336x Series System Specifications Processor DM&P 32-bit x86 Dual Core Vortex86DX3 (1GHz) SoC BIOS AMI BIOS Memory Onboard 1GB/2GB DDR3-1600MHz SATA/ mPCIe SATA Gen1 x1 , 7-pin internal/Standard Mini PCIe x1 Storage SD Slot x1 (SD, SDHC)/(Optional Internal SD slot) Integrated Graphics Chip/D-Sub 15-pin (max. -
Page 13: Sd Card Recommendation
EBOX-336x Series User Manual SD card recommendation Class 10 SD card for EBOX-336x Series is highly recommended. EBOX-336x Series support SD and SDHC only, it does not support SDXC. Users may be able to use SDXC on EBOX-336x, however, SDXC will be recognized as SDHC, and capacity support up to 32GB only. - Page 14 EBOX-336x Series User Manual Chapter DMP Electronics Inc.
-
Page 15: Bios Reconfiguring
EBOX-336x Series User Manual BIOS Reconfiguring To reconfigure the BIOS, press <Del> key repeatedly to enter BIOS setup main menu as below: Use and keys to select screen; and keys to scroll the selected item. Press <ESC> return to previous screen and press <F9> if you want to load factory default setting. Primary IDE Pin Select setting: 1. -
Page 16: Mpcie Signal Setting
EBOX-336x Series User Manual mPCIe signal setting: EBOX-336x with mPCIe socket support both USB and COM port signals. And mPCIe Series COM port signal support function defaulted as Disabled, user can use mPCIe via USB signal without setting. For user want to use mPCIe via COM port signal, set BIOS COM9 Port Interface enabled as below: Move to Security ... -
Page 17: Boot Setting
EBOX-336x Series User Manual Boot setting: 1. Boot up EBOX unit and press <Del> to get enter BIOS menu. 2. Move to Boot “Boot Settings Configuration” and press Enter 3. Set your main storage as 1 boot. 4. Press <F10> to save the setting and exit. DMP Electronics Inc. -
Page 18: Pxe Diskless Boot Setting
EBOX-336x Series User Manual PXE Diskless boot setting: 1. Boot up EBOX unit and press <Del> to enter BIOS menu. 2. Move to Boot then select “Boot Settings Configuration” and press ENTER. 3. Move to “Boot From LAN” and choose “Used INT 19h” then press “F10” to save the setting and exit. DMP Electronics Inc. - Page 19 EBOX-336x Series User Manual PXE Diskless boot additional setting: EBOX-336x model with three or four COM ports required additional BIOS setting for PXE diskless boot. Users have to set COM5 and COM6 interface security “Disable” temporary in order to release IRQ resource for PXE diskless boot function.
- Page 20 EBOX-336x Series User Manual To resume the default setting: 1. Select “Security” then move to “I/O Interface Security” and press ENTER. Enable “COM5 port” and “COM6 port“ interface then press “F10” to save setting and exit. 2. Or move to EXIT and select “Load Optimal Defaults” then press “F10” to save the setting. DMP Electronics Inc.
-
Page 21: Drivers Installation
EBOX-336x Series User Manual Drivers Installation guide Under the Windows series OS, the following drivers need to be installed manually. 1. VGA driver 2. Ethernet driver 3. Wireless LAN Dongle driver (Optional) 4. Audio driver (for windows XP only) Note: 1. - Page 22 EBOX-336x Series User Manual Ethernet driver: 1. Download corresponding Ethernet drivers from EBOX website and unzip. 2. Find the yellow question mark of Ethernet in the Device Manager under the control panel/system. 3. Select “Update Driver Software” and choose the unzipped driver folder path, then click “Install this driver software anyway”...
- Page 23 EBOX-336x Series User Manual Audio driver: Unzip the downloaded file and double click to execute .exe file, then click “Next” as below to install. After the installation completed, the Device Manager will update and show the correct device. DMP Electronics Inc.
-
Page 24: Additional Information
EBOX-336x Series User Manual Additional information Disable TRIM function: TRIM function sets enable as default in Windows 7 and WES7 OS. And EBOX-336x Series does not support storages with TRIM function (SSD/Disk on Module). User has to disable TRIM function manually by following steps: 1. -
Page 25: Screen Rotation
EBOX-336x Series User Manual Screen rotation: 1. After VGA driver installation completed, type “Customize icons” in search bar. 2. Adjust Utility Application to “Show icon and notifications”. 3. A blue icon = Graphic Utility appears on screen, double click it. 4. -
Page 26: Turn Off The Display Function Setting
EBOX-336x Series User Manual Turn off the display function setting: For Windows 7 or WES7 OS, click Start Menu > Control Panel > Power Options, or simply search for "Power Options" (without quotes). You will see a list of different power plans. The plan currently in use has a blue dot in front of it. -
Page 27: Hdmi 1080P Video Playback
EBOX-336x Series User Manual HDMI 1080p video playback: For windows platform (Windows 7, WES7, XP, XPe): Click here to download 1080p video specific use media player DMP_mpc-hc_R7. In media player DMP_mpc-hc_R7 full screen mode, adjust screen with keyboard number pad “8” to increase or “2”... -
Page 28: Canbus Information
EBOX-336x Series User Manual CANbus information: In EBOX-336x CANbus Series, serial port (COM4) has been adapted for CANbus use. And the CANbus is onboard; it doesn't need extra external power. PIN assignment: J14: COM - 9-pin D-Sub connector (CANbus) Pin # Signal Name Pin # Signal Name... -
Page 29: Linux Installation Guide
EBOX-336x Series User Manual Linux Installation guide For Debian7.0/Ubuntu10.04 Regarding Debian7.0/Ubuntu10.04, follow steps and suggestions for installation on EBOX-336x Series. The following is a brief instruction; users may configure it according to their specific needs. 1. Basic system installation. For Debian7.0, after booting from installation CD, move straight to install system user would get a text mode system only, please choose Graphic Install for OS installation. - Page 30 EBOX-336x Series User Manual During installation, the system would ask users to create partitions for operating system. Following example is using entire disk for the beginner. Choose “Guided - use entire disk”. Select “Yes” to create the partition. ...
- Page 31 EBOX-336x Series User Manual For Install the GRUB boot loader on a hard disk: Answer YES to complete the installation as last procedure. When it's completed, the disc tray will eject with pop-up message, press continue to restart and be ready to enjoy the new system. The Debian7.0 The Ubuntu10.04 DMP Electronics Inc.
- Page 32 EBOX-336x Series User Manual 2. Install the VGA driver (Console mode) Download VGA driver from EBOX website. Switch to console mode by pressing key <Ctrl> + <Alt> + <F1>, then copy the VGA driver rdc_drv.so to driver folder /usr/lib/xor/modules/drivers/. ...
- Page 33 EBOX-336x Series User Manual 3. The system configuration: Enable the Auto login System / Administration / Login Screen Execute the utility “Login Screen” and enter the password to process it Set the Log in as “user account” automatically. Disable the power saving mode when system idle, System / Preference / Screensaver Unmarked the option “Active the screensaver when computer is idle”...
- Page 34 EBOX-336x Series User Manual 4. Setting adjustment for Gigabit LAN device (RTL-8111/8168 for Debian and Ubuntu system only). To add the parameters “pci=nomsi” in the line of Linux of GRUB as below. The MSI/MSI-X must disabled for application of Gigabit LAN (RTL-8111/8168), and it could be set permanent by edition of file /boot/grub/grub.cfg.
- Page 35 EBOX-336x Series User Manual Chapter DMP Electronics Inc.
-
Page 36: Onboard Connectors Summary
EBOX-336x Series User Manual Onboard Connectors Summary Summary Table for EBOX PCB Board Description Type of Connections Pin nbrs. SO-DIMM-SOC-200P-1.8V SO-DIMM socket 200 Pin 200-pin SATA SATAIII port connector 7-pin USB1 (Front) USB connector 4-pin USB2 (Front) USB connector 4-pin USB3 (Rear) USB connector 4-pin... -
Page 37: Pin Assignments
EBOX-336x Series User Manual Pin Assignments J3: SATAIII connector Pin # Signal Name Pin # Signal Name Transmit+ Transmit- Receive- Receive+ J5, J6, J8: USB 2.0 (180 J7: USB 2.0 (90 Horizontal Type Pin # Signal Name Vertical Type Pin # Signal Name Data -- Data --... - Page 38 EBOX-336x Series User Manual J20: VGA 15-pin D-Sub connector Pin # Signal Name Pin # Signal Name Pin # Signal Name HYSYNC VSYNC J28: HDMI Pin # Signal Name Pin # Signal Name TMDS_Data2+ TMDS CLK Shield TMDS_Data2_Shield TMDS_CLK- TMDS_Data2- TMDS_Data1+ Reserved TMDS_Data1_Shield...
- Page 39 EBOX-336x Series User Manual For CANbus version: J12 (COM1), J13 (COM2): RS-232/ RS-485/ RS-422, 9-pin D-Sub connector Pin # Signal Name Pin # Signal Name DCD/ RS-485- / 422TX- RXD/ RS-485+ / 422TX+ TXD/ 422RX+ DTR1/ 422RX- J12 (COM1), J13 (COM2): GPIO P4 and P5, 9-pin D-Sub connector Pin # Signal Name Pin #...
- Page 40 EBOX-336x Series User Manual For 8-bit GPIO version with RS-232 port: J12 (COM1): GPIO P4, 9-pin D-sub connector Pin # Signal Name Pin # Signal Name PORT 40 PORT 44 PORT 41 PORT 45 PORT 46 PORT 42 PORT 47 PORT 43 J13 (COM2): GPIO P5, 9-pin D-Sub connector Pin #...
- Page 41 EBOX-336x Series User Manual For 8-bit GPIO version with RS-485 port: J12 (COM1), J13 (COM2): RS-485, 9-pin D-Sub connector Pin # Signal Name Pin # Signal Name RS-485- RS-485+ DTR1 J14 (COM3): GPIO P0, 9-pin D-Sub connector Pin # Signal Name Pin # Signal Name PORT 00...
- Page 42 EBOX-336x Series User Manual For RS-485 x3, x4 version: J12 (COM1): RS-232, GPIO P4, 9-pin D-sub connector Pin # Signal Name Pin # Signal Name DCD/ PORT 40 RXD/ PORT 44 TXD/ PORT 41 DTR/ PORT 45 DSR/ PORT 46 RTS/ PORT 42 CTS/ PORT 47 RI/ PORT 43...
- Page 43 EBOX-336x Series User Manual Chapter DMP Electronics Inc.
-
Page 44: Taking Care Of Ebox
EBOX-336x Series User Manual Taking Care of EBOX This section provide guidelines on using EBOX-336x Series – Safe using, Storing and Handling. Storing Do not place EBOX in a location that is subject to: Heating sources, such as stove, oven, heater, radiator or air duct ... -
Page 45: Troubleshooting
EBOX-336x Series User Manual Troubleshooting This section describes the techniques of resolving some basic problems that you encounter when using EBOX. For more troubleshooting guidelines, please contact your nearest dealer for technical support. Troubleshooting EBOX A. EBOX does not start – Make sure EBOX is properly secured and plugged into a power source before it is turned on. - Page 46 EBOX-336x Series User Manual (BIOS Setup menu “Save & Exit”) C. “Operating System Not Found” – A message indicating “Operating system not found” appear when unit starts (Windows won’t start) Enter BIOS setup main menu by pressing <DEL> key, be sure that the C: drive is enable. If Windows still does not start, follow these steps to initialize the BIOS: 1.
- Page 47 EBOX-336x Series User Manual Chapter DMP Electronics Inc.
-
Page 48: Warranty
EBOX-336x Series User Manual Terms and Conditions Warranty The warranty terms for EBOX are twelve (12) months from the shipped month. During the warranty period, DMP Electronics will repair replace the product covered under this limited warranty. Service and Support DMP Electronics Inc.
Need help?
Do you have a question about the DMP EBOX-336 Series and is the answer not in the manual?
Questions and answers