Table of Contents
Advertisement
Available languages
Available languages
Quick Links
CENTRINO SX
Bodenstaubsauger
Bedienungsanleitung
Cylinder vacuum cleaner
Operating Manual
Aspirateur
Mode d'emploi
Vloerstofzuiger
Bedieningshandleiding
Aspiradora rodante
Manual de instrucciones
Aspirador de pó de piso
Instrução de manuseamento
Podlahovy vysávaè
Návod na obsluhu
Talni sesalec
Navodila za uporabo
Padló porszívó
Kezelési útmutató
Vysavaè
Návod k obsluze
Odkurzacz do podlóg
Instrukcja obslugi
Podni usisavaè
Uputa za upotrebu
Advertisement
Chapters
Table of Contents

Related Manuals for Dirt Devil Royal CENTRINO SX


Summary of Contents for Dirt Devil Royal CENTRINO SX
- Page 1 CENTRINO SX Padló porszívó Bodenstaubsauger Aspiradora rodante Bedienungsanleitung Kezelési útmutató Manual de instrucciones Vysavaè Cylinder vacuum cleaner Aspirador de pó de piso Operating Manual Návod k obsluze Instrução de manuseamento Odkurzacz do podlóg Aspirateur Podlahovy vysávaè Mode d‘emploi Instrukcja obslugi Návod na obsluhu Podni usisavaè...
- Page 2 Bedienungsanleitung ................4 - 17 Operating Manual ..................18 - 31 Mode d'emploi ..................... 32 - 45 Bedieningshandleiding ................46 - 59 Manual de instrucciones ................60 - 73 Instrução de Manuseamento ..............74 - 87 Instrukcja obsługi ..................88 - 101 Návod k obsluze..................
- Page 3 Abb. 1...
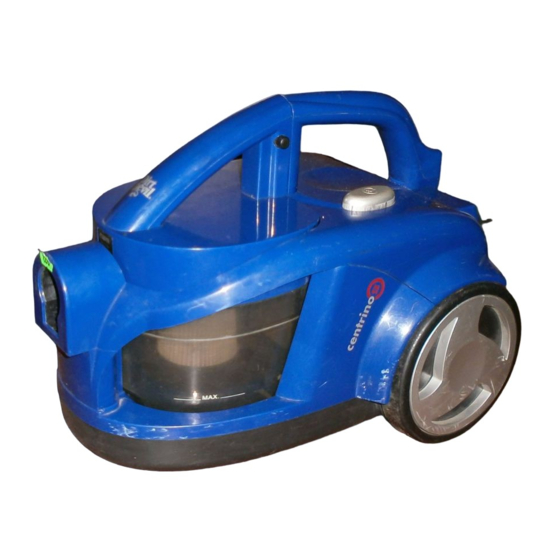
- Page 4 Übersicht über Ihren Centrino SX Übersicht über Ihren Centrino SX Vielen Dank! Es freut uns, dass Sie sich für den Bodenstaubsauger Centrino SX entschieden haben! Wir wünschen Ihnen viel Freude mit dem Gerät und danken Ihnen für den Kauf! Geräteteile/Lieferumfang 1 Handgriff 12 Verstauhalterung 2 Nebenluftregler...
-
Page 5: Table Of Contents
Inhaltsverzeichnis 1 Sicherheitshinweise ..............6 zur Bedienungsanleitung ..................... zu den verwendeten Hinweisen................... zur Stromversorgung ....................zu Kindern ........................zur bestimmungsgemäßen Verwendung ..............bei defektem Gerät ...................... 2 Auspacken und Anschließen........... 8 Auspacken........................Zusammenbauen......................Weitere Düsen (Zubehör) verwenden ................. 3 Bedienung ................. 10 Staubsaugen ....................... -
Page 6: Sicherheitshinweise
1 Sicherheitshinweise Sicherheitshinweise Lesen Sie diese Bedienungsanleitung vollständig durch, 1.1 zur Bedienungsanlei- bevor Sie mit dem Gerät arbeiten. tung Bewahren Sie die Anleitung gut auf. Falls Sie das Gerät an Dritte weitergeben, geben Sie die Bedienungsanleitung mit. Die Nichtbeachtung dieser Anleitung kann zu schwe- ren Verletzungen oder Schäden am Gerät führen. -
Page 7: Zu Kindern
1 Sicherheitshinweise Lassen Sie das Gerät nicht unbeaufsichtigt und ver- 1.4 zu Kindern wenden Sie es mit größter Vorsicht, wenn Kinder oder Per- sonen, die die Gefahren nicht einschätzen können, in der Nähe sind. Kinder oder Personen, die die Gefahren nicht einschät- zen können, dürfen das Gerät nicht benutzen. -
Page 8: Auspacken Und Anschließen
2 Auspacken und Montieren Auspacken und Montieren 1. Packen Sie das Gerät und alle Zubehörteile aus. 2.1 Auspacken 2. Überprüfen Sie den Inhalt auf Vollständigkeit. Informa- tionen zum Lieferumfang, Seite 4, „Übersicht über Ihren Centrino SX“. ACHTUNG: Transportieren/versenden Sie das Gerät grundsätzlich immer in der Originalverpackung, damit es keinen Scha- den nimmt. -
Page 9: Weitere Düsen (Zubehör) Verwenden
2 Auspacken und Montieren 5. Stellen Sie die Länge des Teleskoprohrs ein. Drücken Sie dazu die Teleskoprohr-Arretierung (Abb. 5/1) nach vorn (Abb. 5/a). Ziehen Sie dann das Teleskoprohr am Handgriff (Abb. 1/1) auf gewünschte Länge (Abb. 5/b). Zum Verriegeln, lassen Sie die Teleskoprohr-Arretie- rung beim Ziehen los. -
Page 10: Bedienung
3 Bedienung WARNUNG: Montieren Sie Düsen nur, wenn der Stecker aus der Steckdose ausgezogen ist. Der Bodenstaubsauger könnte versehentlich eingeschaltet werden. Zum Aufsetzen der Düsen gehen Sie wie folgt vor: 1. Schalten Sie das Gerät aus und ziehen Sie den Stecker aus der Steckdose. -
Page 11: Ausschalten Und Stromkabel Aufrollen
3 Bedienung 1. Stecken Sie die gewünschte Düse auf, Kapitel 2.3, „Weitere Düsen (Zubehör) verwenden“. 2. Ziehen Sie das Kabel am Stecker bis zur gelben Mar- kierung (Abb. 11/1) heraus. WARNUNG: Falls die rote Markierung (Abb. 11/2) sichtbar ist, ziehen Sie das Kabel wieder soweit ein, bis diese nicht mehr zu Abb. -
Page 12: Aufbewahren
3 Bedienung Zum Abstellen oder bei Arbeitspausen können Sie den 3.3 Abstellen und Aufbe- Parkhaken (Abb. 15/1) der Bodendüse in die Parkhalterung wahren (Abb. 15/2) einhängen. WARNUNG: Wenn Sie den Arbeitsplatz verlassen, schalten Sie das Gerät aus und beachten Sie die Hinweise unter Kapitel 3.2, „Ausschalten und Stromkabel aufrollen“. -
Page 13: Filter
4 Filter Filter Der Bodenstaubsauger besitzt die folgenden Filter: - Ausblasfilter (Abb. 19/1) Filtert feinste Partikel aus der ausgeblasenen Luft. Austauschen: alle 6 Monate - Lamellen-Zentralfilter (Abb. 19/2) Dient zum Herausfiltern der leichten Staubpartikel. Reinigen: alle 2 Monate Die Filter können nach einiger Zeit verstopfen und so Abb. -
Page 14: Lamellen-Zentralfilter Reinigen
4 Filter 1. Schalten Sie das Gerät aus und beachten Sie die Hin- 4.2 Lamellen-Zentralfilter weise unter Kapitel 3.2, „Ausschalten und Stromkabel reinigen aufrollen“. 2. Entleeren Sie den Staubbehälter, Kapitel 3.4, „Staubbehälter leeren“. 3. Drücken Sie die „PRESS“-Taste (Abb. 22/A/1) und neh- men Sie den Deckel vom Staubbehälter ab (Abb. -
Page 15: Fehlerbehebung
5 Fehlerbehebung Fehlerbehebung ® Bevor Sie das Gerät an den Royal Appliance-Kundendienst einschicken, überprüfen Sie anhand der folgenden Tabelle, ob Sie den Fehler selbst beseitigen können. WARNUNG: Verwenden Sie niemals ein defektes Gerät! Bevor Sie auf Fehlersuche gehen, schalten Sie das Gerät aus und ziehen Sie den Netzstecker Kapitel 3.2, „Ausschalten und Stromkabel aufrollen“. -
Page 16: Reinigung
6 Reinigung Reinigung WARNUNG: Bevor Sie das Gerät reinigen, schalten Sie das Gerät aus und ziehen Sie den Netzstecker Kapitel 3.2, „Ausschalten und Stromkabel aufrollen“. 6.1 Gehäuse reinigen Reinigen Sie das Gehäuse ausschließlich mit einem leicht angefeuchteten Tuch. Verwenden Sie keine Reinigungsmittel, Scheuermittel oder Alkohol, da diese das Gehäuse beschädigen können. -
Page 17: Garantie
9 Garantie Garantie 9.1 Garantiebedingungen Wir übernehmen für das von uns vertriebene Gerät eine Garantie von 24 Monaten ab Kaufda- tum. Innerhalb dieser Garantiezeit beseitigen wir nach unserer Wahl durch Reparatur oder Austausch des Gerätes oder des Zubehörs (Schäden an Zubehörteilen führen nicht automatisch zum Um- tausch des kompletten Gerätes) unentgeltlich alle Mängel, die auf Material- oder Herstellungsfehlern beruhen. - Page 18 An overview of your Centrino SX An overview of your Centrino SX Many thanks! We are pleased that you decided on the Centrino SX cylinder vacuum cleaner! We hope you enjoy using your appliance and we would like to thank you for your purchase! Appliance parts/scope of delivery 1 Handle 12 Stow-away hook mount...
- Page 19 List of contents 1 Safety instructions..............20 Regarding the operating manual ................. 20 Regarding the instructions used .................. 20 Regarding the power supply ..................20 Regarding children ...................... 21 Regarding intended use ....................21 If the appliance is defective ..................21 2 Unpacking and connecting ............
-
Page 20: Safety Instructions
1 Safety instructions Safety instructions 1.1 Regarding the Read this operating manual through completely before operating manual working with the appliance. Keep the operating manual safe. If you pass the appliance on to a third party, give them the operating manual as well. Non-compliance with these instructions can lead to serious injuries or damage to the appliance. -
Page 21: Regarding Children
1 Safety instructions 1.4 Regarding children Never leave the appliance unattended, and use it with the greatest of care if children or persons who cannot assess the risks are nearby. Children or persons who cannot assess the risks may not use the appliance. Store it so it is inaccessible. Packing material must not be used to play with. -
Page 22: Unpacking And Connecting
2 Unpacking and connecting Unpacking and connecting 2.1 Unpacking 1. Unpack the appliance and all accessory parts. 2. Check the contents are all there. Information regarding the scope of delivery, Page 18, "An overview of your Centrino SX". ATTENTION: Always transport/send the appliance in its original packaging so that it does not become damaged. -
Page 23: Using Other Nozzles (Accessories)
2 Unpacking and connecting 5. Adjust the length of the telescopic tube. To do this, press the telescopic tube lock (Fig. 5/1) forwards (Fig. 5/a). Then pull the telescopic tube by the handle (Fig. 1/1) to the desired length (Fig. 5/b). To lock it, release the telescopic tube lock when you let go. -
Page 24: Operating
3 Operating WARNING: Only assemble the nozzles if the plug has been removed from the socket. The cylinder vacuum cleaner could be switched on by accident. Proceed as follows to attach the nozzles: 1. Switch the appliance off and pull the plug out of the socket. -
Page 25: Switching Off And Retracting The Power Cable
3 Operating 1. Push on the desired nozzle, Chapter 2.3, "Using other nozzles (accessories)". 2. Remove the cable, by holding the plug, until the yellow mark is reached (Fig. 11/1). WARNING: If the red mark (Fig. 11/2) is visible, then retract the cable again until it is no longer visible, Chapter 3.2, Fig.11... -
Page 26: Setting Aside And Storage
3 Operating 3.3 Setting aside and When setting the appliance aside or during work breaks, you can hook the parking hook (Fig. 15/1) for the storage floor nozzle into the parking hook mount (Fig. 15/2). WARNING: If you leave your work area, switch off the appliance and observe the instructions under Chapter 3.2, "Switching off and retracting the power cable". -
Page 27: Filters
4 Filters Filters The cylinder vacuum cleaner has the following filters: - Blow-out filter (Fig. 19/1) Filters out the fine particles from the blow-out air. Replace: every 6 months - Central laminar filter (Fig. 19/2) Is used to filter out the fine dust particles. Clean: every 2 months The filters can become blocked after some time and can Fig.19... -
Page 28: Cleaning The Central Laminar Filter
4 Filters 4.2 Cleaning the central 1. Switch the appliance off and observe the instructions under Chapter 3.2, "Switching off and retracting the laminar filter power cable". 2. Empty the dust container, Chapter 3.4, "Emptying the dust container". 3. Press the "PRESS" button (Fig. 22/A/1) and remove the cover from the dust container (Fig. -
Page 29: Correcting Malfunctions
5 Correcting malfunctions Correcting malfunctions ® Before sending the appliance to Royal Appliance Customer Services, use the following table to check whether you can correct the malfunctions yourself. WARNING: Never use a defective appliance! Before starting to troubleshoot, switch the appliance off and pull out the mains plug Chapter 3.2, "Switching off and retracting the power cable". -
Page 30: Cleaning
6 Cleaning Cleaning WARNING: Before you clean the appliance, switch off the appliance and remove the mains plug Chapter 3.2, "Switching off and retracting the power cable". 6.1 Cleaning the housing Only clean the housing with a slightly damp cloth. Do not use any cleaning agent, scouring agent or alcohol as these can damage the housing. -
Page 31: Warranty
9 Warranty Warranty 9.1 Warranty conditions We offer a warranty of 24 months from the date of purchase for the appliances we sell. Within this warranty period, we will remove all defects free of charge that are due to material or manufacturing faults, either by repair work or replacing the appliance or accessories, at our discretion (damage to accessory parts does not automatically lead to the entire appliance being replaced). - Page 32 Royal Appliance Int. GmbH International Service Sona France Royal Appliance Espana, SL Z.E.S. Goes B.V. 21 rue Eugene Sue Royal, Dirt Devil, Stellar T.a.v. afd. Service F-94700 Maisons Alfort C/ Jazmin, 66 - 3° Pearyweg 1 Tel: +33 1 43 78 00 42...
Need help?
Do you have a question about the Royal CENTRINO SX and is the answer not in the manual?
Questions and answers