Table of Contents
Advertisement
Available languages
Available languages
Advertisement
Table of Contents

Related Manuals for Millenium MD34 PRO


Summary of Contents for Millenium MD34 PRO
- Page 8 les termes et op�ons peuvent changer en fonc�on des modèles...
- Page 17 9.1 Réglage de la langue de l’OSD Appuyez sur l’un des boutons (M, ▼, ▲, E, pour activer la fenêtre du navigateur (Figure 1). Si vous utilisez le moniteur pour la première fois, les paramètres s’ajusteront automatiquement aux paramètres optimaux en fonction de la configuration et des composants de votre ordinateur, etc.
- Page 18 FR-17...
- Page 19 FR-18...
- Page 20 FR-19...
- Page 21 FR-20...
- Page 22 FR-21...
- Page 23 La fiche d'information sur le produit conformément au règlement UE n ° 2019/2013 L'étiquetage énergétique pour l'affichage électronique et la télévision se trouve sous l'URL ou le code QR indiqué sur l'URL de l'étiquette énergétique : https://eprel.ec.europa.eu/qr/364181 ENERG MD34PRO kWh/1000h 3440 px FR-22...
- Page 24 Important Safety Information • Excessive sound pressure from earphones headphones can cause hearing loss. • Please keep the monitor away from direct sunlight, very strong bright lights and other sources of heat. Prolonged exposure to these environments can cause discoloration and damage to the monitor.
- Page 25 unplugging the power cable or DC power cord, wait 5 seconds before connecting the power cable or DC power cord for normal operation. • Use only the DC adapter to power the monitor. • If the power cable is damaged, it must be replaced by the manufacturer or a qualified after-sales service to avoid a...
- Page 26 • Try to protect your eyes from eyestrain when using display for a constant period: - Looking something at varying distances from one centered on the screen for a long time. - Voluntarily blinking often while you work. - Closing and gently rolling your eyes to relax.
- Page 27 too much light. - Consulting a doctor if your symptoms persist. • Unplug the monitor if you need to clean it with a damp cloth. The screen may be wiped with a dry cloth when it is off. However, never use organic solvents, such liquids...
- Page 28 • If a foreign substance or water gets in your monitor, please immediately turn off and unplug the power cord. Then, remove the foreign substance or water, and send it to the maintenance center. • Do not store or use the monitor in locations exposed to heat, direct sunlight or extreme cold.
- Page 29 WARNING: Do not place the monitor in the rain, in a damp environment and do not open the monitor case to avoid shock, electrical hazards mechanical hazard. Before cleaning, always unplug your monitor. It is advisable to use a dry or slightly damp cloth to clean your monitor.
- Page 30 Avoid placing it near heat sources such portable monitor radiators or heating ducts, as this may damage your monitor. Do not spray cleaner and / or liquid of any kind either directly on the monitor screen or on another part of the monitor.
- Page 31 cables. Do not disassemble or remove monitor elements. Disassembly or alteration etc. Not done (e) by an approved technician can damage the monitor and / or lead to possible exposure to the high-voltage electricity, which can cause serious injury or death.
-
Page 32: Section 2: Box Contents
Section 2: Box contents Monitor x 1 stand rod x 1 base x 1 (hand screw included) Screw x 3 hex bolts x 4 Screwdriver x 1 (for mounting) (PM5*11mm) Power cable x 2 DP cable User Manual x 1 (AC 100-240V 50/60Hz ) (UK Plug included) Terms and options may change depending on the model... -
Page 33: Section 3: Product Overview
Section 3: Product Overview 3.1 - Monitor Buttons M Button Menu: Press to view the OSD menu or access the sub-menus. Down Button: Press to go down in the menus. Up Button: Press to get into the menus. E Exit Button: Press to exit. On / Off Button: Press to turn on / off the monitor. -
Page 34: Section 4: Base Installation
Section 4: base installation 2. Take out the upper polyfoam and the inner package bag,lower polyfoam place on a desktop or table,keep the lower foam underneath the monitor. 3. See picture,fasten the stand stem and base with a screw. ,Fix the stand plate into the stand stem with the screw 5*11mm. -
Page 35: Section 5: Wall Mount
Section 5: Wall Mount Quick click Shaft assembly parts 35mm+7mm hex bolts x 4 pcs EN-12... -
Page 36: Section 6: Connectivity Options
Section 6: Connectivity Options 6.1 - Connecting the power cable Connect the power cable included in the power connector, and connect the other end into a wall outlet. - DP Connectivity So that the monitor can receive the DP signals from the computer, use the DP cable to connect the monitor to the computer. -
Page 37: Hdmi Connectivity
6.3 - HDMI Connectivity So that the monitor receives HDMI signals from the computer using an HDMI cable to connect the monitor to the computer. HDMI cable (not included) EXIT HDMI 6.3 - Connecting your headphones Plug your headphones to receive the audio signals from your monitor. If your headphones are connected to the monitor and audio devices are connected to your computer at the same time, audio devices do not generate sound. -
Page 38: Section 7: Basic Operation
Section 7: Basic Operation Insert one end of the DP cable to the graphics card in your PC. Other types of connection can be used. additional cables not included. To refresh rate (or "performance") is ideal, it is suggested to use a cable DP (Display Port) or HDMI monitor with the mating connector. - Page 39 Section 9: OSD The OSD (On Screen Display) can be used to adjust the settings of your monitor and appears on the screen after turning on the monitor and press the button M. If use the monitor for the first time, the settings will automatically adjust to the optimal settings based on the configuration and components of your computer, etc.
-
Page 40: Osd Language Setting
9.1 OSD Language Setting Press one of the buttons , E, to activate the browser window (Figure 1). If use the monitor for the first time, the settings will automatically adjust to the optimal settings based on the configuration and components of your computer, etc. Press to enter the OSD menu, Press to choose LANGUAGE. -
Page 41: Osd Menu Functions
9.2 - OSD Menu Functions Main Menu Sub-Menu Op ons Descrip on Input Source HDMI 1; NONE Selects the primary video source HDMI 2; DP1; NONE itch to DP signal input DP2; Brightness/ Brightness 0~100 Adjust display brightness Contrast Blacklevel 0~100 Adjust display Blacklevel Contrast... - Page 42 Main Menu Sub-Menu Op ons Descrip on Audio Mute On, Off Turn mute mode on/off Volume 0-100 Adjust audio volume Audio Source DP2, Select audio signal input via HDMI or DP DP1, HDMI 1, HDMI 2, Mul - Mu -Window Off, PIP Mode, Select PIP/PBP modes according to the Window PBP 2Win...
- Page 43 Section 10: LED Effects and Gameplus ) to ac vate the naviga on window. 1. Press any one of the bu ons ( , E, bu on to switch Gameplus modes. According to the needs of your game, choose Press the corresponding game icon.
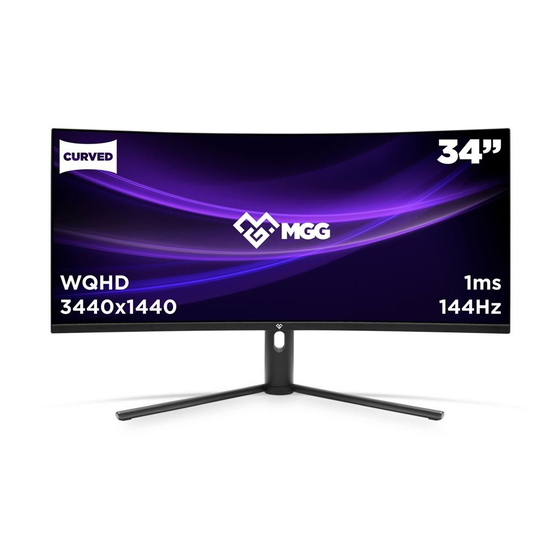
- Page 44 Section 11: Information 11.1 - Specifications Element Detail Model Number MD34PRO Screen size 34" Format 21: 9 Curvature 1500R Brightness 350cd / m² (typ) Panel type Resolution DP1.4: 3440x1440 @ 144Hz HDMI2.0: 3440x1440 @ 100Hz refresh rate 144 Hz Response time OD 4 ms Viewing Angle 178 °...
-
Page 45: Supported Timing List
11.2 SUPPORTED TIMING LIST Standard Timing Video Timing Detailed Timing 720 x 400 @70Hz 640 x 480p @60Hz(4:3,1:1) 3440 x 1440 @50Hz 640 x 480 @60Hz 720 x 480p @60Hz(4:3,8:9) 3440 x 1440 @60Hz 640 x 480 @67Hz 720 x 480p @60Hz(16:9,32:27) 3440 x 1440 @100Hz 640 x 480 @72Hz 1280 x 720p @60Hz(16:9,1:1) -
Page 46: Disposal Of The Device
Compatibility resolutions for HDMI / DP The requirements below are the minimum for your monitor. These requirements are recommended to properly use all the features of the monitor and ensure a high-quality image. minimum requirements Operating system: Windows 7 / Windows® 8/64-bit Windows 10 (latest service pack) or higher Processor (CPU): Intel®... - Page 47 Product Information sheet according to EU Regulation No. 2019/2013 Energy labeling for Electronic Display & Television can be found on below URL or QR code indicated on Energy label URL: https://eprel.ec.europa.eu/qr/364181 ENERG MD34PRO kWh/1000h 3440 px EN-24...
- Page 53 Los términos y opciones pueden cambiar dependiendo de los modelos...
- Page 62 9.1 Ajustes de idioma de OSD Pulse uno de los botones (M, ▼, ▲, E, para activar la pantalla del buscador (Figura 1). Si utiliza el monitor por primera vez, la configuración se ajustará automáticamente a los parámetros óptimos según la configuración y componentes del ordenador, etc.
- Page 63 ES-16...
- Page 64 ES-17...
- Page 65 ES-18...
- Page 66 ES-19...
- Page 67 ES-20...
- Page 68 Hoja de información del producto según la norma n° 2019/2016 de la EU. La etiqueta energética de los aparatos de pantallas electrónicas y televisionpuede encontrarse en la URL o el código QR indicado en la etiqueta energética. URL: https://eprel.ec.europa.eu/qr/364181 ENERG MD34PRO kWh/1000h 3440 px...
- Page 74 Os termos e opções podem mudar dependendo do modelo...
- Page 83 9.1 Definição do idioma do OSD Prima um dos botões (M, ▼, ▲, E, para ativar a janela do browser (Figura 1). Se utilizar o monitor pela primeira vez, as definições serão otimizadas automaticamente com base na configuração e nos componentes do seu computador, etc.
- Page 84 PT-16...
- Page 85 PT-17...
- Page 86 PT-18...
- Page 87 PT-19...
- Page 88 PT-20...
- Page 89 Folha de informações do produto de acordo com o Regulamento da UE nº 2019/2013. Rotulagem energética para ecrãs eletrónicos e televisão pode ser encontrado em abaixo URL ou código QR indicado no URL da etiqueta energética: https://eprel.ec.europa.eu/qr/364181 ENERG MD34PRO kWh/1000h 3440 px PT-21...
-
Page 90: Wichtige Sicherheitshinweise
Wichtige Sicherheitshinweise • Übermäßiger Schalldruck von Kopf- oder Ohrhörern kann Hörverlust zur Folge haben. • Halten Sie den Monitor stets von direktem Sonnenlicht, sehr hellen Lichtquellen anderen Wärmequellen fern. Eine längere Aussetzung solcher Umgebungen kann Verfärbung Monitorschäden führen. • Entfernen Sie jegliche Objekte, die in die Belüftungsöffnungen fallen oder eine angemessene Kühlung Elektronik... - Page 91 • Achten Sie beim Aufstellen des Monitors darauf, dass Netzkabel und Steckdose leicht zugänglich sind. • Wenn Sie den Monitor durch Ziehen Netz- oder Gleichspannungskabels abschalten, warten Sie 5 Sekunden, bevor Sie Netz- oder Gleichspannungskabel für einen normalen Betrieb wieder anschließen.
- Page 92 • Übermäßige Nutzung des Monitors kann die Augen schädigen. Es ist besser, häufiger kürzere Pausen von Ihrer Workstation einzulegen seltener längere Pausen; machen Sie beispielsweise nach 50 bis 60 Minuten eine 5- bis 10- minütige Pause. Dies ist besser, als alle zwei Stunden eine 15-minütige Pause zu machen.
- Page 93 - Bildschirmhöhe -winkel entsprechend Ihrer Körpergröße anpassen. - Helligkeit Kontrast angemessen einstellen. - Umgebungslicht entsprechend der Helligkeit Ihres Bildschirms anpassen, Neonlicht und zu stark reflektierende Oberflächen vermeiden. - Wenden Sie sich an einen Arzt, falls Ihre Symptome anhalten. • Trennen Sie den Monitor vom Stromnetz, wenn Sie ihn mit einem feuchten Tuch reinigen müssen.
- Page 94 ammoniakhaltige Flüssigkeiten, zur Reinigung Ihres Bildschirms. • Zur Vermeidung von Stromschlag und dauerhaften Schäden am Gerät dürfen Sie den Monitor keinem Staub, Regen, Wasser oder hoher Feuchtigkeit aussetzen. • Falls Ihr Monitor nass wird, wischen Sie ihn so bald wie möglich mit einem trockenen Tuch ab.
- Page 95 • Damit Ihr Monitor optimal arbeitet und länger funktionsfähig bleibt, verwenden Sie ihn bitte an einem Ort, der folgenden Temperatur- und Feuchtigkeitsgrenzen entspricht: Temperatur: 0 bis +40 °C Feuchtigkeit: 20 bis 80 % relative Luftfeuchte WARNUNG: Platzieren Monitor nicht im Regen oder in einer feuchten Umgebung.
- Page 96 Verwendung eines feuchten Tuchs, bis der Monitor vollständig trocken ist, bevor wieder anschließen. • Verwenden Sie zur Reinigung Ihres Monitors keine Flüssigkeiten und/oder Reiniger, die Alkohol oder Ammoniak enthalten. • An der Rückseite dieses Monitors befinden sich Belüftungsöffnungen. Blockieren Sie diese Öffnungen nicht.
- Page 97 nicht direkt auf den Bildschirm oder ein anderes Teil des Monitors. • Stecken Sie nichts in den Monitor, allem nicht Belüftungsöffnungen. • Achten Sie immer darauf, dass der Monitor einem ebenen Untergrund steht. Er muss gesichert sein, damit er nicht herunterfällt und beschädigt wird.
- Page 98 oder Änderungsarbeiten usw. können den Monitor beschädigen und/oder zur Aussetzung hoher Spannungen damit verbundener Gefahr ernsthafter oder sogar tödlicher Verletzungen führen. • Die Steckdose muss in der Nähe des Gerätes installiert und leicht zugänglich sein. DE-9...
- Page 99 Lieferumfang Monitor x 1 Ständer x 1 Aufsteller x 1 (einschließlich Rändelschraube) Schraube x 3 Sechskantschrauben Schraubendreher x 1 (PM5 x 11 mm) (zur Montage) Netzkabel x 2 DP-Kabel Bedienungsanleitung (100 bis 240 V Wechselspannung, 50/60 Hz) (einschließlich Netzstecker) Bedingungen und Optionen können je nach Modell variieren.
- Page 100 Produktübersicht 3.1 - Monitortasten M Menütaste: Zur Anzeige des OSD-Menüs oder zum Zugreifen auf Untermenüs drücken. ▼ Abwärtstaste: Zur Abwärtsnavigation in den Menüs drücken. ▲ Aufwärtstaste: Zur Aufwärtsnavigation in den Menüs drücken. E Verlassen-Taste: Zum Verlassen drücken. Ein-/Austaste: Zum Ein-/Ausschalten des Monitors drücken. LED-Anzeige: Ändert die Farbe zur Anzeige des Status.
- Page 101 Aufsteller installieren Halten Sie den Schaumstoff im Monitor, bevor Sie den Aufsteller anbringen. Öffnen Sie die Verpackung und nehmen Sie das Produkt mitsamt dem Schaumstoff heraus. Legen Sie es vorsichtig auf einen Tisch. Nehmen Sie das obere Schaumstoffteil und den innenliegenden Beutel heraus.
- Page 102 Wandmontage Öffnen Sie die Verpackung und nehmen Sie das Produkt mitsamt dem Schaumstoff heraus. Legen Sie es vorsichtig auf einen Tisch. Entfernen Sie die zusätzlichen Teile und den Schaumstoff, der den Monitor abdeckt. Falls der Monitor bereits am Ständer montiert ist, entfernen Sie den Ständer. Drücken Sie die Taste zum Entfernen des Adapters an der Rückseite des Monitors.
- Page 103 Anschlüsse 6.1 - Netzkabel anschließen Schließen Sie das mitgelieferte Netzkabel am Stromanschluss und an einer Steckdose an. Netzkabel 6.2 - DP-Anschluss Damit der Monitor DP-Signale vom Computer empfangen kann, stellen Sie über ein DP-Kabel eine Verbindung zwischen Monitor und Computer her. DP-Kabel (mitgeliefert) DE-14...
- Page 104 6.3 - HDMI-Anschluss Damit der Monitor HDMI-Signale vom Computer empfängt, stellen Sie über ein HDMI-Kabel eine Verbindung zwischen Monitor und Computer her. HDMI-Kabel (nicht mitgeliefert) 6.4 - Kopfhörer anschließen Schließen Sie Ihre Kopfhörer an, um Audiosignale von Ihrem Monitor zu empfangen.
-
Page 105: Grundlegende Bedienung
Grundlegende Bedienung Schließen Sie das DP-Kabel an der Grafikkarte in Ihrem PC an. Andere Anschlussarten sind ebenfalls möglich, allerdings sind weitere Anschlusskabel nicht im Lieferumfang enthalten. Für eine ideale Bildwiederholfrequenz (bzw. „Leistung“) muss ein DP- (DisplayPort) oder HDMI-Kabel mit dem entsprechenden Anschluss am Monitor verbunden werden. - Page 106 Betriebsanzeige Betriebsanzeige Die leuchtende blaue LED zeigt an, dass der Monitor eingeschaltet ist und normal funktioniert. Die blinkende blaue LED zeigt an, dass keine Videoquelle erkannt wurde. Bitte stellen Sie sicher, dass Ihr Computer eingeschaltet und alle Videokabel vollständig angeschlossen sind. DE-17...
- Page 107 Das OSD (On Screen Display, Bildschirmanzeige) dient der Einstellung Ihres Monitors. Es erscheint nach dem Einschalten des Monitors und Drücken der Taste Bei erstmaliger Inbetriebnahme des Monitors werden die Einstellungen entsprechend der Konfiguration und Komponenten Ihres Computers automatisch auf die optimalen Werte angepasst. Drücken Sie eine der Tasten(M, ▼, ▲...
- Page 108 Heben Sie mit ▼ oder ▲ die Optionen hervor, drücken Sie dann zum Bestätigen der Einstellung und zum Verlassen des aktuellen Bildschirms die Taste M. Drücken Sie zum Verlassen des aktuellen Bildschirms E. 9.1 OSD-Spracheinstellungen Drücken Sie eine der Tasten(M, ▼, ▲ , E, ) zur Aktivierung des Browser- Fensters (Abbildung Bei erstmaliger Inbetriebnahme des Monitors werden die Einstellungen...
- Page 109 Drücken Sie zur Auswahl Ihrer Sprache 9.2 - OSD-Menüfunktionen Hauptmenü Untermenü Optionen Beschreibung Eingangsquelle HDMI 1; OHNE Wählt die pimäre Videoquelle HDMI 2; DP 1; OHNE Auf DP-Signaleingang umschalten DP 2; Helligkeit/ Helligkeit 0 bis 100 Helligkeit anpassen Kontrast Schwarzpegel 0 bis 100 Schwarzpegel anpassen...
- Page 110 Hauptmenü Untermenü Optionen Beschreibung Farbeinstellung Gamma Gamma 1,8 Gamma-Erweiterung Gamma 2,0 Gamma 2,2 Gamma 2,4 Gamma 2,6 Bildmodus Standard, Foto, Visuellen Modus Film, Spiel, entsprechend der FPS, RTS Aktivität einstellen Farb- Warm, Kühl, Farbtemperatur wählen Benutzer temperatur Schwaches Blaulicht 0 bis 100 Blaulichtfilterung einrichten Farbton...
- Page 111 Hauptmenü Untermenü Optionen Beschreibung Mehrfach- Mehrfach-Fenster Aus, BiB- BiB/BuB-Modi Fenster Modus, entsprechend der Anzahl Eingangssignale BuB 2 Fenster wählen Sub-Fenster 2 Eingang DPI, DP2, Entsprechend dem Eingangssignal für HDMI 1, HDMI BiB/BuB-Modus wählen BiB-Größe Klein, Mittel, Größe des BiB/BuB- Groß Fensters anpassen BiB-Position Oben rechts,...
- Page 112 LED-Effekte und Gameplus Drücken Sie eine der Tasten (M, ▼, ▲ , E ) zur Aktivierung des Navigationsfensters. Schalten Sie durch Drücken von ▼ zwischen den Gameplus-Modi um. Wählen Sie je nach Anforderungen Ihres Spiels das entsprechende Spielsymbol. Diese Spielsymbole sind in erster Linie darauf ausgelegt, das Zielen bei Shootern zu optimieren.
-
Page 113: Technische Daten
Informationen 11.1 - Technische Daten Element Details Modellnummer MD34PRO Bildschirmgröße 34 Zoll Format 21: 9 Wölbung 1500R Helligkeit 350 cd/m (typ.) Bildschirmtyp Auflösung DP 1.4: 3440 x 1440 bei 144 Hz HDMI 2.0: 3440 x 1440 bei 100 Hz Bildwiederholfrequenz 144 Hz Reaktionszeit Übertaktung 4 ms... - Page 114 11.2 LISTE UNTERSTÜTZTER TIMINGS Standardtiming Videotiming Detailtiming 720 x 400 bei 70 Hz 640 x 480p bei 60 Hz (4:3, 1:1) 3440 x 1440 bei 50 Hz 640 x 480 bei 60 Hz 720 x 480p bei 60 Hz (4:3, 8:9) 3440 x 1440 bei 60 Hz 640 x 480 bei 67 Hz 720 x 480p bei 60 Hz 3440 x 1440 bei 100 Hz...
- Page 115 Kompatible Auflösungen bei HDMI / DP Die nachstehenden Anforderungen sind das Minimum für Ihren Monitor. Diese Anforderungen werden zur angemessenen Nutzung aller Funktionen des Monitors und zur Gewährleistung hoher Bildqualität empfohlen. Mindestanforderungen Betriebssystem: Windows 7 / Windows® 8/64 Bit Windows 10 (aktuellstes Service Pack) oder höher Prozessor (CPU): Intel®...
- Page 116 Produktinformationsblatt gemäß EU-Richtlinie 2019/2013 Energieverbrauchskennzeichnung elektronischer Displays und Fernseher finden Sie unter nachstehender URL oder mit Hilfe des an der Energiekennzeichnung angezeigten QR-Codes. URL: https://eprel.ec.europa.eu/qr/364181 DE-27...
- Page 118 108.007.12363 34CHR MD34PRO Millenium 说明书 2020-11-02 140*210mm 封120g内80g双铜 单色印刷 胶装 Liumeihong Change list: 1.四国增加能效标 20200927 2.附件清单 电源线删除1.8米 20201102...
Need help?
Do you have a question about the MD34 PRO and is the answer not in the manual?
Questions and answers