Table of Contents
Advertisement
Quick Links
Advertisement
Table of Contents

Related Manuals for N-Com basic kit 2


Summary of Contents for N-Com basic kit 2
- Page 1 USER INSTRUCTIONS AND SAFETY...
- Page 2 Congratulations on your purchase of a Nolan N-Com product. The N-Com Basic Kit2 was designed and built using the latest technologies and the best materials. Long tests and thorough system development have made it possible to achieve the highest sound quality.
-
Page 3: Table Of Contents
Table of contents WARNINGS AND SAFETY ____ 4 8.2.Exclusions and limitations of 1.1.Road safety _________________ 4 the coverage ___________________ 27 1.2.Switching on the system in 8.3.Validity of this limited warranty 28 safe environments_________________ 4 8.4.Procedure for the forwarding of 1.3.Interferences ________________ 5 claims _________________________ 29 1.4.Appropriate use ______________ 5 8.5.Product identification ________ 30... -
Page 4: Warnings And Safety
1. WARNINGS AND SAFETY Read this User Manual carefully, as well as the User Manuals for other N-Com kits that you will be using with the N-Com Basic Kit2. Read the simple rules listed below. Failure to comply with these rules may lead to dangerous situations. -
Page 5: Interferences
Do not turn on your cell phone or the N-Com system whenever their use is forbidden or when the devices can cause interference or dangerous situations. Turn off while refuelling. Do not use the N-Com system in filling stations. Do not use ... -
Page 6: Accessories And Batteries
1.7. Disposal Refer to this user manual and to manuals related to other parts of the N-Com system in order to disassemble the system from the helmet. Once the system has been disassembled, dispose of it according to the following instructions: The presence of a crossed-out wheelie bin indicates that in the European ... -
Page 7: Contents Of The Packaging
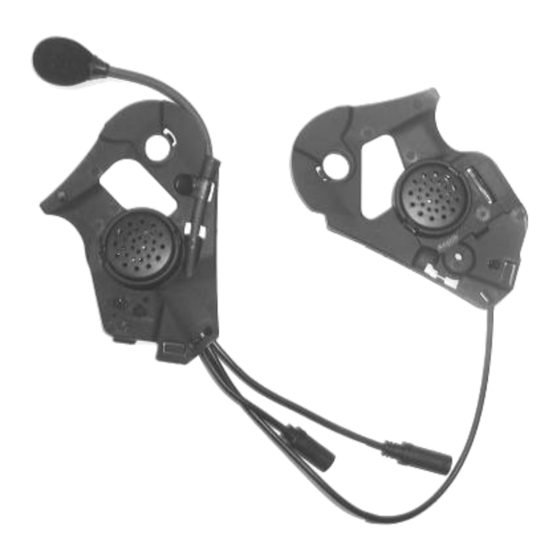
2. CONTENTS OF THE PACKAGING Loudspeaker 15-way Connector Positioning Cable Microphone Basic Kit2 Nomenclature Basic card Protection cover... -
Page 8: Installing The Basic Kit2
3. INSTALLING THE BASIC KIT2 3.1. Installing and removing the battery If the system contemplates the use of a rechargeable battery, the battery must be installed in advance, as described below. Fig. 1 Fig. 2 Fig. 3 – N42 Fig. 4 – N102... - Page 9 Position the battery in the housing behind the right side of the Basic Kit2 (fig. 1). Connect the battery cable (Red+Black) to the proper connector, passing the cables through the housing (fig. 2). Position the battery charge cable so that it passes through the housing (fig.3-4). ...
-
Page 10: Installation Of Basic Kit2 For The Modular Helmet N102
Remove the rear part of the comfort padding, pulling on the neck roll until it separates from the shell. Temporarily put the padding back inside the helmet (Fig. 8). Remove the “N-Com” protection cover located on the left side of the helmet (fig. ... - Page 11 Fig. 10 Fig. 11 Prepare the Basic Kit2 for assembly. The left side of the Basic Kit2 is the one equipped with microphone, and it has to be positioned inside the helmet on the side of the cover that has just been removed (fig. 10). Pass the chin strap, left and right side, through the hole in the Basic Kit2 and ...
- Page 12 Position the cable behind the comfort padding frame. (fig. 12). Put the rear part of the comfort padding back in its original position, fastening the neck roll to its frame. Arrange the IN/OUT connection wires equipped with connector below the neck ...
- Page 13 Position the slot of the neck roll, left side in the special housing on the Basic Kit2 (fig. 14). Rotate the helmet looking at the N-Com housing in the shell (fig. 15) from the outside. While holding the Basic Kit2 and still looking at the N-Com housing on the shell, ...
- Page 14 Position the neck roll slot, right side, in its housing on the Basic Kit2 (fig. 18). Put the right cheek pad back in its original position, clicking the press-stud. Note: If you assembled the Basic Kit2 with the battery, keep the recharge cable under the neck roll.
-
Page 15: Installation Of Basic Kit2 For The Jet Helmet N42/N42E
Installation of Basic Kit2 for the jet helmet N42/N42E Fig. 20 Fig. 21 Remove the “N-Com” protection cover located on the left side of the helmet (fig. 20). Remove the cheek pads area from the shell, undoing the fastening buttons (fig. - Page 16 Remove the rear part of the comfort padding, pulling on the neck roll until it separates from the shell. Temporarily put the padding back inside the helmet (fig. 22) or remove it altogether to facilitate the ensuing operations. Prepare the Basic Kit2 for assembly (fig.23).
- Page 17 Fig. 26 Fig. 27 Put the rear part of the comfort padding back in its original position, hooking the neck roll in the 3 fastening teeth (fig. 26). Pass the chin strap (right side) through the slot in the padding (fig 27). ...
- Page 18 Fasten the right cheek pad area in its original position by clicking the press-stud. Arrange the IN/OUT connection wires equipped with connector below the neck roll (fig. 29). Fig. 30 Fig. 31 Verify that the chin strap is not in the way when positioning the Basic Kit2 in its ...
- Page 19 Rotate the helmet, looking at the N-com housing on the shell from the outside (fig. 32). While holding the Basic Kit2 and still looking at the N-Com housing on the shell, insert the positioning tab in the groove A on the shell (fig. 33).
- Page 20 Align the 15-way connector with the shell and fasten it, making sure the fastening clasp clicks. Check the positioning of the Basic Kit2, left side, matching up the press-stud with the hole in the Basic Kit2. Pass the chin strap (left side) through the slot in the padding (fig. 34). ...
-
Page 21: Installing The Basic Card
N-Com system. Depending on the type of connection and on the cable used, the basic card has to be... - Page 22 Kit. IMPROPER USE MAY DAMAGE THE SYSTEM. Fig. 38 Fig. 39 Position the back of the Basic Card (Fig. 38) in the rear of the “N-Com” protection plate and then push the basic card in its housing until the fastening clasps click (Fig.
-
Page 23: Removing The Basic Kit2
5. USING THE BASIC KIT2 WITH A CELL PHONE The N-Com systems are preset for connection to a cell phone. By separately purchasing an N-Com connection cable, specific for your cell phone model, you can use the N-Com system as a simple earphone. -
Page 24: Answering A Phone Call
Note: In order to use the Basic Kit2 together with another N-Com system, please refer to the specific instructions provided with these systems. Note: Due to the varying strength of the network signal, there may be interferences in the wire connections that do not depend on the N-Com system or the cable used. -
Page 25: Making A Phone Call
5.2. Making a phone call Stop your vehicle in a suitable place in compliance with Traffic Regulations and make the phone call as you would normally with your cell phone. Once the phone call is sent, communication switches directly to the helmet. Caution: Do not make any calls while riding. -
Page 26: Using Other Audio Peripheral Devices
6. USING OTHER AUDIO PERIPHERAL DEVICES The N-Com Basic Kit2 is pre-set for listening to various audio devices, which must be connected through the special Multimedia Wire cable (sold separately). You can listen to an MP3 or to an FM radio, connect to a satellite navigation system, to the audio system of your motorcycle or to a radio for communication between two motorcycles. -
Page 27: Limited Warranty
Any damage caused by an accident; Any change or modification made to the helmet or to the N-com system by the user or by third parties. Colour changes or damages caused by exposure to harmful chemical products. -
Page 28: Validity Of This Limited Warranty
Nolangroup. Tampering with the internal electronic card or with other parts of the N-Com system shall invalidate the warranty. Moreover, the defects covered by this warranty do not include all those specific and subjective situations that may come up during the active use of the helmet such as, for example, comfort problems while riding or aerodynamic noises. -
Page 29: Procedure For The Forwarding Of Claims
Nolangroup reserves itself the right to not carry out repairs under warranty if the aforementioned information is removed or modified after the original purchase of the product from the dealer. 8.4. Procedure for the forwarding of claims To forward a claim covered by this warranty, the buyer has to directly notify the dealer where the helmet was purchased with regards to the defect, presenting at the same time the defective product, a copy of the sales receipt and the Warranty registration form, duly filled out as instructed above. -
Page 30: Product Identification
Legislative Decree 2 February 2002 n. 24. 8.5. Product identification N-Com products are identified by means of a code that allows product traceability and identification. The identification code is found underneath the bar code printed on the product packaging. -
Page 31: Warranty Registration Form
WARRANTY REGISTRATION FORM Product name: Basic Kit2 Identification code Buyer’s Information Name Last name Address Phone e-mail Dealer’s stamp Date of purchase... - Page 32 Basic Kit2 - 07/03/2016 15:05:00 Printed on recycled paper.
Need help?
Do you have a question about the basic kit 2 and is the answer not in the manual?
Questions and answers