Table of Contents
Advertisement
Available languages
Available languages
Quick Links
Advertisement
Table of Contents

Related Manuals for MSW MSW-HS-F1000


Summary of Contents for MSW MSW-HS-F1000
- Page 1 BEDIENUNGSANLEITUNG User manual | Instrukcja | Návod k použití | Manuel d´utilisation | Istruzioni per l‘uso | Manual de instrucciones | Használati útmutató | Brugsanvisning METAL SHEARS E X P O N D O . C O M...
- Page 2 Nome del prodotto CESOIA A GHIGLIOTTINA DA TAVOLO Nombre del producto CIZALLA PARA CHAPA Termék neve TÁBLAOLLÓ Produktnavn GUILLOTINESAKS TIL METALPLADE Modell: Product model: Model produktu: Model výrobku MSW-HS-F1000 MSW-HS-F1320 Modèle: MSW-HS-F1500 Modello: Modelo: Modell Model Hersteller Manufacturer Producent Výrobce Fabricant expondo Polska sp.
-
Page 3: Technische Daten
Vorschriften. Sollten Fragen zur Genauigkeit der Informationen in der Bedienungsanleitung aufkommen, beziehen Sie sich bitte auf die englische Version dieser Inhalte. Sie ist die offizielle Version. Technische Daten Beschreibung des Parameters Parameterwert Produktname Tafelblechschere MSW-HS- MSW-HS- MSW-HS- Modell F1000 F1320 F1500 Abmessungen (Breite x Tiefe x... - Page 4 Vor dem Gebrauch die Gebrauchsanweisung sorgfältig lesen. VORSICHT! oder WARNUNG! oder HINWEIS! zur Beschreibung einer Situation (allgemeines Warnzeichen). Schutzbrille tragen. Es sind Schutzhandschuhe zu tragen. Abdeckung muss verwendet werden. Fußschutz verwenden. ACHTUNG! Gefahr von Quetschverletzungen der Hand! Nur für internen Gebrauch. ACHTUNG! Die Abbildungen in dieser Bedienungsanleitung dienen nur der Veranschaulichung und können in einigen Details vom tatsächlichen Aussehen des Produkts abweichen.
-
Page 5: Sicherheit Am Arbeitsplatz
Metallschere. 2.1. Sicherheit am Arbeitsplatz a) Halten Sie den Arbeitsbereich aufgeräumt und gut beleuchtet. Unordnung oder schlechte Beleuchtung kann zu Unfällen führen. Seien Sie vorausschauend, achten Sie darauf, was Sie tun, und nutzen Sie Ihren gesunden Menschenverstand, wenn Sie das Gerät benutzen. b) Wenn Sie Zweifel an der Funktionstüchtigkeit des Geräts haben, wenden Sie sich an den technischen Kundendienst des Herstellers. - Page 6 Seien Sie vorsichtig und benutzen Sie Ihren gesunden Menschenverstand, wenn Sie mit dem Gerät arbeiten. Ein Moment der Unachtsamkeit während des Betriebs kann zu schweren Verletzungen führen. Verwenden Sie bei der Arbeit mit dem Gerät die erforderliche persönliche Schutzausrüstung, wie in Abschnitt 1 der Symbolerklärung angegeben. Die Verwendung geeigneter, zugelassener persönlicher Schutzausrüstung verringert das Verletzungsrisiko.
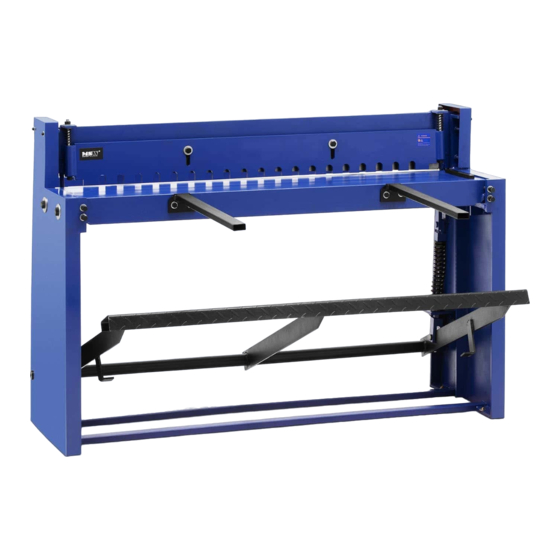
- Page 7 Produkts. Es wird empfohlen, bei der Verwendung Vorsicht und gesunden Menschenverstand walten zu lassen. 3. Anweisungen für den Gebrauch Das Produkt ist zum Schneiden von Blechen, ABS oder anderen Kunststoffen bestimmt. Für allerlei Schäden, die durch unsachgemäßen Gebrauch entstehen, haftet der Anwender. 3.1. Produktübersicht MSW-HS-F1320 (andere ähnliche)
- Page 8 A. Einstellschrauben für das Messerspiel...
- Page 9 B. Klingenschutz C. Vordere Halterungen D. Klingenhebel-Pedal E. Hintere Halterungen Beweglicher Querbalken 3.2. Arbeitsvorbereitung AUFSTELLUNG DES GERÄTS: Die Umgebungstemperatur darf 45°C und die relative Luftfeuchtigkeit darf 85 % nicht übersteigen. Das Gerät muss von heißen Oberflächen ferngehalten werden. Verwenden Sie das Gerät immer auf einer ebenen, stabilen, sauberen, feuerfesten und trockenen Oberfläche und außerhalb der Reichweite von Kindern und Personen mit eingeschränkten geistigen, sensorischen und intellektuellen Fähigkeiten.
-
Page 10: Arbeiten Mit Der Maschine
Richten Sie die kleineren Löcher in den Profilen der Pedaleinheit mit den Hebelprofilen von innen mit der Feder aus, setzen Sie 2 Stifte ein und sichern Sie sie an den Enden mit Clips (siehe Bild unten), biegen Sie die Enden der Clips. Nach der Installation der Pedaleinheit befestigen Sie die 2 vorderen Halterungen von vorne, indem Sie sie mit der Tischplatte verschrauben. - Page 11 Drücken Sie das Pedal des Messerhebels fest mit dem Fuß, bis es einen • vollständigen Hub ausführt. HINWEIS: Bei dickeren und/oder härteren Materialien kann es manchmal notwendig sein, das Pedal stärker zu drücken oder sogar darauf zu stehen. 3.3.3 Einstellung des Blattspiels Zum Einstellen des Blattspiels: Lösen Sie auf beiden Seiten die Tischbefestigungsschrauben (a), •...
-
Page 12: Reinigung Und Wartung
Um das Messerende nach oben oder unten zu verstellen, ziehen Sie den Pedalstift des Messerhebels heraus und lösen Sie die Mutter, die ihn hält, dann stellen Sie den Bügel nach oben oder unten ein und setzen Sie sie wieder zusammen. HINWEIS: Eine lockere Feststellschraube kann dazu führen, dass die Klinge während des Betriebs vibriert;... - Page 13 Metallschleifmaschine geschärft werden, indem beide Breitseiten der Klinge geschliffen werden. Die untere Klinge hat eine Schneide mit 50 mm Unterschnitt und 25 mm Unterschnitt vorne. Sie können auf einer Schärfmaschine nachgeschärft werden, indem die breite Seite der Klinge mit einem Unterschnitt von 25 mm geschliffen wird.
-
Page 14: Technical Data
If any questions arise related to the accuracy of the information contained in the User Manual, please refer to the English version of those contents which is the official version. Technical Data Parameter description Parameter value Product name Metal shears MSW-HS- MSW-HS- MSW-HS- Model F1000 F1320 F1500 Dimensions [width x depth x... -
Page 15: Safety Of Use
Explanation of symbols Read the manual before use. CAUTION! or WARNING! or REMEMBER! describing a situation (general warning sign). Wear protective goggles. Wear protective gloves. Use the safety cover. Wear protective footwear. CAUTION! Danger of crushing your hand!! For indoor use only. CAUTION! The figures in this manual are illustrative only and may vary in some details from the actual appearance of the product. -
Page 16: Safety In The Workplace
2.1. Safety in the workplace a) Keep the work area tidy and well-lit. Disorder or poor lighting can lead to accidents. Be foresighted, watch what you are doing, and use common sense when using the device. b) If in doubt as to whether the device is working, contact the manufacturer’s technical service. - Page 17 Do not overestimate your capabilities. Maintain body balance and equilibrium at all times during operation. This allows for better control of the machine in unexpected situations. Do not wear loose clothing or jewelry. Keep hair, clothing, and gloves away from moving parts. Loose clothing, jewelry, or long hair can be caught in moving parts.
-
Page 18: Product Overview
Caution and common sense are advised when using the product. 3. Instructions for use The product is designed for cutting sheet metal or ABS or other type of plastic. The user is responsible for any damage resulting from misuse. 3.1. Product overview MSW-HS-F1320 (other similar) - Page 19 A. Knife clearance adjustment screws...
-
Page 20: Preparation For Operation
B. Blade guard C. Front brackets D. Blade lever pedal E. Rear brackets Movable crossbar 3.2. Preparation for operation POSITIONING OF THE UNIT The ambient temperature must not exceed 45°C and ambient humidity should not exceed 85%. Keep the unit away from any hot surfaces. Always use the appliance on an even, stable, clean, fireproof and dry surface and out of the reach of children and persons with reduced mental, sensory and intellectual functions. -
Page 21: Working With The Machine
Align the smaller holes in the pedal unit profiles with the lever profiles from the inside with the spring, insert 2 pins and secure them at the ends with clips (see picture below), bend the ends of the clips. After installing the pedal unit, attach the 2 front brackets from the front by screwing them to the table top. - Page 22 To set the blade clearance: On both sides, loosen the table fixing screws (a), the table locking • screws (b), and the large table clamping screws (c). • Adjust the gap between the table and the blade (using the feeler gauge (d;...
-
Page 23: Cleaning And Maintenance
To adjust the blade end up or down, pull out the knife lever pedal pin and loosen the nut holding it, then adjust the yoke up or down and put them back together. NOTE: A loose locking screw can cause the blade to vibrate during operation, so make sure it rests firmly on the washers. - Page 24 a) Upper blade cross-section (center holes) b) Lower blade cross-section (holes below the center line)
-
Page 25: Dane Techniczne
Dane techniczne Opis Wartość parametru parametru Nazwa produktu Nożyce gilotynowe do blachy MSW-HS- MSW-HS- MSW-HS- Model F1000 F1320 F1500 Wymiary [Szerokość x 1950 x 1220 x 1950 x 1525 x 1935 x 1700 x Głębokość... - Page 26 Dla zapewnienia długiej i niezawodnej pracy urządzenia należy dbać o jego prawidłową obsługę oraz konserwację zgodnie ze wskazówkami zawartymi w tej instrukcji. Dane techniczne i specyfikacje zawarte w tej instrukcji obsługi są aktualne. Producent zastrzega sobie prawo dokonywania zmian związanych z podwyższeniem jakości. Uwzględniając postęp techniczny i możliwość...
-
Page 27: Bezpieczeństwo Użytkowania
2. Bezpieczeństwo użytkowania UWAGA! Przeczytać wszystkie ostrzeżenia dotyczące bezpieczeństwa oraz wszystkie instrukcje. Niezastosowanie się do ostrzeżeń i instrukcji może spowodować ciężkie obrażenia ciała lub śmierć. Termin „urządzenie” lub „produkt” w ostrzeżeniach i w opisie instrukcji odnosi się do: nożyce gilotynowe do blachy. 2.1. - Page 28 Maszynę mogą obsługiwać osoby sprawne fizycznie, zdolne do jej obsługi i odpowiednio wyszkolone, które zapoznały się z niniejszą instrukcją oraz zostały przeszkolone w zakresie bezpieczeństwa i higieny pracy. Urządzenie mogą obsługiwać osoby sprawne fizycznie, zdolne do jego obsługi i odpowiednio wyszkolone, które zapoznały się z niniejszą instrukcją oraz zostały przeszkolone w zakresie bezpieczeństwa i higieny pracy.
-
Page 29: Zasady Użytkowania
Aby zapewnić zaprojektowaną integralność operacyjną urządzenia, nie należy usuwać zainstalowanych fabrycznie osłon lub odkręcać śrub. Przy transportowaniu i przenoszeniu urządzenia z miejsca magazynowania do miejsca użytkowania należy uwzględnić zasady bezpieczeństwa i higieny pracy przy ręcznych pracach transportowych obowiązujących w kraju, w którym urządzenia są... -
Page 30: Opis Urządzenia
3.1. Opis urządzenia MSW-HS-F1320 (pozostałe podobne) -
Page 31: Przygotowanie Do Pracy
A. Śruby regulacji prześwitu noża B. Osłona ostrza C. Wsporniki przednie D. Pedał dźwigni ostrza E. Wsporniki tylne Ruchoma poprzeczka 3.2. Przygotowanie do pracy UMIEJSCOWIENIE URZĄDZENIA Temperatura otoczenia nie może przekraczać 45°C a wilgotność względna nie powinna przekraczać 85%. Urządzenie należy trzymać z dala od wszelkich gorących powierzchni. - Page 32 Urządzenie należy przymocować do podłogi w miejscy w którym będzie pracować – zapewni to stabilność oraz dokładność pracy urządzenia. Posiłkować się poziomicą. Do mocowania wykorzystać otwory w podstawie urządzenia. Następnie zespół pedała dźwigni ostrza wsunąć pomiędzy boczne ściany urządzenia tak, by otwory na krańcach jego profili zbiegały się z otworami w bocznych ścianach. Przez te otwory w ścianach przełożyć...
-
Page 33: Praca Z Urządzeniem
Po zamocowaniu zespołu pedała przymocować od frontu 2 wsporniki przednie przykręcając je do blatu przy pomocy dołączonych w blacie śrub wraz z podkładkami – użyć dołączonych kluczy. Od tyłu wsunąć w otwory wsporniki tylne tak, by miarka na nich znajdowała się od góry i na tych wspornikach zamontować... - Page 34 Celem ustawienia luzu ostrza należy: Z obydwu stron poluzować śruby ustalające stół (a), śruby • blokujące stół (b) oraz duże śruby mocowania stołu (c). • Wyregulować szczelinę pomiędzy stołem a ostrzem (przy pomocy szczelinomierza (d; nie wchodzi w skład urządzenia) ustawionego na 0,05 mm) suwając stołem w odpowiednim kierunku (c).
-
Page 35: Czyszczenie I Konserwacja
Aby wyregulować koniec ostrza w górę lub w dół, wyciągnąć zawleczkę pedału dźwigni noża i poluzować nakrętkę trzymającą go, następnie ustawić jarzmo w górę lub dół i z powrotem złożyć je ze sobą. UWAGA: luźna śruba blokująca może powodować drgania ostrza podczas pracy, dlatego należy upewnić... - Page 36 Dolne ostrze ma jedną krawędź tnącą z 50 mm podcięciem krawędzi i 25 mm podcięciem czołowym. Można je ponownie naostrzyć na szlifierce, szlifując szeroką stronę ostrza z 25 mm podcięciem. a) Przekrój górnego ostrza (otwory na środku) b) Przekrój dolnego ostrza (otwory poniżej linii środkowej)
-
Page 37: Technické Údaje
řiďte anglickou verzí tohoto obsahu. Jedná se o oficiální verzi. Technické údaje Popis parametru Hodnota parametru Název výrobku Gilotinové nůžky na plech MSW-HS- MSW-HS- MSW-HS- Model F1000 F1320 F1500 Rozměry (šířka x hloubka x... - Page 38 Před použitím se seznamte s pokyny. POZOR! nebo VAROVÁNÍ! nebo PAMATUJ! popisující situaci (obecné varovné znamení). Používejte ochranné brýle. Používejte ochranné rukavice. Používejte víko. Používejte ochranu nohou. UPOZORNĚNÍ! Nebezpečí rozmačkání rukou! K použití pouze uvnitř místností. UPOZORNĚNÍ! Ilustrace použité v těchto pokynech k obsluze slouží pouze k náhledu a v některých detailech se mohou lišit od skutečného vzhledu výrobku.
-
Page 39: Bezpečnost Na Pracovišti
2.1. Bezpečnost na pracovišti a) Udržujte pracovní prostor uklizený a dobře osvětlený. Nepořádek nebo nedostatečné osvětlení může vést k nehodám a úrazům. Buďte předvídaví, sledujte, co děláte, a při používání zařízení používejte zdravý rozum. b) V případě pochybností, zda zařízení funguje, kontaktujte technický servis výrobce. - Page 40 Nenoste volný oděv ani šperky. Vlasy, oděv a rukavice udržujte v dostatečné vzdálenosti od pohyblivých částí. Volný oděv, šperky nebo dlouhé vlasy mohou být pohyblivými částmi zachyceny a vtaženy. Zařízení není hračka. Zabraňte dětem, aby si se zařízením hrály. Zpracovávaný materiál by měl být zbavený nečistot. Během práce zařízení...
-
Page 41: Návod K Použití
Výrobek je určen pro řezání plechu nebo ABS nebo jiného typu plastu. Zodpovědnost za veškeré škody, které vzniknou jako důsledek používání zařízení způsobem, který není v souladu s jeho určením, je na straně uživatele. 3.1. Přehled produktů MSW-HS-F1320 (další podobné) - Page 42 A. Šrouby pro nastavení vůle nožů...
- Page 43 B. Kryt čepele C. Přední držáky D. Pedál čepelové páky E. Zadní držáky Pohyblivá příčka 3.2. Příprava k práci UMÍSTĚNÍ ZAŘÍZENÍ Teplota prostředí nesmí překračovat 45 °C a relativní vlhkost by neměla překračovat 85 %. Zařízení používejte v dostatečné vzdálenosti od horkých ploch. Spotřebič vždy používejte na rovném, stabilním, čistém, ohnivzdorném a suchém povrchu a mimo dosah dětí...
-
Page 44: Práce Se Strojem
Menší otvory v profilech pedálové jednotky srovnejte zevnitř s pružinou s profily páky, vložte 2 čepy a na koncích je zajistěte sponami (viz obrázek níže), konce spon ohněte. Po instalaci pedálové jednotky připevněte 2 přední držáky zepředu přišroubováním k desce stolu. Použijte šrouby a podložky dodané s deskou stolu - použijte přiložené klíče. - Page 45 Chcete-li nastavit vůli čepele: Na obou stranách povolte upevňovací šrouby stolu (a), zajišťovací • šrouby stolu (b) a velké upínací šrouby stolu (c). • Nastavte mezeru mezi stolem a čepelí (pomocí spároměru (d; není součástí dodávky) nastaveného na 0,05 mm) pohybem stolu ve vhodném směru (c).
- Page 46 Chcete-li nastavit konec čepele nahoru nebo dolů, vytáhněte čep pedálu nožové páky a povolte matici, která jej drží, poté nastavte třmen nahoru nebo dolů a dejte je zpět k sobě. POZNÁMKA: Uvolněný zajišťovací šroub může způsobit vibraci kotouče během provozu, proto se ujistěte, že pevně spočívá na podložkách. 3.4.
- Page 47 a) Horní průřez čepele (středové otvory) b) Spodní průřez čepele (otvory pod středovou osou)
-
Page 48: Caractéristiques Techniques
à la version anglaise de ces contenus en tant que version officielle. Caractéristiques techniques Description du paramètre Valeur du paramètre Nom de produit Cisaille à tôle d'atelier MSW-HS- MSW-HS- MSW-HS- Modèle F1000 F1320 F1500 Dimensions (largeur x 1950 x 1220 x 1950 ×... - Page 49 conçue et construite de manière à ce que les risques résultant des émissions sonores soient réduits au niveau le plus bas possible. Explication des symboles Veuillez lire attentivement le mode d’emploi ci-dessous avant d’utiliser le produit. AVERTIR! ou ATTENTION ! ou SOUVENEZ-VOUS ! décrivant une situation (signe d'avertissement général).
-
Page 50: Sécurité Personnelle
Le terme "dispositif" ou "produit" dans les avertissements et dans la description du manuel fait référence à l'intitulé suivant: cisailles à métaux. 2.1. Sécurité au travail a) Gardez la zone de travail propre et bien éclairée. Tout désordre ou mauvais éclairage risquent d’entraîner des accidents. - Page 51 Lors de l’utilisation de l’appareil, utilisez les équipements de protection individuelle nécessaires énumérés au point 1 de la signification des symboles. L’utilisation d’équipements de protection individuelle appropriés et agrées réduit le risque de blessure. Ne surestimez pas vos capacités. Maintenez l’équilibre du corps à tout moment du travail.
-
Page 52: Présentation Du Produit
3. Mode d'emploi Le produit est conçu pour couper de la tôle ou de l'ABS ou tout autre type de plastique. L’utilisateur est responsable de tout dommage résultant d’une utilisation non conforme du produit. 3.1. Présentation du produit MSW-HS-F1320 (autres similaires) - Page 53 A. Vis de réglage du dégagement des couteaux...
- Page 54 B. Capot protecteur de la lame C. Supports avant D. Pédale de levier de lame E. Supports arrière Traverse mobile 3.2. Préparation au fonctionnement PLACEMENT DE L'APPAREIL : La température ambiante ne doit pas dépasser 45°C et l'humidité ambiante ne doit pas dépasser 85 %.
-
Page 55: Travailler Avec La Machine
Alignez les petits trous des profils du pédalier avec les profils du levier de l'intérieur avec le ressort, insérez 2 goupilles et fixez-les aux extrémités avec des clips (voir l'image ci-dessous), pliez les extrémités des clips. Après avoir installé le pédalier, fixez les 2 supports avant par l'avant en les vissant au plateau de la table. - Page 56 Appuyez fermement sur la pédale du levier de lame avec votre pied • jusqu'à ce qu'elle effectue un mouvement complet. REMARQUE : parfois dans le cas de matériaux plus épais et/ou plus durs, il peut être nécessaire d'appuyer davantage sur la pédale ou même de se tenir dessus.
-
Page 57: Nettoyage Et Entretien
Pour ajuster l'extrémité de la lame vers le haut ou vers le bas, tirez sur la goupille de la pédale du levier du couteau et desserrez l'écrou qui la maintient, puis ajustez le joug vers le haut ou vers le bas et remettez-les ensemble. - Page 58 La lame inférieure a un tranchant avec une contre-dépouille de 50 mm et une contre-dépouille avant de 25 mm. Ils peuvent être réaffûtés sur un affûteur en meulant le côté large de la lame avec une contre-dépouille de 25 mm. a) Coupe transversale de la lame supérieure (trous centraux) b) Section transversale de la lame inférieure (trous sous la ligne médiane)
-
Page 59: Dati Tecnici
è la versione ufficiale. Dati tecnici Descrizione del parametro Valore del parametro Nome del prodotto Cesoia a ghigliottina da tavolo MSW-HS- MSW-HS- Modello MSW-HS-F1500 F1000 F1320 Dimensioni (larghezza x... - Page 60 Spiegazione dei simboli Prima dell’uso bisogna prendere visione del manuale. ATTENZIONE! o ATTENZIONE! o RICORDA! descrivere una situazione (segnale di avvertimento generale). Indossare gli occhiali protettivi. Indossare guanti di protezione. Utilizzare la protezione. Indossare la protezione dei piedi ATTENZIONE! Pericolo di schiacciamento delle mani Da utilizzare esclusivamente all’interno dei locali.
-
Page 61: Sicurezza Sul Posto Di Lavoro
cesoie metalliche. 2.1. Sicurezza sul posto di lavoro a) Mantenere l'area di lavoro ordinata e ben illuminata. Il disordine o la scarsa illuminazione possono provocare incidenti. Sii previdente, guarda cosa stai facendo e usa il buon senso quando usi il dispositivo. b) In caso di dubbi sul funzionamento del dispositivo, contattare il servizio tecnico del produttore. - Page 62 Usare i dispositivi di protezione individuale necessari quando si lavora con l'apparecchio, come specificato nella sezione 1 della spiegazione dei simboli. L'uso di dispositivi di protezione individuale appropriati e approvati riduce il rischio di lesioni. Non sopravvalutate le proprie capacità. Mantenere l'equilibrio del corpo e il bilanciamento in ogni momento durante il lavoro.
-
Page 63: Istruzioni Per L'uso
3. Istruzioni per l'uso Il prodotto è progettato per il taglio di lamiere o ABS o altro tipo di plastica. L'utente è responsabile di qualsiasi danno derivante da un uso improprio. 3.1. Panoramica del Prodotto MSW-HS-F1320 (altro simile) - Page 64 A. Viti di regolazione del gioco del coltello...
-
Page 65: Preparazione Al Lavoro
B. Protezione della lama C. Staffe anteriori D. Pedale leva lama E. Staffe posteriori Traversa mobile 3.2. Preparazione al lavoro POSIZIONAMENTO DELL’APPARECCHIO La temperatura ambiente non deve superare i 45°C e l'umidità relativa non deve superare l'85%. Tenere l’apparecchio lontano da qualsiasi superficie calda. Utilizzare sempre l'apparecchio su una superficie piana, stabile, pulita, ignifuga e asciutta e fuori dalla portata di bambini e persone con ridotte funzioni mentali, sensoriali e intellettive. - Page 66 Allineare i fori più piccoli dei profili pedaliera con i profili leva dall'interno con la molla, inserire 2 perni e fissarli alle estremità con clip (vedi foto sotto), piegare le estremità delle clip. Dopo aver installato la pedaliera, fissare le 2 staffe anteriori dalla parte anteriore avvitandole al piano del tavolo.
- Page 67 Per impostare la distanza della lama: Su entrambi i lati, allentare le viti di fissaggio del tavolo (a), le viti • di bloccaggio del tavolo (b) e le viti grandi di bloccaggio del tavolo (c). • Regolare la distanza tra la tavola e la lama (utilizzando lo spessimetro (d;...
-
Page 68: Pulizia E Manutenzione
Per regolare l'estremità della lama verso l'alto o verso il basso, estrarre il perno del pedale della leva del coltello e allentare il dado che lo trattiene, quindi regolare il giogo verso l'alto o verso il basso e rimetterli insieme. NOTA: una vite di bloccaggio allentata può... - Page 69 a) Sezione lama superiore (fori centrali) b) Sezione trasversale lama inferiore (fori sotto la linea centrale)
-
Page 70: Datos Técnicos
Datos técnicos Descripción del Valor del parámetro parámetro Nombre del producto Cizalla para chapa MSW-HS-F1000 MSW-HS-F1320 MSW-HS-F1500 Modelo Dimensiones (anchura × profundidad × altura) 1950x1220x1205 1950x1525x1025... -
Page 71: Seguridad De Uso
Explicación de los símbolos Antes de utilizar, leer atentamente el manual. ¡PRECAUCIÓN! o ¡ ADVERTENCIA! o ¡ RECUERDA! describir una situación (señal general de advertencia). Utilizar gafas de seguridad. Usar guantes de protección. Utilizar protección. Utilizar protección para los pies. ¡ADVERTENCIA! ¡Peligro de aplastar las manos! Solo para uso en interiores. -
Page 72: Seguridad En El Lugar De Trabajo
cizallas metalicas. 2.1. Seguridad en el lugar de trabajo a) Mantenga el área de trabajo ordenada y bien iluminada. El desorden o la mala iluminación pueden provocar accidentes. Sea previsor, mire lo que está haciendo y use el sentido común cuando use el dispositivo. b) En caso de duda sobre el funcionamiento del dispositivo, contacte con el servicio técnico del fabricante. - Page 73 Utilizar los equipos de protección individual necesarios para el trabajo con esta herramienta, detallados en el apartado 1 explicación de los símbolos. El uso de los equipos de protección individual adecuados y certificados reduce el riesgo de lesiones. Cuidado con no sobrevalorar las fuerzas. Siempre mantener el equilibrio y el balance del cuerpo.
-
Page 74: Instrucciones De Uso
3. Instrucciones de uso El producto está diseñado para cortar chapa o ABS u otro tipo de plástico. La responsabilidad de todos los daños resultantes de un uso distinto al indicado recae sobre el usuario. 3.1. Descripción del producto MSW-HS-F1320 (otros similares) - Page 75 A. Tornillos de ajuste de la holgura de la cuchilla...
-
Page 76: Preparación Para El Trabajo
B. Protección de la cuchilla C. Soportes delanteros D. Pedal de palanca de cuchilla E. Soportes traseros Travesaño móvil 3.2. Preparación para el trabajo LUGAR DE USO La temperatura de ambiente no debe exceder los 45°C y la humedad relativa no debe exceder el 85%. - Page 77 Alinee los orificios más pequeños en los perfiles de la unidad de pedal con los perfiles de palanca desde el interior con el resorte, inserte 2 pasadores y asegúrelos en los extremos con clips (vea la imagen a continuación), doble los extremos de los clips.
- Page 78 Presione firmemente con el pie el pedal de la palanca de la cuchilla hasta • que haga un recorrido completo. NOTA: en ocasiones, en el caso de materiales más gruesos y/o más duros, puede ser necesario pisar más el pedal o incluso pararse sobre él. 3.3.3 Ajuste de la holgura de la hoja Para configurar el espacio libre de la cuchilla: En ambos lados, afloje los tornillos de fijación de la mesa (a), los...
-
Page 79: Limpieza Y Mantenimiento
Para ajustar el extremo de la cuchilla hacia arriba o hacia abajo, extraiga el pasador del pedal de la palanca de la cuchilla y afloje la tuerca que lo sostiene, luego ajuste el yugo hacia arriba o hacia abajo y vuélvalos a unir. NOTA: Un tornillo de bloqueo flojo puede hacer que la cuchilla vibre durante el funcionamiento, así... - Page 80 La hoja inferior tiene un filo con un destalonado de 50 mm y un destalonado frontal de 25 mm. Se pueden volver a afilar en un afilador rectificando el lado ancho de la hoja con una muesca de 25 mm. a) Sección transversal de la hoja superior (agujeros centrales) b) Sección transversal inferior de la hoja (agujeros debajo de la línea central)
-
Page 81: Műszaki Adatok
Ha bármilyen kérdés merül fel a használati útmutatóban szereplő információk pontosságával kapcsolatban, kérjük, hivatkozzon ezen tartalmak angol nyelvű változatára, amely a hivatalos változat. Műszaki adatok Paraméter leírása Paraméter értéke Precíziós mérleg Táblaolló MSW-HS- MSW-HS- MSW-HS- Modell F1000 F1320 F1500 Méretek (szélesség x mélység... - Page 82 Jelmagyarázat Használat előtt ismerkedjen meg az utasítással! VIGYÁZAT! vagy FIGYELEM! vagy FIGYELEM! egy helyzet leírása (általános figyelmeztető jel). Viseljen védőszemüveget. Használjon védőkesztyűt. Használjuk a borítást. Viseljen munkavédelmi cipőt. VIGYÁZAT! Kézfejzúzódás veszélye Csak beltéri használatra. VIGYÁZAT! A használati útmutató illusztrációi szemléltető jellegűek és bizonyos részletekben eltérhetnek a termék tényleges megjelenésétől.
- Page 83 fémolló. 2.1. Munkahelyre vonatkozó biztonsági szabályok a) Tartsa rendben és jól megvilágítva a munkaterületet. A rendetlenség vagy a rossz megvilágítás balesetekhez vezethet. Legyen előrelátó, figyeljen arra, hogy mit csinál, és használja a józan eszét a készülék használatakor. b) Ha kétségei vannak afelől, hogy a készülék működik-e, forduljon a gyártó műszaki szolgálatához.
- Page 84 Használja szimbólummagyarázat pontjában felsorolt, gép üzemeltetéséhez szükséges személyi védőfelszereléseket. A megfelelő, hitelesített egyéni védőfelszerelések használata csökkenti a sérülés veszélyét. Ne becsülje túl képességeit. Mindenkor tartsa fenn teste egyensúlyát. Ez lehetővé teszi váratlan helyzetekben a készülék jobb irányítását. Ne viseljen laza ruházatot vagy ékszert. Haját, ruházatát és kesztyűjét tartsa távol a mozgó...
-
Page 85: Használati Utasítás
óvatosan és a józan ész szabályai szerint! 3. Használati utasítás A terméket fémlemez, ABS vagy más típusú műanyag vágására tervezték. A felhasználó felelős a nem rendeltetésszerű használatból eredő bármilyen kárért. 3.1. Termék áttekintés MSW-HS-F1320 (más hasonló) - Page 86 A. A kés távolságának beállítási csavarjai...
- Page 87 B. Élfedő C. Első konzolok D. Penge kar pedál E. Hátsó konzolok Mozgatható keresztrúd 3.2. Beüzemelés előtt BERENDEZÉS ELHELYEZÉSE: A készülék környezetének hőmérséklete nem haladhatja meg a 45°C-ot, és páratartalma nem haladhatja meg a 85%-ot. Tartsa távol a készüléket bármilyen forró...
- Page 88 Igazítsa a pedálegység profiljain lévő kisebb lyukakat a karprofilokhoz belülről a rugóval, helyezzen be 2 csapot, és rögzítse őket a végükön klipszekkel (lásd az alábbi képet), hajlítsa meg a klipszek végeit. A pedálegység felszerelése után rögzítse a 2 elülső konzolt elölről az asztallaphoz csavarozva.
- Page 89 MEGJEGYZÉS: néha vastagabb és/vagy keményebb anyagok esetében szükség lehet a pedál erősebb nyomására vagy akár ráállásra is. 3.3.3 A penge távolságának beállítása A pengehézség beállítása: • Lazítsa meg mindkét oldalon az asztal rögzítőcsavarjait (a), az asztal rögzítőcsavarjait (b) és a nagy asztal rögzítőcsavarjait (c). Állítsa be az asztal és a penge közötti hézagot (a 0,05 mm-re •...
-
Page 90: Tisztítás És Karbantartás
A penge végének felfelé vagy lefelé történő beállításához húzza ki a késkar pedálcsapját, és lazítsa meg az azt tartó anyát, majd állítsa be az igát felfelé vagy lefelé, és rakja vissza őket. MEGJEGYZÉS: A laza rögzítőcsavar a penge működés közbeni rezgését okozhatja, ezért győződjön meg róla, hogy szilárdan nyugszik az alátéteken. - Page 91 a) Felső lapát keresztmetszete (középső furatok) b) Az alsó lapát keresztmetszete (lyukak a középvonal alatt)
-
Page 92: Tekniske Data
Såfremt der opstår tvivl om meningen, henviser vi til den engelske brugsanvisning da dette er den officielle version. Tekniske data Parameterbeskrivelse Parameterværdi Produktnavn Guillotinesaks til metalplade MSW-HS- MSW-HS- MSW-HS- Model F1000 F1320 F1500 Dimensioner (bredde x dybde... - Page 93 Læs betjeningsvejledningen inden brug. FORSIGTIG! eller ADVARSEL! eller HUSK! som beskriver en situation (generelt advarselstegn). Brug sikkerhedsbriller. Brug beskyttelseshandsker. Brug afskærmning. Brug fodbeskyttelse OBS! Fare for at knuse hænder Udelukkende til indendørs brug. OBS! Illustrationerne i denne betjeningsvejledning er kun til reference og kan i nogle detaljer afvige fra det faktiske produkt.
-
Page 94: Sikkerhed På Arbejdspladsen
2.1. Sikkerhed på arbejdspladsen a) Hold arbejdsområdet ryddeligt og veloplyst. Uorden eller dårlig belysning kan føre til ulykker. Vær forudseende, se, hvad du gør, og brug din sunde fornuft, når du bruger apparatet. b) Hvis du er i tvivl om, hvorvidt enheden fungerer, skal du kontakte producentens tekniske tjeneste. - Page 95 Overvurder ikke dine evner. Oprethold kropsbalancen under hele arbejdstiden. Dette muliggør bedre kontrol af apparatet i uventede situationer. Bær ikke løst tøj eller smykker. Hold dit hår, tøj og handsker væk fra bevægelige dele. Løst tøj, smykker eller langt hår kan fanges i bevægelige dele. Apparatet er ikke et legetøj.
- Page 96 Det anbefales at udvise forsigtighed og sund fornuft, når du bruger det. 3. Brugsanvisning Produktet er beregnet til skæring af metalplader eller ABS eller andre typer plast. Enhver skade, der skyldes forkert brug, er brugerens ansvar. 3.1. Produktoversigt MSW-HS-F1320 (andre lignende)
- Page 97 A. Justeringsskruer til justering af knivafstand...
- Page 98 B. Klingeskærm C. Beslag foran D. Pedal til bladspiral E. Bageste beslag Flytbar tværstang 3.2. Klargøring til drift APPARATETS PLACERING Den omgivende temperatur må ikke overstige 45 °C, og luftfugtigheden må ikke overstige 85 %. Hold apparatet væk fra varme overflader. Brug altid apparatet på et jævnt, stabilt, rent, brandsikkert og tørt underlag og uden for børns og personer med nedsatte mentale, sensoriske og intellektuelle funktioner.
-
Page 99: Arbejde Med Maskinen
Juster de mindre huller i pedalenhedens profiler med håndtagsprofilerne indefra med fjederen, indsæt 2 stifter og fastgør dem i enderne med clips (se billedet nedenfor), bøj clipsenes ender. Når du har monteret pedalenheden, skal du fastgøre de 2 frontbeslag forfra ved at skrue dem fast til bordpladen. - Page 100 Sådan indstilles knivspændingen: På begge sider løsnes bordfastgørelsesskruerne (a), • bordlåseskruerne (b) og de store bordspændeskruer (c). • Juster afstanden mellem bordet og bladet (ved hjælp af føleren (d; medfølger ikke) indstillet til 0,05 mm) ved at flytte bordet i den rigtige retning (c).
-
Page 101: Rengøring Og Vedligeholdelse
Hvis du vil justere knivspidsen op eller ned, skal du trække knivhåndtagets pedalstift ud og løsne møtrikken, der holder den, og derefter justere åget op eller ned og sætte dem sammen igen. BEMÆRK: En løs låseskrue kan få bladet til at vibrere under drift, så sørg for, at den sidder fast på... - Page 102 a) Tværsnit af det øverste blad (midterhuller) b) Tværsnit af det nederste blad (huller under midterlinjen)
- Page 103 Umwelt – und Entsorgungshinweise Hersteller an Verbraucher Sehr geehrte Damen und Herren, gebrauchte Elektro – und Elektronikgeräte dürfen gemäß europäischer Vorgaben [1] nicht zum unsortierten Siedlungsabfall gegeben werden, sondern müssen getrennt erfasst werden. Das Symbol der Abfalltonne auf Rädern weist auf die Notwendigkeit der getrennten Sammlung hin.
Need help?
Do you have a question about the MSW-HS-F1000 and is the answer not in the manual?
Questions and answers