Table of Contents
Advertisement
Quick Links
Advertisement
Table of Contents

Subscribe to Our Youtube Channel
Related Manuals for Reflexion HIF2080


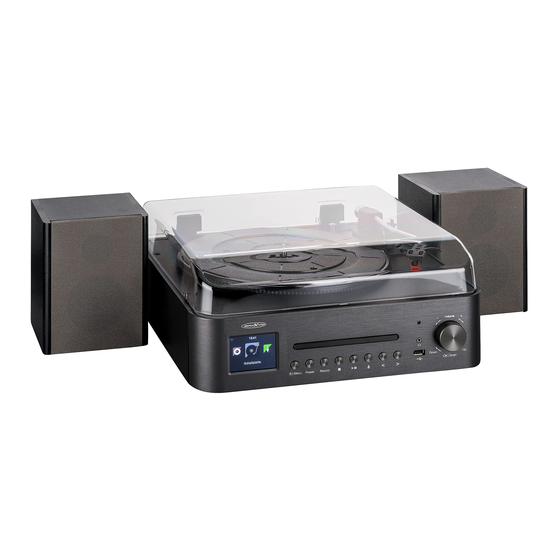
Summary of Contents for Reflexion HIF2080
- Page 1 User Manual Internet/DAB/UKW/CD/Bluetooth & Phono. COMBO HIF2080...
-
Page 2: Table Of Contents
Inhalt WHATS IN THE BOX ....................3 SAFETY INSTRUCTIONS ..................3 CONTROL BUTTONS AND CONNETCTIONS ............6 REMOTE CONTROL ....................8 FIRST INSTALLATION ..................... 9 GENERAL CONTROLS ..................11 FIRST SETUP ......................13 MANUAL CONTROL ....................18 THE MAIN MENU ....................19 INTERNET RADIO MODE .................. -
Page 3: Whats In The Box
WHATS IN THE BOX • HIF-2080 • 2 x Loudspeaker with loudspeaker cable • Remote control • User manual Also required for the remote control • 2 x Batterie Typ AAA, 1,5 V (not included) Recommended app To control your stereo system via mobile device, you need an app that can establish a connection between your Combi turntable and your mobile device. - Page 4 Never open the housing without authorization. Never carry out repairs yourself! Handle the product carefully. It can be damaged by bumps, blows or falling from even a small height. Keep the product away from moisture and extreme heat. ...
- Page 5 and its connecting cable as well as accessories for damage. Do not use the device if it is visibly damaged. Only operate the device on standard household sockets. Check whether the mains voltage specified on the type plate matches that of your mains supply. ...
-
Page 6: Control Buttons And Connetctions
CONTROL BUTTONS AND CONNETCTIONS 10 11 12 TFT LCD Display CD-driveLaufwerk Power / Menu button Press the switch the device on or off. Short key press to open the menu. Preset button Hold for about 3 seconds to save an FM / DAB station as a favorite. ... - Page 7 Record button Start USB recording. Stopp button ress to stop CD / USB playback. Play / Pause button Press to pause or resume CD / USB playback. Eject button Open / close the CD drive. Previous track (<) ...
-
Page 8: Remote Control
REMOTE CONTROL Power On / Off (Standby) Hold for about 3 seconds to save an FM / DAB station as a favorite. Briefly press the button to open the favorites list (preset list). Start USB recording ... -
Page 9: First Installation
Open the main menu. Open / close the CD drive. CD / USB playback buttons : CD / USB previous track. : CD / USB pause / resume playback. : CD / USB next track. ... - Page 10 Connect the loudspeakers with the loudspeaker cable supplied to the loudspeaker connections of your stereo system in the same color and on the side (R / L). To do this, simply pull the connection terminal up (red connection) or down (black connection), insert the end of the cable and allow the terminal to open.
-
Page 11: General Controls
GENERAL CONTROLS The HIF2080 can be controlled both via the buttons on the device itself, via the remote control and via the app. The buttons on the remote control are shown in the table. It is controlled via the app via your mobile device. - Page 12 ► Press for 3 s Next track Press ◄ Press for 3 s Previous track Press Selector Press switch Volume + Press Selector Press switch Volume - Press Eject button Press Eject CD Press Selector switch Press ◄ / ► Press Choose Press...
-
Page 13: First Setup
Press Display brightness Press Preset-button Press Favorites list Press Station search Selector switch Press Alarm clock menu Press Equalizer Press Sound on / off Press Mode Press FIRST SETUP Manual WiFi setup Turn on your stereo. Wait for it to boot up. This may take a few moments. Set the desired system language by turning the selector switch or using the arrow buttons on the remote control. - Page 14 Confirm your selection by pressing the selector switch or the OK button on the remote control. Start the manual network configuration by turning the selector switch or using the arrow buttons on the remote control to select the option Yes. Confirm your selection by pressing the selector switch or the OK button on the remote control.
- Page 15 Next input field: ► button Previous input field: ◄ button 12. Confirm the password by pressing the selector switch or the OK button on the remote control. Your stereo system will be connected to the WiFi network. This may take a few moments.
- Page 16 Confirm your selection by pressing the selector switch or the OK button on the remote control. Now press the WPS button on your router within 120 seconds. Note: Depending on your router, you may need to hold down the WPS button for a few seconds.
- Page 17 Turn on your stereo. Wait for it to boot. This may take a few moments. Select the desired system language by turning the selector switch or using the arrow buttons on the remote control. Confirm your selection by pressing the selector switch or the OK button on the remote control.
-
Page 18: Manual Control
MANUAL CONTROL Turn on Turn on your stereo by plugging it into a suitable power outlet. The display lights up and your stereo system starts up. Turn on a device In standby mode, the time is shown on the darkened display. Turn on your device by pressing the Standby / Menu button on the control panel or the Standby button on the remote control. -
Page 19: The Main Menu
THE MAIN MENU NOTE: With the exception of the Settings menu, this menu is also available in the app. Control via the app is faster and offers a greater range than control via the remote control. Internet radio Media center Bluetooth DAB/DAB+ Configuration... -
Page 20: Internet Radio Mode
INTERNET RADIO MODE NOTE: An internet connection is required to use internet radio mode. Menu structure Menü Untermenü Funktion/Option My Favorite Favorite list Manage favorites list Global Top 20 Genre Radio station Select radio station Country / Location Highlight Birds Lullaby Piano Rain... - Page 21 NOTE: To add a station manually, you need the URL of the stream. This does not mean the web address of the sender (e.g. http://example.fm). Finding the URL you need can be tricky. Sometimes this can be found on the broadcaster's website. There is also the option of browsing existing stream directories online or using a corresponding browser add-on or plug-in.
- Page 22 NOTE: Initially, you will only be shown 6 storage locations. As soon as the sixth memory location is occupied (even if the previous memory locations are also free), memory location 7 is displayed etc. NOTE: If a station has already been stored, the following symbol is shown in the display at the top left of the cOK instead of the memory list: Favorites list Open the list...
-
Page 23: Dab/Dab+ Mode
Select the station you want. Press the ► button to OK the options menu. Select the Rename menu item. Confirm your selection. The input window opens. OK the new station name one character at a time. Select characters Select the characters by turning the selector switch (counterclockwise: numbers & special characters, clockwise: AaBbCc) or pressing the number buttons on the remote control. - Page 24 Listen to DAB + radio Open the DAB / DAB + menu. Select a station and confirm your selection. The station is loaded and played. Save station Open the DAB / DAB + menu. Select the station you want. Hold down the preset button for approx. 3 seconds. Select the desired storage locatio NOTE: Initially, you will only be shown 6 storage locations.
-
Page 25: Fm Mode
Delete station list & start new station search Open the DAB / DAB + menu. Press the selector switch and then the ◄ button. Select the Yes option. Confirm your selection. The list is deleted. A new station search is started. FM MODE NOTE: Before using the FM mode, fully extend the antenna. - Page 26 The frequencies are searched and the stations found are stored. NOTE: To simply search for the next station from the current frequency, press and hold the ► (search up) or ◄ (search down) button. Listen to radio Open the FM menu. Tune in the desired station.
-
Page 27: Cd Mode
Save the station by pressing the selector switch or the OK button on the remote control. CD MODE NOTE: Your stereo system can play audio and MP3 CDs. Please make sure that the CDs are not badly scratched or otherwise damaged. Open the CD menu. -
Page 28: Aux Mode
AUX MODE Connect an audio source (e.g. MP3 player) to the AUX input of your stereo system using a 3.5 mm jack cable (not included). Open the AUX menu. Start and control playback via the audio source. The AUX symbol is shown in the display. - Page 29 Search for HIF2080 and connect the devices. After a successful connection, Bluetooth connected (device name) is shown on the display. Start the audio playback from your mobile device. Control playback via your mobile device or the playback buttons on your stereo system.
-
Page 30: Usb Mode
USB MODE NOTE: Please note that only the following audio formats can be played: MP3, WAV, WMA and AAC. Connect a USB storage device (up to 256 GB) to the USB socket on the device. Open the Media Center menu. Select the USB menu item and press the selector switch or the OK button on the remote control. -
Page 31: Vinyl Mode
VINYL MODE General Turntable Fixing screw Tonarm lock Counter weight Lift lever Speed switch Tonearm Needle... - Page 32 Gramophone playback NOTE: Before playing, please make sure that the fixing screw, which is used as a transport lock, is loosened. To do this, turn it counterclockwise. Open the Vinyl menu. Fold the cover up. Place your vinyl on the turntable. Set the speed required to play the vinyl.
-
Page 33: Usb Recording (Digitizing)
USB RECORDING (DIGITIZING) In the following modes you have the option of digitizing your music and storing it on a USB storage device (up to 256 GB). Connect a USB storage (not included) to the USB socket on the device. If the USB storage has been recognized, a USB symbol is shown in the top right of the display. -
Page 34: Stream Music
AAC / AAC + / FLAC / MP3 / WAV / WMA From the computer Connect your computer to the same network that the HIF2080 is connected to. Open a suitable media player (e.g. Windows Player version 11 or higher) or another streaming program. - Page 35 Sharing the content allows. We recommend the free App: AirMusic Control. Search for it in the Google Play Store (Android) or App Store (iOS) and install it on your mobile device. Connect your mobile device to the 2.4 GHz network that the HIF2080 is connected Open the AirMusic Control app.
- Page 36 Click on Stream in the bar at the top. Select More Streaming Options. All devices registered in the network are displayed. Set your stereo system (HIF2080) to Allowed. Check the box next to Allow remote control of the player. Open the Media Center menu on your stereo system.
-
Page 37: Weather Information In The Standby Display
You need a DLNA app to use this function. Please refer to the operating instructions for the app used for the exact steps for audio streaming. Open the DLNA app. Select HIF2080 as the playback device. WEATHER INFORMATION IN THE STANDBY DISPLAY NOTE: An internet connection is required to use this function. -
Page 38: Configurations
NOTE: In the weather display, you can call up an hourly weather forecast and other details (e.g. wind speed) by turning the selector switch or pressing the arrow buttons ▲ / ▼ on the remote control. CONFIGURATIONS Open the settings menu Open the Configuration menu. - Page 39 Timer Countdown / egg timer Scheduled Playing Set automatic on / off switch Language Set system language Dimmer Power saving mode Display Display color Power Management Automatic standby Sleep timer Set the sleep timer Location, temperature unit, display in standby on Weather / off DAB/FM Setup...
- Page 40 Resume When Power Switch function on / off Software update Updating the software Reset to Default Reset the stereo system to the factory settings Time Display In standby mode the display shows the date and time. If set, also the weather forecast. You have the choice between a digital and an analog clock display (standard: analog).
- Page 41 Select the desired network and confirm your selection. OK the password of the selected WLAN network by turning the selector switch (counterclockwise: numbers & special characters, clockwise: AaBbCc) or pressing the number buttons on the remote control. ► button Next input field: ...
- Page 42 Confirm your selection. Select the menu item Manual configuration. Confirm your selection. Select the Wireless menu item. Confirm your selection. Select the menu item DHCP and confirm your selection. Select the option you want (Default: DHCP (On)). Confirm your selection. The connection to the network is established. This may take a few moments.
- Page 43 Select the Wireless menu item. Confirm your selection. Select the Manage menu item and confirm your selection. Select the network that you want your stereo to connect to. Confirm your selection. The connection to the network is established. This may take a few moments.. Check Network when Power on By default, your stereo system is set up so that it automatically connects to the saved network when it is switched on.
- Page 44 Set the date & time In the Configuration menu, select the Date & Time menu item. Confirm your selection. Select the menu item Set date and time. Confirm your selection. Select the option you want and confirm your selection: Manual setup Auto Detect OK the date and time by turning the dial or You will automatically return to the...
- Page 45 Alarm You have the option of setting up to two alarm times as well as a timer-controlled alarm (snooze alarm clock, e.g. for a short nap). These can sound once, daily or only on selected days of the week. Activate & set alarm In the Configuration menu, select Alarm menu item.
- Page 46 Return to the alarm settings menu by pressing the ◄ button. The settings are applied. Select the Time menu item and confirm your selection. Set the desired alarm time by turning the selector switch or pressing the number buttons on the remote control. Use the ◄ / ► buttons to switch between the hours and minutes.
- Page 47 NOTE: When the alarm is activated, an alarm clock symbol is shown on the display to the left of the time. In the alarm clock menu, next to an activated alarm is the alarm time, next to a deactivated alarm is Off. NAP alarm NOTE: The NAP alarm clock is not a snooze or snooze function.
- Page 48 In the Configuration menu, select the Alarm menu item. Or press the alarm button on the remote control. The alarm menu opens. Select the menu item Alarm volume. Confirm your selection. Set the desired volume by turning the volume switch. Save the setting.
- Page 49 End the alarm completely by pressing one of the following keys: Alarm button on the remote control On / Off button on the remote control NOTE: The display is still in standby mode after the alarm has ended. To exit standby mode, either press and hold the volume button for 2-3 seconds or press the power button on the remote control.
- Page 50 Confirm your selection. Select the On option and confirm your selection. NOTE: To deactivate the automatic switching on and off, select the Off option and confirm it. Select the menu item Repeat: XXX. Confirm your selection. Select the repeat option you want. Set or remove the tick by pressing the ► button or the selector switch.
- Page 51 Confirm your selection. Select the desired mode (energy saving / turn on). Confirm your selection. Set the desired display brightness by turning the selector switch or pressing the ◄ / ► buttons. Save the setting. You will automatically return to the dimmer menu. Press the ◄...
- Page 52 Confirm your selection. The sleep timer symbol is shown in the display with the remaining time until the device is switched off. Weather info Set location Select the Weather menu item in the Configuration menu. Confirm your selection. Select the menu item Set Location. Confirm your selection. Select the area you want.
- Page 53 Confirm your selection. Select the menu item Show on standby. Confirm your selection. Select the desired option (Off / On). Confirm your selection. You will automatically return to the weather menu. DAB / FM setting Select the DAB / FM setting menu item in the Configuration menu. Confirm your selection.
- Page 54 Repeat one Shuffle Device settings Rename How to change the device name for the WLAN and Bluetooth function (default: HIF2080). Select the Configuration menu item in the Device menu. Confirm your selection. Select the menu item Rename. Confirm your selection.
- Page 55 OK the name of your stereo system by turning the selector switch (counterclockwise: numbers & special characters, clockwise: AaBbCc) or pressing the number buttons on the remote control. ► button Next input field: ◄ button Previous input field: Save the setting.
-
Page 56: App
Connect the device to the app Make sure the device HIF2080 is connected to the WiFi network. This is the case when the WLAN symbol in the top left of the display is white. If the WLAN symbol is gray, there is no network connection. -
Page 57: Stream Music
After a short time, you will be shown the home page of your stereo system. NOTE: If this is not the case, tap on HIF2080 in the list of devices found. Tap the streaming icon in the upper right corner. -
Page 58: Technical Specifications
Protection through double or reinforced insulation Protection class II Remote control 2 x battery Typ AAA, 1,5 V (Micro) Max. music output 2x 160 W Version Name HIF2080 2.402 – 2.480 MHz Frequency Bluetooth Max. Transmission power 4 dBm Range Up to 30m Type 802.11 b/g/n... - Page 59 SIMPLIFIED EU DECLARATION OF CONFORMITY Hereby, UltraMedia GmbH & Co. Handels KG declares that the radio equipment type HIF2080 is in compliance with Directive 2014/53 / EU. The full text of the EU Declaration of Conformity can be requested at the following email address.
-
Page 60: Warratny
WARRATNY...
Need help?
Do you have a question about the HIF2080 and is the answer not in the manual?
Questions and answers