Table of Contents
Advertisement
Quick Links
Advertisement
Table of Contents

Related Manuals for GlideScope Ranger


Summary of Contents for GlideScope Ranger
- Page 1 Ranger and Ranger Single Use User’s Manual...
- Page 3 Ranger and Ranger Single Use User’s Manual...
- Page 4 ® Sterrad is a registered trademark of Johnson & Johnson Gateway, LLC. ® The GlideScope technology is covered under US Patents (6,655,377) (6,543,447) (6,142,144) as well as European Patent 1307131. Additional patents pending. Information in this User’s Manual may change at any time without notice.
-
Page 5: Table Of Contents
Getting Started................. 13 Initial Inspection ..............13 Preparing for First Use............13 Powering the Ranger System..........16 ® Inserting the Ranger Video Baton into the GVL Stat..18 ® Detaching the GVL Stat from the Ranger Video Baton ... 20 Clinical Application Tips ............ - Page 6 Weekly Inspections ..............33 Replacing the Monitor Battery..........33 Storing the Ranger..............34 ® Storing the Reusable GVL ..........34 Storing the Ranger Video Baton ......... 34 Device Disposal ..............35 ® GlideScope Warranty Offerings ........... 36 Original First Year Total Customer Care Warranty ....
-
Page 7: Important Information
The device is dependable in an array of field conditions, making it ideal for pre-hospital and critical care situations. The Ranger is operational in seconds. It is compact for easy carrying and storage. The integrated, rechargeable lithium battery provides a minimum 90-minute continuous-use autonomy and allows for approximately 20 intubations per battery cycle (depending on usage). -
Page 8: Notice To All Operators
Notice to All Operators All operators should read this entire User’s Manual prior to using the Ranger System. Failure to follow these instructions may result in patient injury, compromise the performance of the system, and may void the system warranty. - Page 9 Connect the equipment to an outlet on a circuit different from that to which the other device(s) is (are) connected Consult your Verathon Medical Customer Care representative The Ranger System must be used with the supplied NOTE: cables to maintain electromagnetic interference (EMI) within certified limits.
-
Page 10: Introducing The Ranger System
The Ranger System is designed to provide an unobstructed view of the vocal cords through the use of advanced video technology. Use of the Ranger System has been found to help eliminate uncertainty during endotracheal intubation by providing a reliable view of the airway 99% of the time. -
Page 11: Ranger System Components
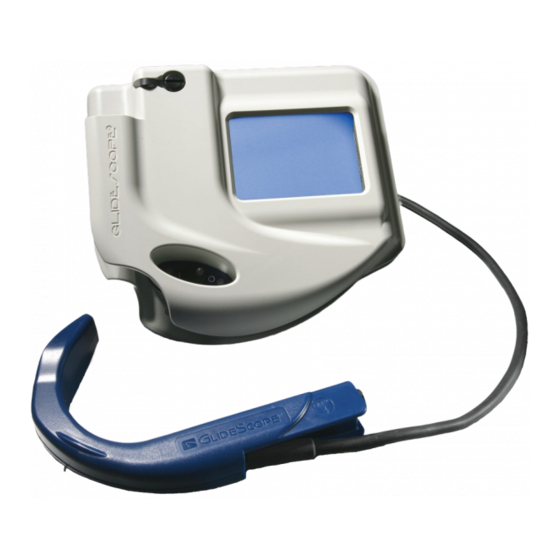
Two interchangeable video laryngoscope systems are available for use with the Ranger Monitor: The reusable Ranger Ranger Single Use Please refer to page 39 for a listing of Ranger System components and part numbers. Reusable Ranger System The Ranger System includes: The Ranger Video Monitor ®... -
Page 12: Ranger Single Use System
The Ranger Single Use System includes: The Ranger Video Monitor Reusable Ranger Video Baton with integrated video cable. The Ranger Video Baton is comprised of a reusable, high resolution, autofocusing, CMOS camera, LED light source, and an innovative anti-fogging mechanism. The Ranger Video Baton is available in two ®... - Page 13 Stats (four sizes available). The GVL Stat is a disposable, medical-grade plastic shell that provides mechanical support and protection for the Ranger Video Baton during intubations. ® GlideRite Rigid Stylet Figure 2. Ranger Single Use System. Ranger Video Monitor Reusable Ranger Video Baton (2 sizes) Single use ®...
-
Page 14: Displays, Controls, And Indicators
® Displays, Controls, and Indicators GlideScope Ranger System Displays, Controls, and Indicators Displays, Controls, and Indicators Ranger System components and features are illustrated in Figure 3. Figure 3. Ranger components. Monitor connector DC power socket (inside cradle) Monitor Protective cap... -
Page 15: Getting Started
425.867.1348 (International) +31.30.68.70.570 (Europe) For additional contact information, please see page 38. Preparing for First Use Prior to using the Ranger System for the first time, perform the following steps: 1. Charge the Battery (page 14). ® 2. Connect the Ranger GVL to the monitor (page 18). - Page 16 ® Getting Started GlideScope Ranger System 1. Charge the Battery Important: The battery must be fully charged before first use The unit will not operate while charging. If it is switched on during charging, the charging light will flash alternatively green and red-orange.
- Page 17 ® GlideScope Ranger System Getting Started Figure 4. Connect the Ranger Monitor to AC power to charge the battery. Figure 5. The charge status LED will turn green when the battery is fully charged. Charge status LED Orange: The monitor is charging...
-
Page 18: Powering The Ranger System
Powering the Ranger System The monitor contains a lithium battery that provides power to the Ranger System. The system must be operated exclusively on battery power, without a connection to an AC power source. Under normal conditions, a fully charged battery will last approximately 90 minutes. - Page 19 ® GlideScope Ranger System Getting Started IMPORTANT! The battery needs to be fully charged on first receipt. For instructions on charging the battery, see “Charge the Battery” on page 14. To supply power to the monitor: 1. Flip the power switch located on the front of the monitor to the position.
-
Page 20: Inserting The Ranger Video Baton Into The Gvl ® Stat
® To insert the Ranger Video Baton into the GVL Stat: 1. Insert the Ranger Video Baton into the sterile, single use ® Stat until it clicks into place (Figure 8). Ensure proper insertion by matching the logos on the ®... - Page 21 ® GlideScope Ranger System Getting Started Figure 8. Inserting the Ranger Video Baton into the single ® use GVL Stat. ® Stat Ranger Video Baton 2. Take care to avoid inserting the video baton backwards (Figure 9)! If the video baton is inserted incorrectly and becomes ®...
-
Page 22: Detaching The Gvl ® Stat From The Ranger Video Baton
Stat from the Ranger Video Baton ® The GVL Stat is a single-use device. After each use, it should be removed from the Ranger Video Baton and disposed of properly. ® To detach the Ranger Video Baton from the GVL Stat, grasp the handle of video baton and pull firmly (Figure 10). - Page 23 2. Connect the Ranger GVL or Ranger Video Baton to the monitor (see page 18). 3. Turn the Ranger on by moving the power switch to the position. 4. Observe the monitor screen to verify that an image is ®...
- Page 24 ® Getting Started GlideScope Ranger System Figure 11. When the power is on, one corner of the Ranger ® will be visible in the display. ® Edge of GVL ® Reusable Ranger GVL page 22 User’s Manual...
-
Page 25: Clinical Application Tips
ET tube with a soft distal tip. The ® GlideRite Rigid Stylet is specifically designed to ® complement the angle of the Ranger GVL to facilitate intubation. 5. To aid the passage of the endotracheal tube, withdraw the stylet approximately 2 inches (5 cm) and withdraw ®... -
Page 26: Tips On Advancing The Endotracheal Tube
If using another type of malleable stylet, Verathon recommends bending the tip of the stylet to at least 90° ® ® to complement the angle of the Ranger GVL or GVL Stat. An angle larger than 90° may increase the difficulty of advancing the endotracheal tube. - Page 27 ® GlideScope Ranger System Getting Started The proximal tip of the stylet may be bent backward to permit one-handed operation of the endotracheal tube ( Figure 13 The proximal end of the endotracheal tube should be carefully introduced between the vocal cords...
-
Page 28: Additional Tips
® Getting Started GlideScope Ranger System Additional Tips New Ranger users often achieve an excellent view with the ® Ranger GVL or Ranger Video Baton but may experience some difficulty advancing the endotracheal tube. This may be caused by two factors: Excessive lifting or pushing of the glottis by the ®... -
Page 29: Cleaning And Maintenance
Damage to the power supply Connectors and cable insulation integrity To ensure patient safety, users should perform a routine inspection of the Ranger System before every use to ensure that all endoscopic components are free of unintended rough surfaces, sharp edges, protrusions or cracks. -
Page 30: Cleaning The Ranger Gvl
Ranger GVL must be cleaned immediately after each use. ® Do not stow the Ranger GVL in the monitor cradle or in any other storage until all cleaning procedures have been completed During cleaning, take care to avoid overheating. Monitor the ®... - Page 31 Failure to cover the cable connector port with the protective cap prior to cleaning may result in water ingress and potential device failure. ® To clean the Ranger GVL ® 1. Disconnect the Ranger GVL and video cable from the monitor.
-
Page 32: Cleaning The Ranger Video Baton
Cleaning the Ranger Video Baton The Ranger Video Baton may be wiped with 70% isopropyl alcohol solution between uses. When required, the Ranger Video Baton can be put through a full cleaning process as follows: Figure 16. Place the To clean the Ranger Video... -
Page 33: Cleaning The Monitor
Make certain that the cable connector and NOTE: protective cap lock into place. 4. Wash the Ranger Video Baton manually with water to remove all foreign material from the surface of the device. 5. After removal, store the video baton in a clean environment. -
Page 34: Approved Disinfection Methods
® Steris System 1 ® ® Place the Ranger GVL or Ranger Video Baton in the Steris System 1 machine and begin the cleaning cycle as instructed by ® ® Steris . After removal, the Ranger GVL or Ranger Video Baton should be kept in a clean environment. -
Page 35: Cidex Or Cidex Opa
Verathon Medical ® Customer Care or your local Verathon Medical GlideScope Representative. Weekly Inspections Once a week, inspect the exterior surfaces of the Ranger ® ® System components: GVL s, GVL Stats, video batons, cables, and video monitor. -
Page 36: Storing The Ranger
Storage compartment Storing the Ranger Video Baton ® When not in use, store the Ranger Video Baton and GVL Stat with the monitor cradle (Figure 17) or in the clam shell storage case (Figure 18). When using the clamshell case for storage, please insert the video baton into the cradle as pictured. -
Page 37: Device Disposal
® GlideScope Ranger System Cleaning and Maintenance Figure 18. Storing the Ranger Single Use Video Baton ® The Ranger GVL and Ranger Video Baton can be safely used and stored under the following environmental conditions: Waterproof up to 3 ft (1.0 m) depth for 60 minutes Storage temperature range of 32°F (0°C) to 113°F... -
Page 38: Glidescope Warranty Offerings
This warranty applies for one (1) year ® from the date of shipment from Verathon . This warranty is given only to the original purchaser of the Ranger System. ® If a customer’s system requires service or repair, Verathon will either replace or provide a loaner unit within one (1) business day from the date of customer service notification. -
Page 39: What Is Covered
® manual are based upon Verathon experience and judgment with the Ranger System as of October 2008. The contents of this manual should not be considered to be all-inclusive, or to cover all contingencies. User’s Manual... -
Page 40: Contact Information
® Warranty GlideScope Ranger System Contact Information To obtain additional information regarding your Ranger System, please contact Verathon Medical Customer Care at: Corporate HQ: Verathon Medical (US and Canada) (United Kingdom) Ltd. Verathon Inc. The Granary Manor Farm 20001 North Creek Parkway... -
Page 41: Parts And Accessories
® GlideScope Ranger System Specifications Parts and Accessories Parts and Accessories Table 2. Ranger System components and accessories. Product Description Part Number ® GlideScope Ranger System, NA 0270-0374 ® GlideScope Ranger System, EU 0270-0375 ® GlideScope Ranger System, UK 0270-0376 ®... - Page 42 ® Specifications GlideScope Ranger System Product Description Part Number ® GlideScope Ranger System 0900-1307 User’s Manual, (English) AC Power Cord, 0.6 m, NA 0600-0247 AC Power Cord, 0.6 m, EU 0600-0246 AC Power Cord, 0.6 m, UK 0600-0248 ® Ranger GVL...
-
Page 43: Specifications
32° F (0° C) to 113°F (45° C) Altitude limit: 20,000 ft (6100 m) Ingress Protection: IP68 up to 3 ft ( 1.0 m) for 60 minutes Pollution Degree: Ranger System Components Ranger Video Monitor Height: 6.6 in 168 mm Width: 6.8 in... - Page 44 Blade length in front of camera: 1.4 in 36 mm Max blade width in front of camera: .79 in 20 mm Ranger Video Baton 3-4: Length: camera tip to SS ring: 4.1 in 104.1 mm Height of camera: .42 in 10.7 mm...
-
Page 45: Power Supply Specifications
® GlideScope Ranger System Specifications ® Stat 2: Tip to front of handle: 2 in 51 mm Thickness (height) at camera: .34 in 8.7 mm Width of camera: .43 in 10.9 mm Blade length in front of camera: 1.10 in... -
Page 46: Contact Information
® Specifications GlideScope Ranger System Contact Information Corporate HQ: Verathon Incorporated 20001 North Creek Parkway Bothell, WA 98011 800.331.2313 (Canada and US) 425.867.1348 Fax: 425.883.2896 http://www.verathon.com Manufacturer: Verathon Medical (Canada) ULC 4224 Manor Street Burnaby, BC V5G 1B2 Canada 604.439.3009 Fax: 604.439.3039... -
Page 47: Symbol Directory
GlideScope Ranger System Symbol Directory Symbol Directory Symbol Directory The following international regulatory symbols are found on Ranger System components and indicate compliance with international regulatory standards. Table 3. Ranger System labeling symbols. Symbol Meaning Power connected to mains Power disconnected from mains...
Need help?
Do you have a question about the Ranger and is the answer not in the manual?
Questions and answers