Advertisement
Quick Links
Installation Manual
Disclaimer:
This installation manual is intended for
professional service companies. Appropri-
ate background knowledge about work on
vehicle electrics and electronics is there-
fore required.
Improper interventions into the vehicle
electronics and their components can un-
der certain circumstances cause them to
no longer function as intended. This can
considerably endanger the installer (work,
e.g., on the airbag system) and the road-
worthiness of the vehicle and can result
not only in property damage, but also in
personal injury.
Therefore, have all work on the vehicle
electronics carried out by a qualified shop.
1
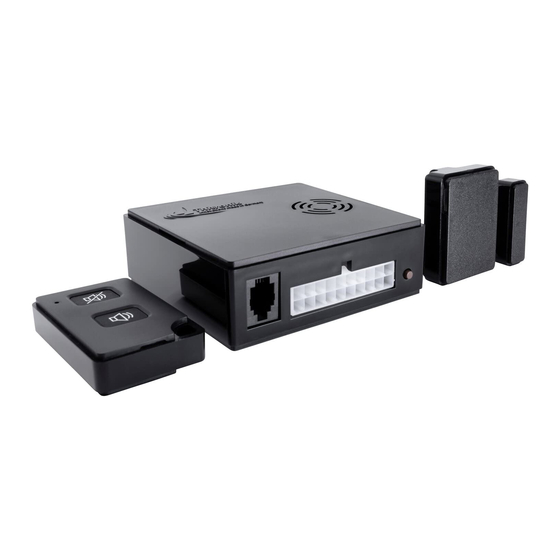
WiPro III safe.lock
Fiat Ducato 8
(Model year 2022+)
Thitronik GmbH is not liable for damage to
property and/or personal injury resulting
from improper, incorrect or only partially
completed installation work. The installing
service company is obligated to ensure
that its connection work neither is faulty
in itself nor can lead to faults or dangers
on the vehicle.
The instructions in the WiPro installation
manual remain applicable. Unused inputs
and outputs must be isolated.
Should the given vehicle conditions differ
from those described herein, please con-
tact the manufacturer or our technical
support team.
Updated 05/22
Advertisement

Subscribe to Our Youtube Channel
Related Manuals for Thitronik WiPro III safe.lock


Summary of Contents for Thitronik WiPro III safe.lock
- Page 1 Installation Manual (Model year 2022+) Disclaimer: This installation manual is intended for Thitronik GmbH is not liable for damage to professional service companies. Appropri- property and/or personal injury resulting ate background knowledge about work on from improper, incorrect or only partially vehicle electrics and electronics is there- completed installation work.
- Page 2 5. Is the horn working? Does the vehicle have electronic (e.g. warning lights, fault memory) or electrical (e.g. lighting) faults? WiPro III safe.lock Installation Manual – Fiat Ducato 8 and identical from model year 2022)
- Page 3 • Press the tab (marked yellow) slightly to the right, the on-board computer can be lowered towards the driver‘s seat → Later backup for WiPro III (7.5, 10 or 15A) WiPro III safe.lock Installation Manual – Fiat Ducato 8 and identical from model year 2022)
- Page 4 The next earthing point is on the left in the extension of the A-pillar. Remove the nut (M10), leaving the original ring eyelets in place, and add the black wire from the WiPro III. Then put the nut back on and tighten! WiPro III safe.lock Installation Manual – Fiat Ducato 8 and identical from model year 2022)
- Page 5 Replace both inserts and provide strain relief again via cable tie. Due to the removal of the small connector, the Fiat clock has to be reset. WiPro III safe.lock Installation Manual – Fiat Ducato 8 and identical from model year 2022)
- Page 6 Solution: Blue wire has no or incorrect connection – check and fix. Error: Doors cannot be locked: Solution: Blue/black wire has no connection – check/fix. WiPro III safe.lock Installation Manual – Fiat Ducato 8 and identical from model year 2022)
- Page 7 Should deletion be necessary, please move the magnets more than 30 mm refer to the section ‘Deleting wireless away from the transmitter unit, press components’ in the installation manual. WiPro III safe.lock Installation Manual – Fiat Ducato 8 and identical from model year 2022)
- Page 8 Entering the serial number of the WiPro in one of the two manuals is also helpful for later clarifica- tion, e.g. in case of questions. WiPro III safe.lock Installation Manual – Fiat Ducato 8 and identical from model year 2022)
- Page 9 > Pull the plug for the power supply when the contacts are closed or remove the fuse (see step 2 on page 3) > Restore the power supply. WiPro III safe.lock Installation Manual – Fiat Ducato 8 and identical from model year 2022)
- Page 10 Mounting of wireless magnetic contacts 868 to windows, doors, hatches etc. Item no.: 100757, 100758...
- Page 11 1. The orientation of the transmitter housing on the window frame depends on the available space (frame profile, distance to the roller blind or window). Variant lying Variant lying left right Magnet Magnet Transmitter housing Transmitter housing Window frame Window frame 2.
- Page 12 Alternative mounting variants Should upright mounting on the window Variant upright Variant frame or mounting on the windowpane windowpane be necessary, e.g., for space reasons, the transmitter LED must also be aligned pointing away from the magnet. Door or hatch mounting Fixing options Ideally, the transmitter housing is aligned and The wireless magnetic contacts are ideally...
- Page 13 Alignment of circuit board in transmitter housing (as-delivered condition) and positions of components. Top view of Cross section Bottom view of circuit board circuit board Transmitter Transmitter cover Reed switch Battery Transmitter housing Long housing leg Short housing leg Battery Battery Positioning the magnet As long as the magnet is in the yellow area, its...
Need help?
Do you have a question about the WiPro III safe.lock and is the answer not in the manual?
Questions and answers