Roche CoaguChek XS Plus User Manual
Hide thumbs
Also See for CoaguChek XS Plus:
- Operator's manual (152 pages) ,
- User manual (112 pages) ,
- Quick reference manual (2 pages)
Table of Contents
Advertisement
Quick Links
Advertisement
Table of Contents

Related Manuals for Roche CoaguChek XS Plus


Summary of Contents for Roche CoaguChek XS Plus
- Page 1 CoaguChek XS Plus ® System User Manual...
- Page 2 Roche Diagnostics has made every reasonable effort to ensure that all the information contained in this manual is correct at the time of printing. However, Roche Diagnostics reserves the right to make any changes necessary without notice as part of ongoing product development.
- Page 3 Revisions to this document are provided by Roche Diagnostics when necessary. No part of this document may be reproduced in any form or by any means without prior written consent. Manual version Revision date Changes 05021464001 (01) June 2009 New document...
- Page 4 (prothrombin time, PT, Quick value) with CoaguChek XS PT test strips. Please note: This manual contains the information you need to operate and care for the CoaguChek XS Plus System. Please read this entire manual carefully before you use the meter.
-
Page 5: Table Of Contents
The CoaguChek XS Plus System Introduction .......................... The CoaguChek XS Plus System ....................7 Test principle ............................8 Contents of the pack..........................8 Safety information ..........................9 Operating conditions ........................10 Quality control ............................11 About this manual ......................Manual format ............................12 The CoaguChek XS Plus meter ................ - Page 6 Testing a capillary blood sample ..............Important notes ..........................53 Getting a good capillary blood sample ...................54 Getting a good test with venous whole blood ..............54 Preparing to test ..........................55 Test strip code chip .........................56 Inserting the code chip ........................56 Switching on the meter .........................58 Performing a test ..........................60 Quality control .........................
-
Page 7: Introduction
The doctor will also determine how often the patient needs blood testing. The system includes the CoaguChek XS Plus meter and CoaguChek XS PT test strips. Optional liquid CoaguChek XS Plus PT Controls are also available. The meter guides you through the test step by step using the symbols and instructions on the display. -
Page 8: Test Principle
Introduction Test principle The CoaguChek XS PT Test, used as directed with the CoaguChek XS Plus Meter, will provide an electrochemical measurement of prothrombin time following activation of blood coagulation with human recombinant thromboplastin. In simple terms, blood works with the chemicals in the test strip to make a small electric current in the test strip that measures blood-clotting time. -
Page 9: Safety Information
The CoaguChek XS Plus System Safety Information Protection against infection Medical staff using the CoaguChek XS Plus System to perform tests on patients must be aware that any contact with human blood is a potential source of infection. n Use gloves. -
Page 10: Operating Conditions
Introduction Operating conditions To be sure that your CoaguChek XS Plus System functions properly, please observe the following guidelines: n Only use the meter at a room temperature between 59°F and 90°F (15°C and 32°C). n Only use the meter at a relative humidity between 10 and 85 percent. -
Page 11: Quality Control
A two-level, on-board quality control test and patient result determination within a single test chamber. Roche Diagnostics has available optional liquid quality controls for the CoaguChek XS Plus System. These controls are provided to assist with regulatory compliance requirements as... -
Page 12: About This Manual
About this manual About this manual Manual format The layout of this operator’s manual has been specially designed to help you locate the most important information quickly and easily. All instructions that require you to actively do something, as well as very important information, appear on a blue background. - Page 13 Example 2: This column contains an illustration of the This column contains information linked to display screen. the display screen. The main menu of the CoaguChek XS Plus Main Menu 09:15 am System contains buttons for the following functions: Patient Test...
-
Page 14: The Coaguchek Xs Plus Meter
The CoaguChek XS Plus meter The CoaguChek XS Plus meter... -
Page 15: Meter Elements Overview
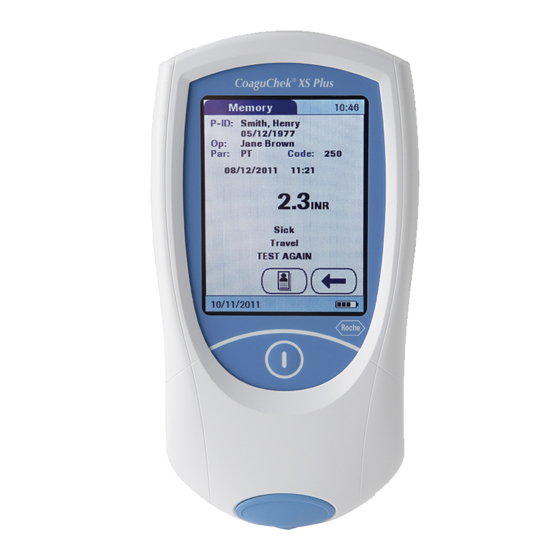
The CoaguChek XS Plus meter Meter elements overview Battery cover tab Touch screen Press tab to slide cover off. Shows results, information, symbols and results recalled from memory. To select Code chip slot with any of the screen prompts, touch the... -
Page 16: Power Supply
This ensures that you will not lose the date and time settings if the power goes out. To save power, the CoaguChek XS Plus meter has the option to automatically turn itself off based on your setup selections, unless a screen prompt has been pressed or a new test strip has been inserted. -
Page 17: Operating The Instrument
3 Enter the settings of choice (language, unit of measure, user administration if applicable, etc.). * Instead of batteries, you can use a special rechargeable battery pack. If you choose this option, order the pack separately from Roche Diagnostics. To recharge, connect the power adapter to the CoaguChek XS Plus meter. -
Page 18: Inserting The Batteries
2 Insert the four batteries in the battery compartment as indicated. (The CoaguChek XS Plus System uses AA batteries. The batteries should last about 60 tests, depending on the type of battery used.) 3 Slide the battery compartment back onto the meter and close it. -
Page 19: Meter Setup
Meter setup Meter setup Please note: If you have not set the date and time (after turning the meter on for the first time or because the batteries were removed from the meter for more than 10 minutes), you cannot perform a test. In that case, turning on the meter takes you immediately to the Setup mode, where you must set the date and time. -
Page 20: Display Field And Symbols
Meter setup Display field and symbols The screen prompts that appear during normal operation are shown here, along with their meaning. Error messages and the description of the symbols linked to them are provided in the chapter entitled Error messages. Symbol Meaning OK, Save setting...
Need help?
Do you have a question about the CoaguChek XS Plus and is the answer not in the manual?
Questions and answers