Advertisement
Advertisement
Table of Contents

Related Manuals for Tascam DR100 MkII


Summary of Contents for Tascam DR100 MkII
- Page 1 Tascam DR100 MkII Setup Guide...
- Page 2 Contents Tascam Dr-100mkII – buttons and functions – [Page 1 - 2] Setup of Tascam – how to reset to basic settings - [Page 3] 1. Initialise the Tascam 2. On/Off switch 3. SD card 4. Date and Time Setup of Tascam – the record settings - [Page 4] 1.
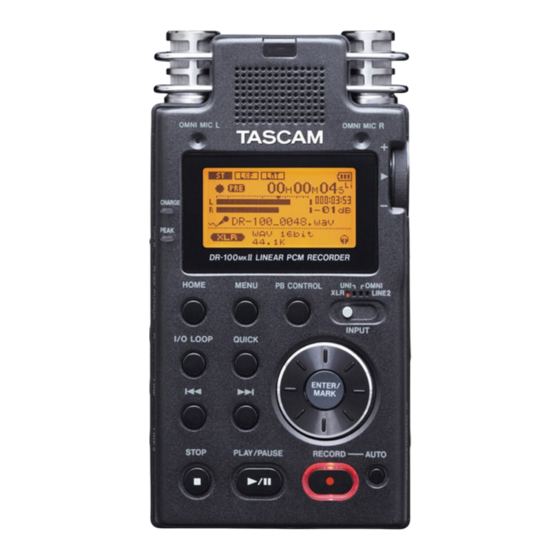
- Page 3 20. USB – a USB Mini connection used to connect the Tascam to a PC and can also be used to charge the the Tascam to become the Mic for the DSLR. 21. DC in 5V – If you require fast charging or the Tascam to be plugged in and work for a long period of internal battery 22.
- Page 4 26. SPEAKER – Turns the mono speaker on the distortion in the recording. 27. ¼ inch screw thread – Allows the Tascam to be front on or off for playback. 28. Battery holder – the Tascam has both an internal mounted on a stand.
- Page 5 P a g e Setup of Tascam – how to reset to basic settings Initialise the Tascam Initialise resets the Tascam its factory setting. This is useful to reset the Tascam before use incase another student changed the menus. To initialise go •...
- Page 6 Most departmental mics require power in order to work, this is sometimes referenced as phantom power or simply as +48V. The phantom power switch is on the back of the Tascam, +48V, turn to on. Setting where to save files If you want to control what folder(s) your audio will save to go •...
- Page 7 Press the Play/Pause button to play the desired file. Force reset function Sometimes, the Tascam can get itself soft-locked. This is where it gets trapped in a menu or recording process and won’t go back or turn off. If this ever happens you can do a force reboot, press and hold the 'POWER' button for at least 10 seconds while holding down the 'STOP' button at the same time.
Need help?
Do you have a question about the DR100 MkII and is the answer not in the manual?
Questions and answers