Advertisement
Available languages
Available languages
Quick Links
I N S T A L L A T I O N
CONTAINER WATER GARDEN FILTER
2
Container Water Garden Filter
Item #77005
Contents
No.
Description
1.
Filter
2.
Spray Bar
Safety Information
WARNING: Risk of electric shock – This pump has not been approved for use in
swimming pool or marine areas.
WARNING: To provide continued protection against risk of electric shock, connect to
properly grounded, ground fault circuit interrupter (GFCI) outlets only, using the following
guidelines:
(A) Have a qualified electrician install a properly grounded receptacle outlet, acceptable for outdoor
use and protected from snow and rain.
(B) Inspect cord before using.
(C) Do not use an extension cord.
(D) Any wiring of pumps should be performed by a qualified electrician to ensure code compliance
and user safety.
(E) Unplug pump at receptacle outlet when not in use or before removal from pond.
(F) To reduce risk of electrical shock, all wiring and junction connections should be made per local
codes. Requirements may vary depending on usage and location.
(G) The power cable should be protected at all times to avoid punctures, cuts, bruises and
abrasions.
(H) Never handle power cords with wet hands.
(I) Do not remove cord and strain relief. Do not connect conduit to pump.
(J) Do not use power cable to lift pump.
• Always operate the pump fully submerged. Failure to do so may overheat the pump and cause it to
fail, voiding the warranty. DO NOT OPERATE DRY!
• Use only in fully assembled state. Failure to operate the pump without the cover/strainer in place
will allow large debris to enter the pump, causing the pump to fail and voiding the warranty.
• Do not wear loose clothing that may become entangled in the impeller or other moving parts.
• Keep clear of suction and discharge openings. DO NOT insert fingers into pump with power
connected.
• Do not pump hazardous materials or liquids, such as oil, saltwater or organic solvents.
• Products returned must be cleaned, sanitized, or decontaminated, as necessary, prior to shipment
to ensure that employees will not be exposed to health hazards in handling said material. All
applicable laws and regulations shall apply.
IMPORTANT: Aquascape, Inc. is not responsible for losses, injury, or death resulting from
a failure to observe these safety precautions, misuse or abuse of pumps or equipment.
Container Water Garden Filter Specifications
• Input Voltage: 120V AC
• Input Frequency: 60 Hz
• Flow: 100 GPH/2.98 ft max head
• For outdoor or indoor use
Installation
• The Aquascape Container Water Garden Filter is sized
and designed for small to medium-sized water features
up to approximately 50 gallons. It's small enough to
fit into tight spaces (Ex. 1), yet contains everything
you need to filter the water: a pump, mechanical
filter sponge, and biological carbon media.
facebook.com/aquascapeinc
youtube.com/aquascape4
pinterest.com/aquascapeinc
1
• This pump has been evaluated for use
with freshwater only
• Input Amps and Wattage: 0.06A/7 Watts
I N S T R U C T I O N S
• The Aquascape Container Water Garden Filter is designed
to be operated fully submerged (Ex. 2). DO NOT RUN DRY.
Add either the spray bar or hose barb attachment to the
filter discharge:
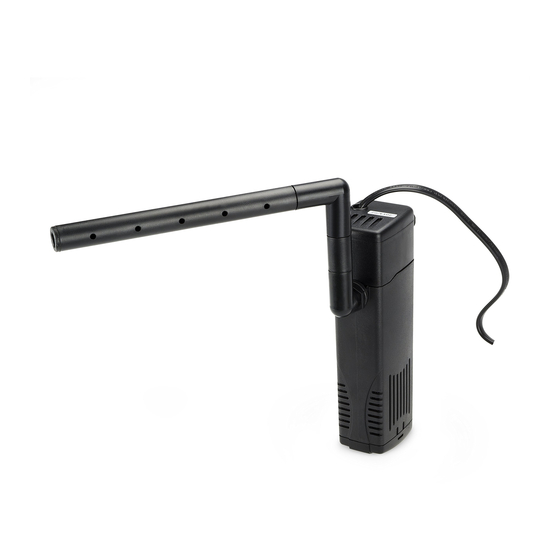
• Spray Bar: The spray bar will ensure circulation and water
movement necessary for proper aeration when keeping fish.
• Attach the threaded elbow portion of the spray bar kit directly
to the Aquascape Container Water Garden Filter (Ex. 3), then
add the remaining two pieces of the spray bar (Ex. 4). The
far end of the spray bar is sealed with a circular rubber plug.
(To position the spray bar farther from the pump add the
extension between the
threaded elbow and the
slip X slip elbow.)
• Position the spray
bar horizontally at the
surface of the water.
• Hose Barb Attachment:
The hose barb
attachment allows you
to use the Aquascape
Container Water
Garden Filter to run a
variety of ornaments
or accessories. Attach the threaded portion of the hose barb
directly to the filter and then attach the hose running from the
ornament to the hose barb (Ex. 5).
• The filter can be placed in either the horizontal position on the
shelf of the container water garden, or vertically or horizontally
on the bottom of the container.
• Connect the filter to an outlet that is protected by a ground
fault circuit interrupter (GFCI).
• Once the filter is running and water circulating, check for any
fitting leaks.
General Maintenance
• Component Parts Cleaning
– The filter cartridge is easily separated from the pump for maintenance purposes. Grasp the pump
in one hand and gently pull while bending the filter cartridge away from the pump. It will pop off,
allowing access to both the filter carbon cartridge and the filter sponge.
• Inlet Screen and Filter Cleaning
– We recommend inspecting your pump on a regular basis to ensure it is functioning properly. If
you notice the water flow rate diminish, it may be due to the pump's inlet screen or internal filters
becoming clogged with debris. In many cases the clogged screen can be cleaned by pulling the
pump out of the water to remove debris from the pump cover. With the filter sponge and carbon
cartridge removed, rinse them in a bucket, using clean water from your container water garden to
dislodge debris. Always disconnect the power before performing maintenance on the pump.
• Internal Pump Cleaning
– If you have thoroughly cleaned the intake screen and filters and still have diminished flow rates,
then you will need to remove the impeller cover to inspect the impeller rotor assembly.
– If your rotor assembly impeller and internal pump body have excessive scale build-up, clean with
a mild acid, such as white vinegar or non-abrasive calcium, lime and rust remover product using
a sponge or soft-bristled brush that won't scratch the impeller. Removing scale build-up will alow
your pump to run like new again.
• Replacing the Impeller Assembly
– The impeller assembly is the only moving part on the pump and will experience wear and tear. If
you've cleaned the pump, as described above, and still experience poor pump performance, it
is most likely time to replace the impeller. Replacing the impeller is extremely easy. Replacement
Impeller Kits are available through your local Aquascape dealer.
Winter Application
• Disconnect the tubing from the discharge fitting and remove the pump from the container water
garden. Clean the pump and inlet screens with fresh water and store the pump in a frost-free location.
Troubleshooting
• Reduced Water Flow
– Pump or plumbing may be clogged. It may be necessary to clean the pump intake screen,
internal filters, and impeller.
• Pump Hums and Doesn't Push Water
– Pump or plumbing may be clogged. It may be necessary to clean the pump intake screen,
internal filters, and impeller.
– Remove the filter cartridge and impeller cover and inspect and clean the impeller rotor assembly
and internal pump body.
– Make sure nothing is blocking or wrapped around the impeller.
– Make sure the pump is receiving the correct voltage.
• Pump Not Working
– The ground-fault circuit-interrupter (GFCI) may have tripped.
– The pump is not receiving the correct voltage.
Ex. 1
For more information about our company or products, please visit our website at
aquascapeinc.com or call us at US (866) 877-6637 CAN (866) 766-3426
©2023 Aquascape, Inc. • All Worldwide Rights Reserved
Ex. 2
Ex. 3
Ex. 4
Ex. 5
01/05/23
Advertisement

Related Manuals for AquaScape 77005


Summary of Contents for AquaScape 77005
- Page 1 Clean the pump and inlet screens with fresh water and store the pump in a frost-free location. applicable laws and regulations shall apply. Troubleshooting IMPORTANT: Aquascape, Inc. is not responsible for losses, injury, or death resulting from a failure to observe these safety precautions, misuse or abuse of pumps or equipment. • Reduced Water Flow –...
- Page 2 Toutes les lois et réglementations applicables s'appliquent. Application d’hiver IMPORTANT : Aquascape, Inc. n'est pas responsable des pertes, blessures ou décès • Débranchez le tuyau du raccord de refoulement et retirez la pompe du jardin d'eau du conteneur.
Need help?
Do you have a question about the 77005 and is the answer not in the manual?
Questions and answers