Table of Contents
Advertisement
Quick Links
30 PC All-In-One
BARISTA PRO SERIES
ESPRESSO & CAPPUCCINO MAKER
30
QUICK START
GUIDE
Read this booklet thoroughly and save these instructions.
FAQs can be found at www.espresso-works.com
Email us for any unanswered questions: cs@espresso-works.com
FOR PRODUCT REGISTRATION, PLEASE VISIT WWW.ESPRESSO-WORKS.COM
1
Advertisement
Table of Contents

Related Manuals for EspressoWorks 30 PC All-In-One BARISTA PRO Series


Summary of Contents for EspressoWorks 30 PC All-In-One BARISTA PRO Series
- Page 1 30 PC All-In-One BARISTA PRO SERIES ESPRESSO & CAPPUCCINO MAKER QUICK START GUIDE Read this booklet thoroughly and save these instructions. FAQs can be found at www.espresso-works.com Email us for any unanswered questions: cs@espresso-works.com FOR PRODUCT REGISTRATION, PLEASE VISIT WWW.ESPRESSO-WORKS.COM...
-
Page 2: Important Safeguards
IMPORTANT SAFEGUARDS Warning : When using electrical appliances, basic safety precautions should always be followed, including the following: 1. Read all instructions before using. 12. Do not touch the hot surfaces. Use handles or knobs. 2. Before connecting the appliance to the power supply, check that the 13. -
Page 3: Power Cord Instructions
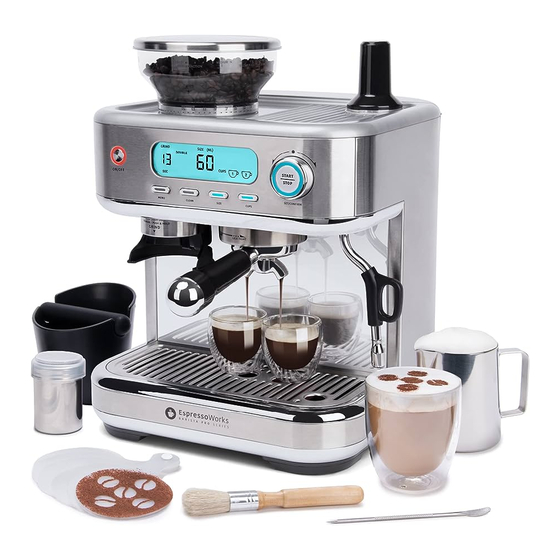
22. This appliance is intended for 29. WARNING: To avoid the risk of injury, do not open the brew chamber household use only. during the brew process. 23. Children should be supervised to 30. Turn the appliance OFF, ensure that they do not play with the then unplug from the outlet when appliance. - Page 4 INCLUDED IN YOUR PURCHASE 15-BAR ESPRESSO MACHINE with THERMOBLOCK HEATING SYSTEM CONICAL BURR GRINDER with 0.5 lbs/250g SINGLE FILTER BEAN HOPPER BASKET PORTAFILTER with BAKELITE HANDLE 77oz/2.3L LARGE DETACHABLE WATER TANK with HANDLE & REMOVABLE LID DOUBLE FILTER BASKET BUILT-IN CUP WARMER ESPRESSO MACHINE COVER...
-
Page 5: Unpacking And Setting Up
UNPACKING AND SETTING-UP 1. Unpack the items supplied and check them for completeness and transport damage. If the machine or the power cord has damage, do not use the machine. Contact our customer service department at cs@espresso-works.com 2. Remove all packaging materials and any possible protective film used for protection during transportation. NOTES •... -
Page 6: Intended Use
INTENDED USE • This machine is only intended to be used to make specialty coffees using coffee powder and cold milk. • This machine is only designed for use in a personal household and is not intended for commercial applications. •... -
Page 7: First Time Use
FIRST TIME USE 1. Plug the machine into a power source. 2. Fill the water tank with water. 3. Press the ON/OFF button to switch on the machine. The red indicator light will start flashing. 4. After 60 seconds, the "red" indicator light on the ON/OFF button will become steady. -
Page 8: Grinding The Coffee
GRINDING THE COFFEE STEP 1 SETTING THE DEGREE OF GRINDING Rotate the bean hopper on the grinder clockwise until the ▲GRIND SIZE marking points to the desired degree of grinding on the bean hopper. IMPORTANT The grinder will NOT function if the ▲GRIND SIZE marking is not within the 1-15 number range. NOTES •... - Page 9 STEP 3 GRINDING THE COFFEE STEP 4 Slide the portafilter with filter into the holder under the grinder Release the "grinder button" as soon as the filter is filled chute. You may choose to set the grinding time or simply tilt slightly full of coffee powder.
- Page 10 PREPARING SINGLE / DOUBLE ESPRESSO STEP 1 STEP 2 If desired, pre-heat the cups by placing them on the cup Place a cup under the brew head. warmer for about 5-10 minutes. STEP 3 1 CUP - SINGLE 2 CUPS - DOUBLE 1.
-
Page 11: Frothing The Milk
FROTHING THE MILK ST EA M SE C STEP 1 STEP 2 Fill the stainless steel frothing pitcher 1/3 of the way with Press the MENU button to set the program to STEAM, and fresh, cold milk. Please use skimmed milk for best results. wait until the STEAM icon stops flashing. - Page 12 EXTRA TIPS • We suggest to try milk from different producers. • Milk with higher protein yields a creamier foam. • Always use cold milk from the refrigerator ( approx. 5 C ). • When foaming, the milk should not become hotter than approx. 60 C.
- Page 13 PROGRAM DISPLAY/FUNCTIONS CUPS & VOLUMES 1 CUP - SINGLE 2 CUPS - DOUBLE GRIND SINGLE SIZE (ML) GRIND SIZE (ML) DOUBLE START START CUPS STEAM CUPS STOP STOP ON/OFF ON/OFF SET/CONFIRM SET/CONFIRM MENU CLEAN SIZE CUPS MENU CLEAN SIZE CUPS GRIND SINGLE SIZE...
-
Page 14: Explanation Of The Symbols
ABOUT THE SAFETY INSTRUCTIONS Before using the machine for the first time, please read the safeguards and safety instructions carefully and keep them for future reference. If the machine is given to someone else, these operating instructions should also be handed over with it. The manufacturer and importer do not accept any liability if the information in these operating instructions is not complied with. - Page 15 • Cleaning and user maintenance may not be performed by children, unless they are older than 8 years of age and are supervised. • Children younger than 8 years of age and animals must be kept away from the machine and the mains cable. •...
- Page 16 the water tank or milk reservoir or cleaning it. • In the interest of your own safety, check the machine, the mains cable and the power cord for damage every time before use. Use the machine only if it is in working order. •...
- Page 17 • Do not connect the machine along with other consumers (with a high wattage) to a multiple socket in order to prevent overloading and a possible short circuit (fire). • Do not operate the machine in the vicinity of combustible material. Do not place any combustible materials (e.g.
-
Page 18: Cleaning And Maintenance
CLEANING AND MAINTENANCE 1. Unplug your espresso machine from the power outlet and allow for it to completely cool off before cleaning. 2. Clean the brew head, steam wand, portafilter and the filters after every use. 3. Regularly run the cleaning program to clean the steam wand and the brew head. 4. -
Page 19: Cleaning The Bean Hopper
CLEANING THE BEAN HOPPER 1. Always switch off and unplug the machine before cleaning. 2. Carefully remove the bean hopper from the machine. 3. Clean the lid and hopper with water and mild detergent. 4. Rinse thoroughly afterwards. 5. Wipe the bean hopper with a dry cloth, then dry thoroughly. -
Page 20: Warranty
NO EMPLOYEE OR REPRESENTATIVE OF ESPRESSOWORKS IS AUTHORIZED TO MAKE ANY ADDITIONAL WARRANTY OR ANY MODIFICATION TO THIS WARRANTY WHICH MAY BE BINDING UPON ESPRESSOWORKS . ACCORDINGLY, PURCHASER SHOULD NOT RELY UPON ANY ADDITIONAL STATEMENTS MADE BY ANY EMPLOYEE OR REPRESENTATIVE OF ESPRESSOWORKS . - Page 21 TROUBLESHOOTING YOUR MACHINE Problem Reason Solution The control panel does not light up / The power cord is not inserted correctly Insert the power cord. the machine cannot be switched on. in the power outlet. The power outlet is defective. Try another power outlet.
- Page 22 Is the machine being used for the first A smell often develops when new During use, an unpleasant smell is machines are first used. The smell time? detected. should disappear once the machine has been used several times. Has the machine just been descaled? Rinse out the water tank.
-
Page 23: Auto Shut-Off Function
AUTO SHUT-OFF FUNCTION When your espresso machine has been switched on and has not been functioning for 30 minutes, your machine will turn itself off automatically and the ON/OFF "red" indicator light will be disabled. Should you wish to continue using your machine, simply press the ON/OFF button once and your espresso machine will be ready to work again. - Page 24 Complete user instructions, FAQ and usage tips can be found at Espresso-Works.com Email us at cs@espresso-works.com for any unanswered questions This symbol on the product or in the instructions means that your electrical and equipment should be disposed at the end of its life separately from your household wares.
Need help?
Do you have a question about the 30 PC All-In-One BARISTA PRO Series and is the answer not in the manual?
Questions and answers