Table of Contents
Advertisement
Quick Links
Weight Limit: 50 lb / 22,7 kg
V.K. - 2022/05/11
© 2022 Dorel Home Products All Rights Reserved
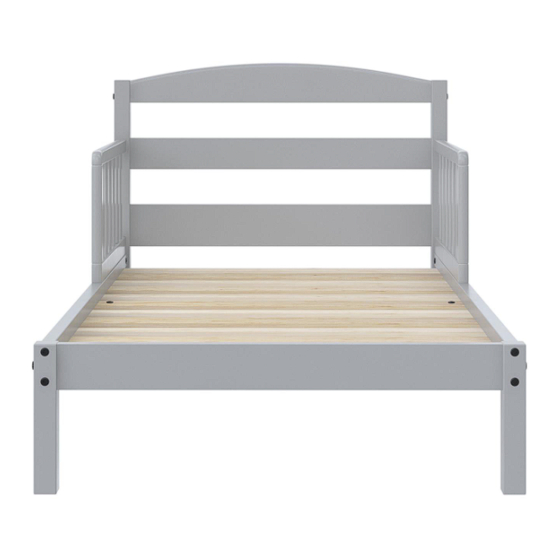
Model Name: TODDLER BED
Thank you for purchasing from Dorel!
Questions, concerns, missing parts?
CONTACT OUR CUSTOMER SERVICE DEPARTMENT
BEFORE RETURNING PRODUCT TO THE RETAILER.
If parts are missing or damaged, we will gladly ship your
replacement parts free of charge.
Visit www.dhpfurniture.com/eng/replacement-parts
or call Toll-Free 1-800-267-1739.
You can also chat with us at www.dhpfurniture.com
Date of Purchase
THIS INSTRUCTION BOOKLET CONTAINS IMPORTANT SAFETY
INFORMATION. PLEASE READ AND KEEP FOR FUTURE REFERENCE.
DA7750G(Light Gray)
Lot Number
(TAKEN FROM CARTON)
B34DA7750G00 - 106484
1
Advertisement
Table of Contents

Subscribe to Our Youtube Channel
Related Manuals for Dorel Home Products DA7750G


Summary of Contents for Dorel Home Products DA7750G
- Page 1 You can also chat with us at www.dhpfurniture.com Date of Purchase Lot Number (TAKEN FROM CARTON) THIS INSTRUCTION BOOKLET CONTAINS IMPORTANT SAFETY INFORMATION. PLEASE READ AND KEEP FOR FUTURE REFERENCE. V.K. - 2022/05/11 B34DA7750G00 - 106484 © 2022 Dorel Home Products All Rights Reserved...
-
Page 2: Limited 1-Year Warranty
Limited 1 year Warranty Read Before Beginning Assembly Dorel warrants this product to be free from defects in material and workmanship ●Work in a spacious area and near where the unit will be used, preferably on a and agrees to remedy any such defect. This warranty covers one year from the carpet, or use a piece of the cardboard packaging to protect your floor and product. - Page 3 WARNING ● * Infants have died in toddler beds from entrapment and strangulation. ● * Failure to follow these warnings and assembly instructions could result in serious injury or death from entrapment or strangulation. ● * NEVER use bed with children under 15 months. ●...
- Page 4 PARTS...
-
Page 5: Parts List
PARTS LIST HEADBOARD POST TOP PANEL MIDDLE PANEL BOTTOM PANEL FOOTBOARD POST 2 PCS 1 PC 1 PC 1 PC 2 PCS FOOTBOARD PANEL LEFT SIDE RAIL RIGHT SIDE RAIL GUARDRAIL CENTER SUPPORT SLAT 1 PC 1 PC 1 PC 2 PCS 1 PC WIDE SUPPORT SLAT... -
Page 6: Part Numbers
PARTS LIST PART NUMBERS Each part has a unique part number. Please reference the appropriate part number when contacting customer DA7750G service for replacement parts. PART LABELS (GRAY) Before throwing any packaging, please verify all contents and make sure you have... -
Page 7: Hardware List
20 PCS Hardware Pack Please do not completely tighten all the hardware, until the entire assembly is complete, unless DA7750G(Light Gray) HP # : TDA7750G-00 otherwise indicated in the step-by-step instructions. The screw(s), bolt(s) to be used at each step are shown in actual size in the lower right corner of the page. - Page 8 Step 1 Insert the wood dowels into top panel B, middle panel C and bottom panel D. Attach panels B, C and D to the headboard posts A as shown below using bolt and Allen NOTE: Do not fully tighten the bolts. Leaving the bolts loose will facilitate assembly in the following steps.
- Page 9 Step 2 Insert the wood dowels into the footboard panel F. Attach footboard panel F to the footboard post E using bolt and Allen key NOTE: Please pieces on a piece of carpet or cardboard to prevent scratching.
- Page 10 Step 3 Insert barrel nuts into both ends of the side rail G & H. Attach the headboard to the left and right side rail G & H by inserting bolts through the headboard post A. Use Allen key install the bolts. Note: The barrel nut can be rotated using as screwdriver (not included) to...
- Page 11 Step 4 Insert barrel nuts into both ends of center support slats J. Ensure the barrel nut is flush with center support slat J. Note: Do not fully tighten the bolts. Leaving the bolts loose will facilitate assembly in the following steps.
- Page 12 Step 5 Insert barrel nuts into both ends of the left and right-side rail G & H by threading hex socket head bolts and footboard post E. Use Allen key to tighten bolts. Note: Do not fully tighten the bolts. This will facilitate assembly in the following steps.
- Page 13 Step 6 Insert wood dowels into both ends of wide support slats L and narrow support slats K. Attack slats K & L to both side rails H & G. Tighten all bolts previously installed. X 20...
- Page 14 Step 7 Attach guardrails I to headboard posts A with hex socket head bolts Attach the guardrails I to the left and right side rails G & H with hex socket head bolts as shown. Use Allen key to tighten bolts.
-
Page 15: Helpful Hints
Helpful Hints CAUTION: This unit is intended for use only with the products and/or maximum weights indicated. Use with other products and/or products heavier than the maximum weights indicated may result in instability or cause possible injury. • Move your new furniture carefully, with two people lifting and carrying the unit to its new location. -
Page 16: Información Sobre La Garantía
Preguntas, inquietudes, partes que faltan? CONTACTE DA7750G(Gris Claro) NUESTRO DEPARTAMENTO DE SERVICIO AL CLIENTE ANTES DE DEVOLVER EL PRODUCTO A LA TIENDA. Si le faltan piezas o las que se incluyen están dañadas, con mucho Cama de niño pequeño gusto le enviaremos sus piezas de reemplazo sin cargo extra. - Page 17 ADVERTENCIA ● * Han muerto niños en camas de este tipo por haber quedado atrapados o haberse estrangulado. ● * Si no se siguen estas advertencias y las instrucciones de ensamblaje pueden producirse lesiones graves o muerte por quedar los niños atrapados o por estratificación. ●...
- Page 18 Partes Paquete de componentes Piezas de reemplazo, visite www.dhpfurniture.com/spa/replacement-parts DA7750G (Gris Claro) # de Paquete : TDADA7500G-00 IMPORTANTE: La lista de números de piezas que aparece a continuación es exclusiva de su producto. Por favor, manténgalo a mano cuando solicite piezas de repuesto.
- Page 19 Instrucciones Etapa 1 Etapa 7 Inserte clavijas de madera (5) en el travesaño superior B, el travesaño central C y el travesaño Fije la baranda I a las patas de la cabecera A con pernos (1). inferior D. Fije los travesaños B, C y D a las patas de la cabecera A como ilustrado más abajo con Fije la baranda I a los lados izquierdo y derecho G y H con pernos pernos (1) y la llave Allen (4).
- Page 20 Des questions, des préoccupations ou des pièces Gris clair DA7750G ( manquantes? CONTACTEZ NOTRE SERVICE À LA CLIENTÈLE AVANT DE RETOURNER LE PRODUIT AU DÉTAILLANT. Si des pièces sont manquantes ou endommagées, nous expédierons volontiers vos pièces de rechange gratuitement.
- Page 21 AVERTISSEMENT ● * Des bébés sont décédés dans des lits pour enfants car ils sont restés coincés ou se sont étranglés. ● * Le non-respect de ces avertissements et des instructions d’assemblage peut conduire à des blessures graves ou à la mort si I’enfant reste coincé ou il s’étrangle. ●...
-
Page 22: Liste Des Pièces
Quincaillerie Pièces Pour des pièces de rechange, visitez www.dhpfurniture.com/fre/replacement-parts DA7750G (Gris Clair) # de Paquet : TDADA7750G-00 IMPORTANT: La liste des références ci-dessous est propre à votre produit. Veuillez l'avoir sous la main lorsque vous appelez pour des pièces de rechange. -
Page 23: Conseils Utiles
Instructions Étape 1 Étape 6 Insérez des goujons de bois (5) dans la traverse supérieure B, la traverse centrale C et la traverse Insérez des goujons de bois (6) dans les extrémités des lattes de inférieure D. Fixez les traverses B, C et D aux pieds de la tête de lit A tel qu’illustré support étroites L et des lattes de support larges K tel qu’illustré.
Need help?
Do you have a question about the DA7750G and is the answer not in the manual?
Questions and answers