Advertisement
Quick Links
Weight Limit for Top of Dresser: 30 lb / 13.6 kg
Weight Limit per Drawer: 15 lb / 6.8 kg
C.L. - 01/12/2020
20 20 Dorel Home Products All Rights Reserved
DA7319-3BL (Graphite Blue), DA7319-3W (White),
Thank you for purchasing from D orel !
Date of Purchase
THIS INSTRUCTION BOOKLET CONTAINS IMPORTANT SAFETY
INFORMATION. PLEASE READ AND KEEP FOR FUTURE REFERENCE.
DA7319-3G (Soft Gray)
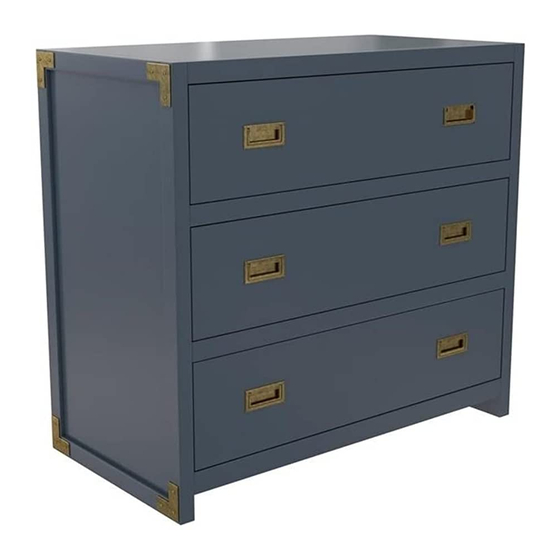
3 Drawer Dresser
DO NOT RETURN TO THE STORE !
I f parts are missing or damaged, we will gladly ship your
replacement parts free of charge.
Visit www.dhpfurniture.com/eng/replacement-parts
or call Toll-Free 1-800-267-1739
You can also chat with us at www.dhpfurniture.com
Lot Number
(TAKEN FROM CARTON)
DA7319-3BL00-100083
1
Advertisement

Related Manuals for Dorel Home Products DA7319-3BL


Summary of Contents for Dorel Home Products DA7319-3BL
- Page 1 You can also chat with us at www.dhpfurniture.com Date of Purchase Lot Number (TAKEN FROM CARTON) THIS INSTRUCTION BOOKLET CONTAINS IMPORTANT SAFETY INFORMATION. PLEASE READ AND KEEP FOR FUTURE REFERENCE. C.L. - 01/12/2020 DA7319-3BL00-100083 20 20 Dorel Home Products All Rights Reserved...
- Page 2 Limited 1 year Warranty Read Before Beginning Assembly D orel warrants this product to be free from defects in material and workmanship ● Work in a spacious area and near where the unit will be used, preferably on a and agrees to remedy any such defect. This warranty covers one year from the carpet, or use a piece of the cardboard packaging to protect your floor and product.
- Page 3 WARNING • Use the wall safety strap provided to secure the unit to the wall. WARNING Children have died from furniture tipover. To reduce the risk of furniture tipover: •ALWAYS install tipover restraint provided. •NEVER put a TV on this product. •NEVER allow children to stand, climb or hang on drawers, doors, or shelves.
- Page 4 PARTS...
- Page 5 PART S LIST TOP PANEL LEFT SIDE PANEL RIGHT SIDE PANEL BACK RAIL BACK TOP PANEL 1 PCS 1 PCS 1 PCS 1 PCS 1 PCS BACK PANEL FRONT MIDDLE RAIL FRONT BOTTOM RAIL DRAWER FRONT DRAWER LEFT SIDE 1 PCS 2 PCS 1 PCS 3 PCS...
- Page 6 PART NUMBERS DA7319-3BL DA7319-3W DA7319-3G PART Each part has a unique part number. (Graphite Blue) (White) (Soft Gray) LABELS Please reference the appropriate part T504760 T504900 number when contacting customer T504620 service for replacement parts. T504770 T504910 T504630 T504640 T504780...
-
Page 7: Hardware Pack
Hardware Pack Please do not completely tighten all the hardware, until the entire assembly is complete, unless otherwise indicated in the step-by-step HP#: TDA7319-3BL-00 DA7319-3BL (Graphite Blue) instructions. DA7319-3G (Soft Gray) TDA7319-3W-00 HP#: DA7319-3W (White) The screw(s), bolt(s) to be used at each step are shown in actual size in the lower right corner of the page. - Page 8 HARDWA RE LIST - WALL SAFETY STRAP SAFETY WALL STRAP MOUNTING BRACKET LONG SCREW SHORT SCREW 4 PCS 2 PCS 2 PCS 2 PCS Please do not completely tighten all the hardware, until the entire assembly is complete, unless otherwise indicated in the step-by- step instructions.
- Page 9 Step 1 Insert large cam bolts (4) into left side panel B and right side panel C as shown. x 18...
- Page 10 Step 2 2.1. Insert large wood dowels ( 6 ) into left side panel B as shown. 2.2. Insert large cam locks ( 5 ) into top panel A , back panel F , front middle rails G and front bottom rail H as shown. 2.3.
- Page 11 Step 3 3.1. Insert large wood dowels ( 6 ) and large cam locks ( 5 ) into top panel A , back panel F , front middle rails G and front bottom rail H as shown. 3.2. Attach the right side panel C to the top panel A , back panel F , front middle rails G and front bottom rail H and secure by rotating the large cam lock ( 5 )
- Page 12 Step 4 Secure top panel A to the back rail D with screws (7) as shown. Use a Phillips head screwdriver (not included) to tighten the screws.
- Page 13 Step 5 Attach back top panel E to the assembled frame with screws (8). Use a Phillips head screwdriver (not included) to tighten screws. x 12...
- Page 14 Step 6 6.1. Insert small cam bolts ( 1 ) into the drawer fronts and backs I & M as shown. 6.2. Insert small wood dowels ( 3 ) and small cam locks ( 2) into the drawer left and right sides L &...
- Page 15 Step 7 7.1. Slide the drawer bottoms K into the grooves of drawer left and right sides J & L and drawer fronts I . 7.2. Insert small wood dowels ( 3 ) and small cam locks ( 2 ) into the drawer support bars N as shown.
- Page 16 Step 8 Insert the drawers into the dresser. To safely secure the dresser to the Wall, please see next step at Page 18.
-
Page 17: Helpful Hints
Helpful Hints CAUTION: This unit is intended for use only with the products and/or maximum weights indicated. Use with other products and/or products heavier than the maximum weights indicated may result in instability or cause possible injury. • Move your new furniture carefully, with two people lifting and carrying the unit to its new location. - Page 18 Safety Wall Strap WARNING: WHEN UPRIGHT, IT IS POSSIBLE THAT THE FURNITURE TIPS OVER. PLEASE INSTALL THE SAFETY WALL STRAP BEHIND THE FURNITURE TO ENSURE SAFETY. Tools required (Not Included) : • Rubber Mallet • 3/8" Drill Bit PLEASE READ ALL INSTRUCTIONS CAREFULLY •...
- Page 19 ¡NO LO REGRESE A LA TIENDA! DA7319-3BL (Azul Grafito), DA7319-3W (Blanco), Si le faltan piezas o las que se incluyen están dañadas, con DA7319-3G (Gris Suave) mucho gusto le enviaremos sus piezas de reemplazo sin cargo extra. Cómoda de 3 Cajones Visite www.dhpfurniture.com/spa/replacement-parts...
- Page 20 PRECAUCIÓN • Utilice la correa de seguridad provista para fijar el mueble a la pared. ADVERTENCIA Niños han muerto por el vuelco de muebles. Para reducir el riesgo de vuelco de muebles: •SIEMPRE instale el dispositivo de restricción de vuelco provisto. •NUNCA coloque un televisor sobre este producto.
- Page 21 Partes Paquete de componentes Piezas de reemplazo, visite www.dhpfurniture.com/spa/replacement-parts # de paquete : TDA7319-3BL-00 DA7319-3BL (Azul Grafito) DA7319-3G (Gris Suave) IMPORTANTE: La lista de números de piezas que aparece a continuación es TDA7319-3W-00 # de paquete : DA7319-3W (Blanco) exclusiva de su producto. Por favor, manténgalo a mano cuando solicite piezas de repuesto.
-
Page 22: Consejos Útiles
Instrucciones Límites de peso de la Parte superior de la Cómoda : 30 lb / 13.6 kg Límites de peso de un Cajone : 15 lb / 6.8 kg Nota : El destornillador en cruz no está incluido. 7.3. Utilice un destornillador Phillips para apretar los tornillos. Paso 1 Asegure N a K girando (2) 1/2 vuelta en el sentido de las agujas del Inserte (4) en B y C, como se muestra (sección en inglés). - Page 23 Correa de seguridad ADVERTENCIA: ES POSIBLE QUE EL MUEBLE PUEDA VOLCARSE AL ESTAR DE PIE. INSTALE LA Herramientas necesarias (no incluidas) : CORREA DE SEGURIDAD PARA LA PARED DETRÁS • Masa de Caucho • Mecha de 3/8" DEL MUEBLE PARA ASEGURARSE DE QUE NO SE •...
-
Page 24: Informations Sur La Garantie
NE PAS RETOURNER CE PRODUIT AU MAGASIN ! DA7319-3BL (Bleu Graphite), DA7319-3W (Blanc), Si une pièce est manquante ou endommagée, nous vous expédierons avec plaisir vos pièces de remplacement DA7319-3G (Gris Doux) gratuitement. Commode à 3 tiroirs Visitez www.dhpfurniture.com/fre/replacement-parts ou appelez au 1-800-267-1739 Date d'achat Num é... - Page 25 AVERTISSEMENT • Utilisez la sangle de sécurité fournie pour fixer le meuble au mur. AVERTISSEMENT Des enfants sont morts de basculement de meubles. Pour réduire les risques de renversement de meubles: •TOUJOURS installer le dispositif de retenue fourni. •Ne JAMAIS placer un téléviseur sur le dessus de ce produit.
- Page 26 Quincaillerie Pièces Pour des pièces de rechange, visitez www.dhpfurniture.com/fre/replacement-parts TDA7319-3BL-00 DA7319-3BL (Bleu Graphite) # de paquet : IMPORTANT: La liste des références ci-dessous est propre à votre produit. DA7319-3G (Gris Doux) TDA7319-3W-00 # de paquet : Veuillez l'avoir sous la main lorsque vous appelez pour des pièces de rechange.
-
Page 27: Conseils Utiles
Instructions Limite de Poids du Dessus de Commode : 30 lb / 13.6 kg Limite de Poids par Tiroir : 15 lb / 6.8 kg Le tournevis à tête cruciforme n'est pas inclus. Étape 7 7.1. Faites glisser K dans les rainures de J, L et I. Étape 1 7.2. - Page 28 Sangle de Sécurité Murale AVERTISSEMENT: QUAND LE MEUBLE EST PLACÉ DEBOUT, IL SE PEUT QU'IL BASCULE ET QU'IL Outils nécessaires (pas inclus): TOMBE. AFIN DE LE SÉCURISER, VEUILLEZ INSTALLER LA SANGLE DE SÉCURITÉ MURALE À • Maillet en Caoutchouc • Mèche 3/8" L'ARRIÈRE DU MEUBLE.
Need help?
Do you have a question about the DA7319-3BL and is the answer not in the manual?
Questions and answers