miniDSP Flex User Manual
Hide thumbs
Also See for Flex:
- User manual (77 pages) ,
- User manual (121 pages) ,
- User manual (76 pages)
Table of Contents
Advertisement
Quick Links
3/15/23, 9:45 AM
Table of Contents
miniDSP Flex
Product Overview
The Flex family
Dirac Live upgrade
Typical applications
Software Installation
System requirements
Windows
macOS
Download the miniDSP software
Install the miniDSP software
Install on macOS
Install on Windows
The miniDSP Device Console
Finding connected devices
Connecting to a device
Using template devices
Settings
Input sources
Using presets
Selecting a preset
Renaming
Importing and exporting
Resetting
Firmware updates
Convert to Flex (DL)
1. Purchase the Dirac Live upgrade
2. Activate the Dirac Live upgrade
Basic Operation
Front and rear panels
Basic operation
Rear panel connnections
All versions
miniDSP Flex
https://docs.minidsp.com/product-manuals/flex/print_page.html
Print or save - miniDSP Flex
1/86
Advertisement
Table of Contents

Related Manuals for miniDSP Flex


Summary of Contents for miniDSP Flex
- Page 1 3/15/23, 9:45 AM Print or save - miniDSP Flex Table of Contents miniDSP Flex Product Overview The Flex family Dirac Live upgrade Typical applications Software Installation System requirements Windows macOS Download the miniDSP software Install the miniDSP software Install on macOS Install on Windows...
- Page 2 3/15/23, 9:45 AM Print or save - miniDSP Flex Flex/Balanced Flex/Digital Playing Audio Connecting sources Connecting an ampli er and speakers Bluetooth audio About USB Audio macOS Windows 11 ASIO Remote control Using the miniDSP remote Using a third-party programmable remote...
- Page 3 3/15/23, 9:45 AM Print or save - miniDSP Flex Invert Mute Current RMS level, level meter DSP Reference Parametric EQ Overview Editing lters Disabling individual lters Filter mode Basic mode Frequency Gain Filter type Jumping between channels Linking channels Reset to default...
- Page 4 1. Check that you have the latest version of Device Console 2. (Windows only) Check that you have the latest USB driver 3. Update DSP Firmware 4. Download the Migration Pack 5. Upgrade the rmware in your Flex 6. Migrate your con guration presets Troubleshooting and support Trouble-shooting audio issues...
-
Page 5: Product Overview
USB audio, Bluetooth streaming with LDAC™ and aptX™ HD codecs and automatic Bluetooth input selection, and an OLED front panel with physical volume control. The Flex family There are several versions of the 2-in 4-out miniDSP Flex with different I/O con gurations. Refer to the Flex product page (https://www.minidsp.com/products/minidsp-in-a-box/ ex) for the complete list. -
Page 6: Typical Applications
Note that the upgrade applies per device. Typical applications The miniDSP Flex has a wide range of applications in home and professional audio. This section illustrates a few of them. Figure 1 shows the miniDSP Flex used as a digital preamp with subwoofer integration. The Flex provides accurate and exible integration between the subwoofers and the main speakers as well as comprehensive EQ and tuning options. - Page 7 Figure 1. miniDSP Flex as preamp with subwoofer integration Figure 2 illustrates a similar use of the miniDSP Flex as a digital preamp, but the output channels have instead been con gured to act as crossover for a pair of active 2-way speakers. Ampli cation can be via a multichannel power ampli er as shown, or a pair of stereo ampli ers.
- Page 8 Figure 2. miniDSP Flex as preamp and active crossover In Figure 3, the miniDSP Flex has been used as an accessory in a home theater system, to manage multiple subwoofers. Driven from the A/V receiver's subwoofer output, the miniDSP Flex can be used to independently adjust gain, delay and parametric EQ of each subwoofer for optimum multi-sub performance.
-
Page 9: Software Installation
If you purchased your Flex from a miniDSP dealer, you will receive a coupon together with the product. Redeem this coupon at this page: Redeem your miniDSP software (https://www.minidsp.com/support/redeem-coupon) - Page 10 2. Drag the miniDSP Device Console application icon to your Applications folder. 3. To run the miniDSP Device Console, locate it in the Applications folder and double-click on it. To make it easier to run in future, right-click on its dock icon and select Options -> Keep in Dock.
- Page 11 If the UAC2 driver is not installed, Device Console will offer to install it. If you have previously installed the miniDSP UAC2 driver but it is not up to date, Device Console will offer to install the latest version. In either case, click PROCEED.
- Page 12 Info The most recent miniDSP processors require the UAC2 driver to be at least version 5.40. If you have di culty with the UAC2 driver or control panel, use Check USB Audio Driver to make sure that you have the latest version.
-
Page 13: Connecting To A Device
Detection and installation of rmware upgrades for your processor Purchase and activation of Dirac Live upgrades (where applicable) If you have not used Device Console with your Flex before, you will need to perform a one-time migration procedure. Migrating to Finding connected devices The Discover Devices screen displays devices connected to your computer, or which have a network-accessible control interface. - Page 14 Model Conversion Convert To Flex (DL) If this is the rst time you have used Device Console with your miniDSP Flex, Device Console will check for an existing preset that was created with the older MiniDSP-2x4-HD "plugin" user interface. If found, Device Console will automatically import it.
- Page 15 3/15/23, 9:45 AM Print or save - miniDSP Flex Using template devices The Template Devices screen displays the complete list of devices supported by Device Console. This can be used to explore features of a processor that you do not have, or to edit your processor settings when you are not able to connect to it.
- Page 16 Info You will see a similar dialog if you edit the settings of your device using a different computer or the older "plugin" user interface (the latter is not recommended once you have migrated to the miniDSP Device Console). Info If you have more than one device of the same type, only one of them can be edited using the template device. If you have more than one device of the same type or need to edit your devices from more than one computer, you will need to manage your presets by exporting them to and importing them from les.
-
Page 17: Input Sources
(Windows or macOS). If you choose the System option, you may need to quit Device Console and restart it for the change to take effect. The Check USB Audio Driver feature checks if you have the miniDSP UAC2 audio driver installed, and that it is the latest version. It appears on Windows only. See Installation for more information. -
Page 18: Using Presets
EXPORT RESET RESET-ALL The miniDSP Flex has four onboard presets, each of which contains all of the settings for audio processing except items controlled by the front panel and remote control (volume, mute, input source). Selecting a preset Click on the desired preset number. Or if you have renamed the presets, its name. -
Page 19: Importing And Exporting
To import a preset from a le, click the IMPORT button, then navigate to a saved preset le and click Open. The preset will be loaded from the le. If Device Console is currently connected to the miniDSP Flex, the preset will also be sent to the Flex. - Page 20 Display Versions Refresh DSP Firmware Refresh XMOS Firmware You do not need to use these buttons in normal operation. They are there in case your Flex has issues and/or miniDSP Support instructs you to refresh the rmware. Convert to Flex (DL) Dirac Live is an optional upgrade to the miniDSP Flex.
- Page 21 Click to display Activation Code for trouble-shooting purpose Step-2: Upgrade to Dirac-Live Please enter the activation key from miniDSP to activate the license User can enter the activation key online if this computer is connected to the Internet. Otherwise, the activation key can be loaded from file.
- Page 22 3/15/23, 9:45 AM Print or save - miniDSP Flex The Stripe payment page redirects to an acknowledgement screen: https://docs.minidsp.com/product-manuals/flex/print_page.html 22/86...
- Page 23 You will also receive an email receipt. Info After you press the Buy Upgrade button, miniDSP Device Console will wait for an acknowledgement from the payment system. If you decide not to proceed with the upgrade, click the back-arrow button near the top left of the purchase screen and the Device Console will return to normal operation.
- Page 24 LOAD FROM FILE and select the le from the USB stick. After activating, the Flex will restart. When it comes back online, it will appear in the Device Console list of devices as a Flex (DL).
- Page 25 3/15/23, 9:45 AM Print or save - miniDSP Flex The miniDSP Flex presets will not be converted to the Flex (DL). When reconnecting, you can choose to either restore all presets to their default values or to use existing Flex (DL) presets.
-
Page 26: Basic Operation
3/15/23, 9:45 AM Print or save - miniDSP Flex Basic Operation https://docs.minidsp.com/product-manuals/flex/print_page.html 26/86... -
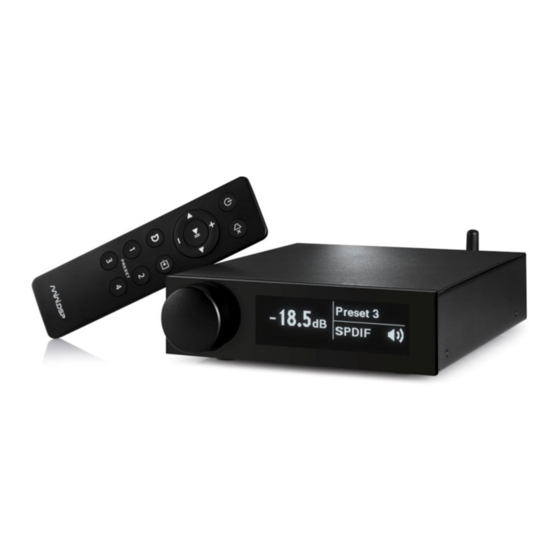
Page 27: Front And Rear Panels
3/15/23, 9:45 AM Print or save - miniDSP Flex Front and rear panels Basic operation The front panel and rotary encoder provide access to the key features of the miniDSP Flex. These can also be accessed with a remote control. Preset 3 Analog To change the volume, rotate the encoder. -
Page 28: All Versions
3/15/23, 9:45 AM Print or save - miniDSP Flex Warning Apply power to the miniDSP Flex only after all input and output connections have been made. All versions SPDIF DSP. DC 12V : FLEX : 12VDC/10W TOSLINK 1. DC power. The supplied 12 VDC power supply includes a set of interchangeable power pins for USA, UK, Europe and Australia. - Page 29 3/15/23, 9:45 AM Print or save - miniDSP Flex INPUTS OUTPUTS SPDIF DSP. DC 12V : FLEX : 12VDC/10W TOSLINK . Analog inputs. Connect an analog source here using RCA cables. Typically, the left channel is connected to input 1 and the right channel is connected to input 2.
- Page 30 -- output channels 1 and 2, or output channels 3 and 4. The TOSLINK and SPDIF outputs for each pair of channels carry the same signal and are both active at the same time. The sample rate on the digital outputs is 96 kHz (miniDSP Flex (without Dirac Live)). https://docs.minidsp.com/product-manuals/flex/print_page.html...
-
Page 31: Playing Audio
The diagram below illustrates a basic connection of a stereo ampli er and a pair of speakers to the miniDSP Flex. Since the default settings of the Flex route the input channels to output channels 1 and 2 with no crossovers active, you can make this connection for initial testing and listening. -
Page 32: Power Amplifier
Connecting a stereo ampli er and speakers to the miniDSP Flex Of course, more complex connections are possible using the additional outputs. In that case, the internal processing will need to be set up using the miniDSP Device Console. Refer to the Signal Flow and DSP Reference sections for details. - Page 33 1. Press the encoder button on the miniDSP Flex twice and rotate it until the display shows "Bluetooth." 2. Press and hold the encoder and the display will change to "BTPairing." The miniDSP Flex is now in pairing mode. 3. Open the Bluetooth Settings on your mobile device to pair with the miniDSP Flex. The exact appearance will vary depending on your speci c device, but this series of screenshots illustrates a typical sequence: 1.
- Page 34 Bluetooth detected. About USB Audio The miniDSP Flex accepts stereo PCM audio at sample rates of 44.1, 48, 88.2, 96, 176.4, and 192 kHz over USB. The same USB connector is used for playing USB Audio as well as for con guration.
- Page 35 Print or save - miniDSP Flex To play USB Audio from a computer, use the supplied cable to connect the USB 2.0 (Type B) port of the miniDSP Flex to a free USB port on your computer. Alternatively, connect a network streamer to the USB port. For an example using the Raspberry Pi, see this application note on our website: Streaming to a miniDSP 2x4HD or DDRC-24 with a Raspberry Pi 3A+ (https://www.minidsp.com/applications/audio-...
- Page 36 Flex 8 DL miniDSP Flex Default audio device To set the miniDSP Flex as the default audio output device, right-click and select "Use this device for sound output": miniDSP Flex miniDSP Flex Note that individual audio playback apps may allow the miniDSP Flex to be selected for audio output independently of the system default.
- Page 37 Analog recording with miniDSP and ocenaudio (https://www.minidsp.com/applications/advanced-tools/analog-recording-with-minidsp-adc) on our website. To avoid having macOS resample the outputs from the Flex, set the sample rate here to the DSP's internal sample rate: 96 kHz. Windows 11 Note: to play USB audio from Windows, the miniDSP UAC2 driver package must be installed rst.
- Page 38 3/15/23, 9:45 AM Print or save - miniDSP Flex miniDSP 2x4n Set sample rate To change the bit depth and sample rate, click on the rightward angle symbol >. Click the selector next to Format to pop up the sample rate menu. Sample rates up to 192 kHz can be selected: https://docs.minidsp.com/product-manuals/flex/print_page.html...
- Page 39 Print or save - miniDSP Flex miniDSP 2x4n USB Audio from Flex to computer The miniDSP Flex sends its four output channels to the computer over USB. These can be used to monitor or record the output channels after DSP processing: https://docs.minidsp.com/product-manuals/flex/print_page.html...
- Page 40 3/15/23, 9:45 AM Print or save - miniDSP Flex miniDSP 2x4n To avoid Windows resampling the outputs from the Flex, set the sample rate here to the DSP's internal sample rate: 96 kHz. https://docs.minidsp.com/product-manuals/flex/print_page.html 40/86...
- Page 41 (https://www.minidsp.com/applications/advanced-tools/analog-recording-with-minidsp-adc) on our website. ASIO If your audio application supports ASIO® audio drivers, we recommend selecting the miniDSP ASIO Driver in its settings. This typically allows the application to automatically change sample rate. For example, in JRiver Media Center: https://docs.minidsp.com/product-manuals/flex/print_page.html...
- Page 42 UAC2 control panel The current settings of the miniDSP Flex can be viewed by opening the miniDSP UAC2 Control Panel from the Windows Start menu (under the miniDSP Ltd folder). This control panel allows you to view current settings. In addition, it can be used to set buffer size, although we recommend that you leave this setting at the default.
-
Page 43: Remote Control
Switch to the selected preset. It will take a few seconds for the preset selection to complete while the processor loads the new lters from its ash memory into the DSP. Using a third-party programmable remote A third-party programmable remote can be used with the miniDSP Flex. Use the remote codes listed below. https://docs.minidsp.com/product-manuals/flex/print_page.html 43/86... - Page 44 3/15/23, 9:45 AM Print or save - miniDSP Flex Code Function 35 CA 0E F1 Next Input Source 35 CA 01 FE Preset 1 35 CA 02 FD Preset 2 35 CA 05 FA Preset 3 35 CA 00 FF...
- Page 45 Harmony database. In addition, you can set up buttons for direct input source selection (instead of cycling through input sources). The procedure is as described in the application note linked below, except that you should select "minidsp ex" as the device instead of "shd".
- Page 46 3/15/23, 9:45 AM Print or save - miniDSP Flex Note that currently the miniDSP Control App cannot be used over the Bluetooth connection. It will work only if a Wi-DG is connected to the USB port of the miniDSP Flex. Warning If the USB port is being used for iOS/Android app control via the Wi-DG, it cannot be used for USB Audio streaming.
-
Page 47: Signal Flow
3/15/23, 9:45 AM Print or save - miniDSP Flex Signal Flow https://docs.minidsp.com/product-manuals/flex/print_page.html 47/86... - Page 48 4. Each output channel runs a comprehensive set of DSP functions: parametric EQ, crossovers, FIR ltering, level metering, delay, output gain and compressor. The combination of the routing matrix and the crossover blocks on the output channels is what gives the miniDSP Flex the ability to be used in many different system con gurations.
-
Page 49: Input Channels
3/15/23, 9:45 AM Print or save - miniDSP Flex Input Channels Channel label Input 1 RMS-Meter Current (dBFS) RMS level -14.0 Level meter Channel gain Gain (dB) Edit parametric EQ settings Mute channel MUTE Channel label Each input channel has a customizable label displayed at the top of the channel strip. This label also appears on the routing matrix. - Page 50 3/15/23, 9:45 AM Print or save - miniDSP Flex Press this button to mute that input channel. The button color and label changes to show that the channel is muted: MUTE MUTED Channel is not muted Channel is muted https://docs.minidsp.com/product-manuals/flex/print_page.html...
-
Page 51: Signal Routing
INPUT 2 In addition to routing, the miniDSP Flex supports mixing, where input channels can be mixed at different levels to a single output channel. The complete set of routing controls along the top of the output channel strips is therefore also called the "matrix mixer."... -
Page 52: Routing Examples
The diagram below shows the connections for a stereo pair of speakers plus a single subwoofer. This is the simplest type of active system, so is a good introduction to the advanced features of the miniDSP Flex. It is also known as a "2.1"... -
Page 53: Two-Way Active Speaker
Input sources Processor Powered Subwoofer No connection (or use for a second subwoofer) Typical connections for subwoofer integration with the miniDSP Flex The routing for this system is: Left Out Right Out Subwoofer Unused Left In Left In Left In... - Page 54 Input sources Processor Right woofer Right tweeter Protection capacitor Typical connections for a two-way active speaker using the miniDSP Flex The routing for this system is: Left Woof Right Woof Left Tweet Right Tweet Left In Left In Left In...
-
Page 55: Output Channels
3/15/23, 9:45 AM Print or save - miniDSP Flex Output Channels Each of the four output channels has a complete "strip" of controls: Output 1 INPUT 1 Signal routing INPUT 2 Edit EQ, crossover CROSSOVER and FIR settings Time delay in ms... -
Page 56: Time Delay
3/15/23, 9:45 AM Print or save - miniDSP Flex Signal routing Sets the routing from input channels to output channels. See Signal routing. Click on this button to open the parametric EQ settings window for that output channel. There are 10 parametric EQ lters on each input channel. - Page 57 3/15/23, 9:45 AM Print or save - miniDSP Flex Each output channel can be individually muted. To mute it, press the Mute button. The status is indicated by a change in color and label: MUTE MUTED Channel is not muted...
- Page 58 3/15/23, 9:45 AM Print or save - miniDSP Flex DSP Reference https://docs.minidsp.com/product-manuals/flex/print_page.html 58/86...
- Page 59 Low Shelf The miniDSP Flex has 10 parametric EQ lters on each input and output channel. The graph displays the response of each lter in a light color and the combined response of all enabled lters as a heavy line. For example, the curve shown above has a low-shelf boost at 100 Hz, a dip at 500 Hz, and a high-shelf cut at 5000 Hz.
-
Page 60: Filter Mode
3/15/23, 9:45 AM Print or save - miniDSP Flex Band 2[579 Hz] -8.7 dB Disabling individual lters All 10 lters are enabled by default. To disable a lter, select it with the row of buttons. Click on the Enable button to turn it off. -
Page 61: Filter Type
3/15/23, 9:45 AM Print or save - miniDSP Flex Frequency For PEAK lters, this is the center frequency of the peak or dip. For HIGH_SHELF and LOW_SHELF lters, this is the frequency at which the gain is half of the set value. For ALL_PASS lters, this is the center frequency of the phase shift. -
Page 62: Linking Channels
3/15/23, 9:45 AM Print or save - miniDSP Flex Click to jump to a different channel PEQ Details (Output 1) Menu BACK OUTPUT 1 OUTPUT 2 OUTPUT 3 OUTPUT 4 OUTPUT 5 OUTPUT 6 OUTPUT 7 OUTPUT 8 Channels No Link... -
Page 63: Advanced Mode
3/15/23, 9:45 AM Print or save - miniDSP Flex To reset all parametric EQ bands of the current channel to the default settings, enable the Menu switch at the top right and click the RESET TO DEFAULT button: Menu OUTPUT 1... - Page 64 3/15/23, 9:45 AM Print or save - miniDSP Flex Info Switching between basic and advanced mode does not convert between Frequency/Gain/Q and biquad parameters. The basic parameters and advanced biquad coe cients for each lter are stored independently and the selected set is used for processing.
-
Page 65: Biquad Design Software
3/15/23, 9:45 AM Print or save - miniDSP Flex If the loaded le contains more than 10 biquads, then only the rst 10 will be loaded. Biquad design software Following are programs that can be used to design your biquad coe cients. The design program must be set for a 96 kHz sample rate. - Page 66 3/15/23, 9:45 AM Print or save - miniDSP Flex Crossover Crossovers "split" the frequency band to send to different drivers. In a two-way loudspeaker, for example, a low pass lter is used to remove high frequencies from the signal sent to the woofer, and a high pass lter is used to remove low frequencies from the signal sent to the tweeter.
-
Page 67: Crossover Mode
3/15/23, 9:45 AM Print or save - miniDSP Flex Output 3 [390 Hz] -15.1 dB Crossover mode The crossovers on each output channel can be set in either basic mode or advanced mode. Basic mode allows each crossover lter to be speci ed simply by providing two parameters, while advanced mode requires the use of a separate design program. -
Page 68: Cut-Off Frequency
3/15/23, 9:45 AM Print or save - miniDSP Flex Crossover filter is disabled Crossover filter is enabled Cut-off frequency Sets the nominal cutoff frequency of the crossover. In actual fact, the crossover has a more or less gradual transition from "full on" to "full off," as determined by the lter slope. -
Page 69: Hiding Channels
3/15/23, 9:45 AM Print or save - miniDSP Flex To link a channel, enable the Menu switch at the top right. Click on the channel that you want to link the current channel to. After con rming, an indicator appears to show the new link:... - Page 70 3/15/23, 9:45 AM Print or save - miniDSP Flex Band Pass Filter (Low+High) Output 1 Output 2 Output 3 Click to hide Output 4 channels Output 5 Output 6 Output 7 Output 8 Frequency (Hz) The crossover settings of channels 1, 2 and 3 can be changed by using the channel selection buttons at the top of the window to jump between them.
- Page 71 3/15/23, 9:45 AM Print or save - miniDSP Flex Setting biquads for the crossover block Paste the coe cients into the text box, then click on the PROCESS AND APPLY button for them to take effect. BASIC MODE ADVANCED MODE...
- Page 72 FIR ltering allows very complex lters to be constructed, with the aid of suitable design software. These lters can correct for amplitude only ("linear phase lters"), phase only, or a combination or both. These numbers are conventionally referred to as "taps." The miniDSP Flex can compute a total of 4096 taps. The FIR lter pane Each output channel has an FIR lter bank with a variable number of taps.
- Page 73 3/15/23, 9:45 AM Print or save - miniDSP Flex FIR Details (Input 1) Enable FIR Menu BACK Channels INPUT 1 INPUT 2 FIR - Frequency Response 1000 2,000 5,000 10,000 20,000 Frequency (Hz) FILE MODE MANUAL MODE Taps Input Area...
-
Page 74: File Mode
Print or save - miniDSP Flex Taps are allocated to each block according to the number of loaded taps. The miniDSP Flex can compute a total of 4096 taps. These can be distributed as you wish across the four output channels, with the limitation that each channel must have 6 or more taps and can have no more than 2048 taps. -
Page 75: Manual Mode
3/15/23, 9:45 AM Print or save - miniDSP Flex To cancel the operation, click UNLOAD FIR. Manual mode In Manual Mode, the FIR lter coe cients are pasted directly into the entry box in plain text, as shown below. FILE MODE... - Page 76 FIR lter design software The lter coe cients must be created with the aid of lter design software. miniDSP does not provide any such software, instead referring you to the many software packages available for this purpose (both freeware and commercial).
- Page 77 3/15/23, 9:45 AM Print or save - miniDSP Flex Compressor The compressor reduces the gain of an output channel when the audio signal reaches the level speci ed by the Threshold parameter. The gain of the channel will be progressively reduced as the signal increases above the threshold, according to the Ratio parameter.
- Page 78 3/15/23, 9:45 AM Print or save - miniDSP Flex Enable The compressor block is disabled by default. To enable it, click on the Enable Compressor switch. The graph will change from a dashed grey line (disabled) to a solid colored line (enabled).
-
Page 79: Additional Information
3/15/23, 9:45 AM Print or save - miniDSP Flex Additional Information https://docs.minidsp.com/product-manuals/flex/print_page.html 79/86... - Page 80 Print or save - miniDSP Flex Migrating to DC If you have used the older "plugin" software with your miniDSP Flex, you will need to perform a one-time migration procedure to use it with miniDSP Device Console. Follow the procedure described below. Please be sure to perform all steps in order.
- Page 81 Create Program Snapshot If the miniDSP USB Audio driver is not up to date (or has not been installed), DC will offer to install the latest version. In that case, click on the PROCEED button and proceed through the installation.
- Page 82 In some cases, the Flex will not restart properly. If you experience odd symptoms, such as Device Console not returning to the Discover Devices page, the Flex not appearing on the Discover Devices page, or the DSP Firmware update screen appearing again, power cycle the Flex and restart Device Console.
- Page 83 5. Click on the Start button. You will see a progress bar as the upgrade proceeds. Warning DO NOT DISCONNECT THE USB CABLE OR POWER FROM THE Flex WHILE FIRMWARE UPGRADE IS IN PROGRESS. DOING SO MAY “BRICK” YOUR Flex.
- Page 84 Presets that were previously loaded into the Flex using the miniDSP 2x4 plugin will automatically be imported into Device Console. If no existing presets are found, you will be prompted to initialize the presets to defaults when you connect to the Flex. In that case, click on Initialize to default settings.
-
Page 85: Troubleshooting And Support
If you get no sound while playing music, double-check the following items. Depending on the speci c processor, you may be able to do this with the aid of the level meters in the miniDSP Device Console. 1. Check which input source you have selected. -
Page 86: Obtaining Support
3/15/23, 9:45 AM Print or save - miniDSP Flex Obtaining support If you are experiencing issues with your miniDSP Flex that are not resolved by this manual and by following the trouble- shooting steps above: 1. Check the miniDSP forums (https://www.minidsp.com/forum/index) to see if this issue has already been raised and a solution provided.
Need help?
Do you have a question about the Flex and is the answer not in the manual?
Questions and answers