Table of Contents
Advertisement
Quick Links
Advertisement
Table of Contents

Subscribe to Our Youtube Channel
Related Manuals for TeeJet MATRIX 908


Summary of Contents for TeeJet MATRIX 908
- Page 1 U S E R G U I D E 98-01578 R3...
-
Page 2: Table Of Contents
Matrix 908 Field Computer Table of Contents IMPORTANT SAFETY INFORMATION GENERAL WARNINGS AND PRECAUTIONS MEASUREMENTS TO HAVE ON HAND BEFORE YOU GET STARTED SPRAYERS Self-Propelled Front Mount Sprayer ................................2 Self-Propelled Rear Mount Sprayer ................................3 Tractor with Fixed Front Mount Sprayer ..............................4 Tractor with Fixed Mount Off-Center Sprayer ............................5... - Page 3 Copyrights © 2023 TeeJet Technologies. All rights reserved. No part of this document or the computer programs described in it may be reproduced, copied, photocopied, translated, or reduced in any form or by any means, electronic or machine readable, recording or otherwise, without prior written consent from TeeJet Technologies.
-
Page 4: Important Safety Informationi
TeeJet Technologies ® IMPORTANT SAFETY INFORMATION All safety related and operating instructions should be read before the system is operated. Safe operation of machinery is the operators responsibility. Safety procedures must be posted close to the equipment and clearly visible to and legible by the operator. Safety procedures should meet all company and local regulations, as well as MSDS-requirements. - Page 5 TeeJet Technologies ® WARNING! PRESSURIZED HYDRAULIC SYSTEMS • Always wear personal protective equipment (PPE) when performing work on hydraulic systems. • Adhere to the machine manufacture’s approved maintenance instructions when working on the hydraulic system. • Always turn equipment off when working on the hydraulic system. Take appropriate precautions when opening systems that have been previously pressurized.
- Page 6 NOTE: RECOMMENDED REPLACEMENT PARTS • The system has been designed with components that work together to provide the best system performance. When the system requires replacement parts, only TeeJet recommended components should be used to maintain proper system operation and safety.
-
Page 7: Measurements To Have On Hand Before You Get Started
Matrix 908 Field Computer MEASUREMENTS TO HAVE ON HAND BEFORE YOU GET STARTED The following pages are to assist in defining vehicle measurements in the Vehicle Wizard, device measurements in the Device Wizard, and mapping location measurements in the Mapping Location options. -
Page 8: Sprayers
Matrix 908 Field Computer SPRAYERS Self-Propelled Front Mount Sprayer Vehicle Name: Device Name: Table 1-1: Vehicle Wizard Measurements Table 1-3: Device Wizard Measurements Description Measurement/Option Description Measurement/Option Vehicle In-Line Direction to Hitch Hitch Type Point Forward of Fixed Mount Vehicle Pivot Point... -
Page 9: Self-Propelled Rear Mount Sprayer
Matrix 908 Field Computer Self-Propelled Rear Mount Sprayer Vehicle Name: Device Name: Table 1-5: Vehicle Wizard Measurements Table 1-7: Device Wizard Measurements Description Measurement/Option Description Measurement/Option Vehicle In-Line Direction to Hitch Hitch Type Point Aft of Vehicle Pivot Fixed Mount... -
Page 10: Tractor With Fixed Front Mount Sprayer
Matrix 908 Field Computer Tractor with Fixed Front Mount Sprayer Vehicle Name: Device Name: Table 1-9: Vehicle Wizard Measurements Table 1-11: Device Wizard Measurements Description Measurement/Option Description Measurement/Option Vehicle In-Line Direction to Hitch Hitch Type Point Forward of Fixed Mount... -
Page 11: Tractor With Fixed Mount Off-Center Sprayer
Matrix 908 Field Computer Tractor with Fixed Mount Off-Center Sprayer Vehicle Name: Device Name: Table 1-13: Vehicle Wizard Measurements Table 1-15: Device Wizard Measurements Description Measurement/Option Description Measurement/Option Vehicle In-Line Direction to Hitch Hitch Type Point Aft of Vehicle Pivot... -
Page 12: Tractor With Fixed Mount Aft Sprayer
Matrix 908 Field Computer Tractor with Fixed Mount Aft Sprayer Vehicle Name: Device Name: Table 1-17: Vehicle Wizard Measurements Table 1-19: Device Wizard Measurements Description Measurement/Option Description Measurement/Option Vehicle In-Line Direction to Hitch Hitch Type Point Aft of Vehicle Pivot... -
Page 13: Tractor With Pivot Mount Sprayer
Matrix 908 Field Computer Tractor with Pivot Mount Sprayer Vehicle Name: Device Name: Table 1-21: Vehicle Wizard Measurements Table 1-23: Device Wizard Measurements Description Measurement/Option Description Measurement/Option Vehicle In-Line Direction to Hitch Hitch Type Point Aft of Vehicle Pivot Pivot Mount... -
Page 14: Spreaders
Matrix 908 Field Computer SPREADERS Self-propelled Spreader Vehicle Name: Device Name: Table 1-25: Vehicle Wizard Measurements Table 1-27: Device Wizard Measurements Description Measurement/Option Description Measurement/Option Vehicle In-Line Direction to Hitch Hitch Type Point Aft of Vehicle Pivot Fixed Mount Point... -
Page 15: Tractor With Fixed Mount Spreader
Matrix 908 Field Computer Tractor with Fixed Mount Spreader Vehicle Name: Device Name: Table 1-29: Vehicle Wizard Measurements Table 1-31: Device Wizard Measurements Description Measurement/Option Description Measurement/Option Vehicle In-Line Direction to Hitch Hitch Type Point Aft of Vehicle Pivot Fixed Mount... -
Page 16: Tractor With Pivot Mount Spreader
Matrix 908 Field Computer Tractor with Pivot Mount Spreader Vehicle Name: Device Name: Table 1-33: Vehicle Wizard Measurements Table 1-35: Device Wizard Measurements Description Measurement/Option Description Measurement/Option Vehicle In-Line Direction to Hitch Hitch Type Point Aft of Vehicle Pivot Pivot Mount... -
Page 17: Console Connections And Features
Matrix 908 Field Computer CONSOLE CONNECTIONS AND FEATURES Power Button Integrated RAM Mount (assembly required) USB Port WiFi Antenna Connection* Serial Number Camera Connection* Harness Connection Speaker Ethernet Connection* GNSS Antenna Connection *Connection Activity is dependent on software version. Power On/Off Button Before powering on the console, attach all devices to the harness. -
Page 18: System Diagram
Matrix 908 Field Computer SYSTEM DIAGRAM The following is to be used for general reference. Specific configurations will vary depending on available devices. Contact TeeJet Customer Service or your local dealer for information on your specific configuration. NOTE: Connectivity to different devices may be released with future software releases. Always refer to software release notes for software/system connectivity at www.teejet.com/support/software.aspx. -
Page 19: Setup The Console
Matrix 908 Field Computer SETUP THE CONSOLE Before powering on the console, verify that all devices are attached to the harness. NO.1 WELCOME SCREEN Once the power up sequence has completed, the Welcome screen will appear. Select a different language ... -
Page 20: 2 Walk Through The Vehicle Wizard
Matrix 908 Field Computer NO.2 WALK THROUGH THE VEHICLE WIZARD Establishing an accurate vehicle is required for mapping or guidance. Follow the prompts on the Vehicle Wizard, making adjustments to the vehicle settings as needed. To navigate through the wizard options: Next Wizard Option –... -
Page 21: To Access The Vehicle Manager After Initial Startup
Matrix 908 Field Computer To Access the Vehicle Manager After Initial Startup Vehicles & Devices Manager To navigate in the Vehicle Manager: Close Settings – use to exit the Settings options and return to the Guidance screen New Vehicle –... - Page 22 Matrix 908 Field Computer Edit a Vehicle Active Vehicle A vehicle cannot be edited while a job is open. 1. Under , select the vehicle card to Vehicle Manager be edited 2. On the Vehicle Details screen, select the EDIT ...
-
Page 23: 3 Enter Available Unlocks
W Unlock purchased post-receipt of your system – PDF instruction sheet with console specific code will be provided. Contact TeeJet Costumer Service or your local dealer for details. A console reboot is required after entering an unlock code. -
Page 24: 4 Establish An Implement Through The Device Wizard
– See "ISOBUS Device" for instructions. NOTE: Only one (1) device of any kind can be active at a time. If an ISOBUS device is on the system, it will be the active device. TeeJet CAN devices and ISOBUS devices cannot be used at the same time. Only one (1) ISOBUS device is supported at a time. - Page 25 Wizard may be handled through the device's UT interface. Only one (1) device of any kind can be active at a time. If an ISOBUS device is on the system, it will be the active device. TeeJet CAN devices and ISOBUS devices cannot be used at the same time. Only one (1) ISOBUS device is supported at a time.
-
Page 26: Edit A Device
Matrix 908 Field Computer Edit a Device Active Device A device cannot be edited while a job is open. 1. Under , select the device card to Device Manager be edited 2. On the Device Details screen, select the EDIT ... -
Page 27: 5 Set Up Guidance Settings
Matrix 908 Field Computer NO.5 SET UP GUIDANCE SETTINGS Guidance Width – the distance between guidelines 98-01578-ENUS R3... -
Page 28: 6 Set Up Mapping Location
Matrix 908 Field Computer NO.6 SET UP MAPPING LOCATION Mapping location establishes the location from which the boundary will be mapped. • Default location – X Without a Device Defined – the Mapping Location will be the Vehicle Pivot Point X With a Device Defined –... -
Page 29: 7 Set Up The Gnss
Matrix 908 Field Computer NO.7 SET UP THE GNSS These settings are required for proper use of the system at your location. Exit this screen to begin initializing the GNSS receiver. A pop-up message will appear during the initialization. This takes about a minute. -
Page 30: 8 Set Up Assisted/Auto Steering
Matrix 908 Field Computer NO.8 SET UP ASSISTED/AUTO STEERING 1. Activate Search for Assisted/Auto Steering Device on System Start 2. Restart the console. 3. Acknowledge the Public Liability Disclaimer Notice. This takes about a minute to pop-up after restart. -
Page 31: 9 Select Job Mode
Matrix 908 Field Computer NO.9 SELECT JOB MODE X Simple Mode – only one (1) job will be available at a time – Start Job menu on the Guidance screen includes options to create a new job or continue the last job X Advanced Mode –... -
Page 32: Job Manager
Matrix 908 Field Computer Job Manager Use the Job Manager to create, delete, duplicate, start, and add information to a selected job or jobs. Create New Job – options to change the automatically generated name and add a field reference will be offered. -
Page 33: Data Manager
Matrix 908 Field Computer Data Manager Use the Data Manager to import or export all job data. Insert USB drive prior to attempting a transfer of Job Data. – used to move job data from USB Import storage to internal storage WARNING! Importing data will delete and replace any existing data on the console. -
Page 34: Start A Job
Matrix 908 Field Computer START A JOB Once the power up sequence has completed, the Start Job Menu will appear with the options to start a new job, continue the last job, or open the job manager to select a different job (options depend on job mode and job availability). -
Page 35: Advanced Job Mode
Matrix 908 Field Computer Advanced Job Mode Use the Start Job menu to start a new job, continue the last job, or open the job manager to select a different job. To navigate in the Start Job screen: Start a New Job – options to change the automatically generated name and add a field reference will be displayed. -
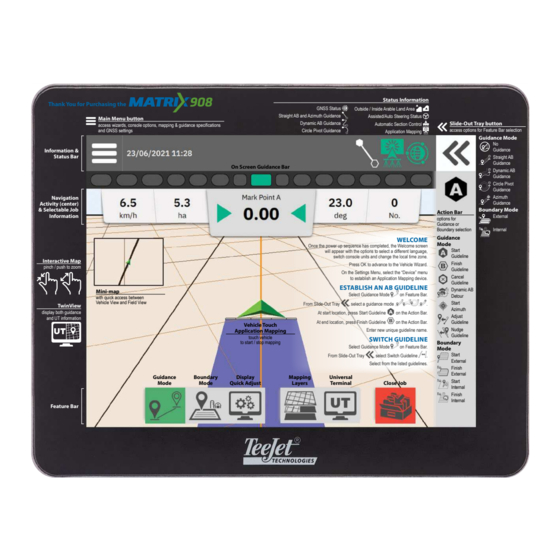
Page 36: Guidance Screen Features
Matrix 908 Field Computer Guidance Screen Features Slide-out Tray Button Information & Status Bar Information & Status Bar Current job name and information on GNSS status, guidance mode, arable land area, and assisted/ automatic steering engagement. See "Information & Status Bar" on page 38 for details. -
Page 37: 1 Choose A Guidance Mode
Matrix 908 Field Computer NO.1 CHOOSE A GUIDANCE MODE 1. With the Guidance button on the Feature Bar active, press the Slide-Out Tray button 2. Select a guidance mode No Guidance Straight AB Guidance Dynamic Adaptive AB Guidance... - Page 38 Matrix 908 Field Computer Straight AB Guidance Straight AB guidance provides straight-line guidance based on A and B reference points. The original A and B points are used to calculate all other parallel guidelines. Azimuth Guidance Azimuth guidance provides straight-line guidance based on a horizontal angle measured clockwise from a true north baseline.
-
Page 39: 2 Establish An Ab Guideline
Matrix 908 Field Computer NO.2 ESTABLISH AN AB GUIDELINE 1. Drive to the desired location of Point A 2. With the Guidance button on the Feature Bar active, press MARK A icon 3. Drive to the desired location of Point B 4. -
Page 40: Delete Last Guideline
Matrix 908 Field Computer Delete Last Guideline Delete Last Marked Guideline deletes the last marked guideline from the current job. 1. With the Guidance button on the Feature Bar active, press the Slide-Out Tray button 2. Press the DELETE GUIDELINE icon 3. -
Page 41: Dynamic Adaptive Ab Guideline Action Bar Options
Matrix 908 Field Computer Figure 3: Detour with Connect Detour Dynamic Adaptive AB Guideline Action Bar Options When in Dynamic Adaptive AB Guidance, the following options are available: Pause Guideline Mapping – use to pause dynamic mapping. A straight line will be drawn between the pause point and the resume point. -
Page 42: 3 Create An Application Boundary
Matrix 908 Field Computer NO.3 CREATE AN APPLICATION BOUNDARY Application boundaries establish the work areas where product is or is not applied while using Automatic Section Control (ASC) or BoomPilot. Application is not required to map a boundary. Boundary will be mapped to the edge of all the programmed sections (not necessarily those turned on at any given time during the boundary pass) or a user selected mapping location (see "No.6 Set Up Mapping Location"... -
Page 43: Delete Last Marked Boundary
Matrix 908 Field Computer 6. Travel the perimeter of the application area. While traveling, use as needed: Pause Boundary – pauses the mark boundary process. A straight line will be drawn between the pause point and the resume point. Resume Boundary –... -
Page 44: 4 Understand More About The Guidance Screen
Matrix 908 Field Computer NO.4 UNDERSTAND MORE ABOUT THE GUIDANCE SCREEN Map Options Vehicle with real-time representation of active Mini-Map boom sections Guideline & Points • Guidelines ◄Orange – active guidance line ◄Black (multiple) – adjacent guidance lines ◄Black – exterior boundary line ◄Gray –... - Page 45 Matrix 908 Field Computer Status Bar The Status Bar provides information on GNSS status, guidance mode, arable land area, assisted/auto steering engagement, and implement control status. To access related status information, select the Status Bar to displayed available options. GNSS Status...
-
Page 46: Mapping Layers
Matrix 908 Field Computer Mapping Layers When a ISOBUS Electronic Control Unit (ECU) sprayer or spreader control is integrated into the implement, rate control options and mapping options are available on the Vehicle View and Field View guidance screens. Coverage map – shows areas covered by the implement with the sections active. -
Page 47: Guidance Bar
Matrix 908 Field Computer Guidance Bar On Screen Lightbar Navigation Activity On Screen Lightbar Used to represent the distance away from the guideline or vehicle. To configure the lightbar availability, display mode or lightbar spacing, from the Main Menu go to Guidance Settings ->... -
Page 48: 5 Application Mapping Instructions
Matrix 908 Field Computer NO.5 APPLICATION MAPPING INSTRUCTIONS Depending on if there is a section control system present and when present what kind of section control is being used as well as what options are enabled, there are multiple options for application mapping. -
Page 49: Isobus Spreader
Optional Spreader On/Off Switch. TeeJet Section Control Module Before starting a job, all Section Control Module configurations should be setup by creating and activating a TeeJet CAN device (see "No.4 Establish an Implement through the Device Wizard" on page 18). -
Page 50: Access The Universal Terminal
Matrix 908 Field Computer ACCESS THE UNIVERSAL TERMINAL When a Universal Terminal unlock has been activated, the Universal Terminal (UT) is accessible from either the Guidance Screen or Main Menu NOTE: An ISOBUS device requires the Universal Terminal which requires an unlock code. See "No.3 Enter Available Unlocks"... -
Page 51: Help Options
Matrix 908 Field Computer HELP OPTIONS About Displays the console identification numbers, system software version, language update version, software versions of modules connected to the CAN bus, how much disk space is remaining, and GNSS status information. User Guide Provides a QR Code to access this user guide online. - Page 52 This guide is intended to get a user started with a general overview of the console. For more detailed information, please reference the User Manual. Scan below to access the User Manual which is accessible under the Field Computer options. www.teejet.com 98-01578-ENUS-A4/LT R3 English-US © TeeJet Technologies 2023...
Need help?
Do you have a question about the MATRIX 908 and is the answer not in the manual?
Questions and answers