
Related Manuals for Biocare iM 8


Summary of Contents for Biocare iM 8
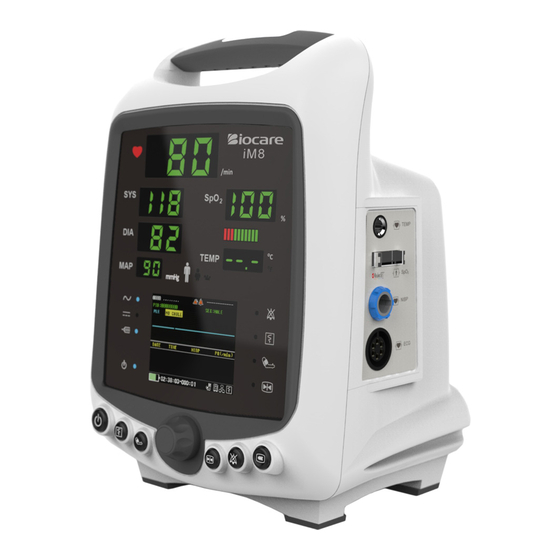
- Page 1 User Manual Patient Monitor Model: iM 8 Shenzhen Biocare Bio-Medical Equipment Co.,Ltd. P/N: 02111778...
-
Page 3: About This User Manual
About This User Manual This manual explains for clinical medical staff how to operate this patient monitor. Due to continuing product innovation, specifications in this manual are subject to change without notice. The manufacturer will not be responsible for those indirect or accidental injuries due to misusing the manual or errors in the content. -
Page 4: About Service
Shenzhen Biocare guarantees the main unit on the material and the technological qualification for this product is within 18 months since purchasing day. For accessories and consumable parts, the warranty period is 6 months. There is no return or exchange in principle. - Page 5 Medical Device Directive 93/42/EEC Shanghai International Holding Corp. GmbH(Europe) Eiffestraß e 80 20537 Hamburg GERMANY Shenzhen Biocare Bio-Medical Equipment Co., Ltd. #16-1, Jinhui Road, Jinsha Community, Kengzi Sub-District, Pingshan New District, 518122 Shenzhen, PEOPLE'S REPUBLIC OF CHINA Tel: 86-755-33005899 Fax: 86-755-27960643...
-
Page 7: Table Of Contents
2.2 Description of the Panel ..........................10 2.2.1 Front Panel .............................. 10 2.2.2 Side Panel ............................... 12 2.2.3 Rear Panel ............................... 13 Chapter 3 Operation .............................. 15 3.1 Start to Monitor.............................. 15 3.1.1 Power On ..............................15 iM 8 User Manual -- I --... -
Page 8: Contents
6.1.4 RESP Monitoring (Optional) ........................51 6.2 NIBP Monitoring (Standard) ......................... 51 6.2.1 Preparation .............................. 51 6.2.2 Display interface ............................. 56 6.2.3 Setup menu ............................. 56 6.2.4 Calibration .............................. 58 6.3 SPO Monitoring (Standard) .......................... 58 -- II -- iM 8 User Manual... - Page 9 8.4 Install and Replace the Battery ........................97 8.5 Periodic Check ............................... 98 8.6 Service ................................99 8.7 Transportation and Storage ..........................99 Chapter 9 Trouble Shooting ..........................101 9.1 Simple and Apparent Malfunction Checking ....................101 iM 8 User Manual -- III --...
- Page 10 A.4 ECG (Optional) ............................108 A.5 NIBP ................................109 A.6 SPO ................................111 A.7 RESP (Optional) ............................112 A.8 TEMP ................................113 A.9 EtCO (Optional) ............................113 Appendix B EMC Statement..........................117 B.1 Electromagnetic emissions ...........................117 B.2 Electromagnetic immunity ...........................118 -- IV -- iM 8 User Manual...
-
Page 11: General Warnings For Users
In order to avoid of burning the patients, high frequency electrical bistoury cannot touch the electrode when used with the monitor. Do not place the electrode onto the injured or edematous site to prevent infection. iM 8 User Manual -- 1 --... - Page 12 Warning: Do not use oral probe when taking the measurement of neonate‟s temperature. EtCO Measurement Warning: Avoid direct contact between the EtCO probe and the infant's body, or an insulation material must be placed between the probe and the body. -- 2 -- iM 8 User Manual...
-
Page 13: Terms For Safety And Symbols
Not necessarily being the earth (ground) potential. e.g. for local bonding. The symbol indicating separate collection for electrical and electronic equipment. Indicating network interface. iM 8 User Manual -- 3 --... - Page 14 Terms for Safety and Symbols -- Blank Page -- -- 4 -- iM 8 User Manual...
-
Page 15: Chapter 1 General Description
, TEMP and ETCO . To meet with different application needs, some different combinations of these modules can be selected. The following table shows the selectable model configurations: Item Configurations NIBP, SpO NIBP, SpO TEMP iM 8 User Manual -- 5 --... -
Page 16: Product Characteristic
Conventional temperature probe or infrared Thermometer probe is selectable EtCO End-Tidal CO , Mainstream and sidestream method. Some of the function modules have several options to meet the special requirements of user. For detailed parameters, please refer to appendix A. -- 6 -- iM 8 User Manual... -
Page 17: Power And Interface Specifications
Rollstand: The manufacturer can provide different specifications of rollstand and the patient monitors on the rollstand can be convenient to move. Support of ward bed: the support can make the patient monitors can be very good fixed. iM 8 User Manual -- 7 --... -
Page 18: Conformance Information
EN ISO 21647, EN ISO 10993-1, EN 62304, EN 62366, EN 980, EN 1041, AAMI SP10, AAMI EC13, ASTM E1112, ASTM E1104-03 …… For more information, please contact the manufacturer or the manufacturer‟s authorized agent. -- 8 -- iM 8 User Manual... -
Page 19: Chapter 2 Installation
2.1.3 Installation of Rollstand If need, please contact the manufacturer or the manufacturer‟s authorized agent, the manufacturer will be responsible for installation. The specific methods of installation please refer to “Instruction for use of rollstand”. iM 8 User Manual -- 9 --... -
Page 20: Connecting Accessories
On the left side of the LCD there are four indicators: AC indicator, DC indicator (vehicle power), charging indicator and power on indicator. On the right side of the LCD there are four other indicators: the alarm indicator, printing indicator and NIBP measuring indicator and freezing indicator. -- 10 -- iM 8 User Manual... - Page 21 To turn off the instrument, hold the on-off button on the left side for 2~3 seconds till the power indicator is off. This instrument will enter the monitor state automatically after it is turn on. The screen will show the important iM 8 User Manual -- 11 --...
-
Page 22: Side Panel
Figure 2.2 shows the side panel located at the right side of the instrument. There are four sockets on the side panel: TEMP socket, SPO socket, NIBP socket, ECG socket and EtCO TEMP socket socket EtCO socket NIBP socket ECG socket Figure 2.2 -- 12 -- iM 8 User Manual... -
Page 23: Rear Panel
On the rear panel there is AC power socket, DC power socket, grounding pole, lithium battery socket, network interface. On the left side of the monitor there is an interface for recorder. Recorder Interface Network Interface AC power socket Grounding pole Lithium battery socket DC power socket Figure 2.3 iM 8 User Manual -- 13 --... - Page 24 Installation -- Blank Page -- -- 14 -- iM 8 User Manual...
-
Page 25: Chapter 3 Operation
When the monitor finished its self-test, it will display the main interface, as shown in Figure 3.2. It includes four display areas, which are LED display area, LCD display area, on the left side of LCD indicators and on the right side of LCD indicators Figure 3.2 iM 8 User Manual -- 15 --... - Page 26 Note: The above data in the figure 3.3 is the data of DEMO program. LCD display area The information of LCD display area is as shown in the Figure 3.4 and Figure 3.5. There are two main status displayed areas and two windows‟ area. -- 16 -- iM 8 User Manual...
- Page 27 ”: Battery Indicator. When the internal battery is been charging, the indicator is lighted, when it is full, the indicator is off. If the symbol is “ ”, No battery is installed in the battery slot; iM 8 User Manual -- 17 --...
- Page 28 ”: Printing indicator (blue). When the Recorder is printing, the indicator is lighted. “ ”: NIBP indicator (blue). When NIBP is measuring, the indicator is lighted. “ ”: Freeze indicator (blue). When the wave is freezing, the indicator is lighted. -- 18 -- iM 8 User Manual...
-
Page 29: Patient Login
“Save Change” to save these information, as shown in figure 3.9. After logging in the new patient, the monitor will enter into monitoring main interface. If doctors want to cancel the operation, they can select “Cancel”. iM 8 User Manual -- 19 --... -
Page 30: New Patient
2) Edit content by Control Knob; 3) After edition has been completed, select “Save Change” by turning Control Knob. Press Control Knob to save modified content, and return to main monitor interface. Figure 3.10 -- 20 -- iM 8 User Manual... - Page 31 2) Edit content by Control Knob. 3) After edition has been completed, select “Save Change” by turning Control Knob. Press Control Knob to save modified content, and return to main monitor interface. Figure 3.11 iM 8 User Manual -- 21 --...
-
Page 32: Continue Patient
If doctors want to login the last patient, please select “Continue Patient” by Control Knob, and press it, as shown in figure 3.12. Then the monitor will enter into monitoring main interface. Figure 3.12 -- 22 -- iM 8 User Manual... -
Page 33: Demo
Start or stop recorder printing (RECORDER) Start or stop the blood pressure measurement (NIBP) Freeze or unfreeze the current waveform (FREEZE) Mute or turn on or suspended the alarm sound (MUTE) Multi-function key (SCREEN) iM 8 User Manual -- 23 --... -
Page 34: Control Knob
Switch interface style in the main monitor interface or blood pressure chart reviewing interface. Case 1: NO ECG Module Review blood pressure PLE waveform blood record chart pressure chart Display PLE single-channel waveform -- 24 -- iM 8 User Manual... -
Page 35: Quick Reference Table
The parameters on the current page turn to default. SAVE Confirm to the parameters amendment on this page. Turn to next interface that includes “Setup” include “System”, “NIBP”, “ALARM” and NEXT “OTHER”. EXIT Exit the system setup. iM 8 User Manual -- 25 --... - Page 36 TEMP Lower Limit TEMP lower limit alarm 0~50℃ TEMP Alarm Switch Alarm switch of TEMP ON/ OFF RESP Upper Limit RESP upper limit alarm 0~120 RESP Lower Limit RESP lower limit alarm 0~120 -- 26 -- iM 8 User Manual...
- Page 37 Set filtering mode of ECG wave. MODE1 / MODE2 / MODE3 / MODE4 RESP LEAD Set respiration analysis lead. I / II / III Set switch of pacemaker analysis PACE OFF/ ON function. iM 8 User Manual -- 27 --...
-
Page 38: Patient
Save modified content and exit the Save Patient Button operation item interface. Enter into editing interface of hospital Hospital Info Button operation item information. Do not save modified content, and exit the Cancel Button operation item interface. -- 28 -- iM 8 User Manual... -
Page 39: Alarm
RESP Alarm Switch Alarm Switch of RESP ON/ OFF ST Upper Limit ST upper limit alarm -1.00~1.00 ST Lower Limit ST lower limit alarm -1.00~1.00 ST Alarm Switch Alarm Switch of ST ON/ OFF iM 8 User Manual -- 29 --... -
Page 40: System Parameter Defaults
NET WORK ON LINE NET MODE CIS3000 NURSE CALL DISABLE SWEEP SPEED 25mm/ s TRACE GAIN 10mm/ mv LEAD TYPE 5-LEADS WAVE WIN-1 WAVE WIN-2 NIBP ECG MODE MODE 3 RESP LEAD PACE -- 30 -- iM 8 User Manual... -
Page 41: Chapter 4 Working Status Setup
LANGUAGE operation. French Set the displaying length time of trend TREND SCALE 4H / 8H / 12H chart- screen. BEAT TUNE Control oxygen pulse modulation. sound. Adjust SPO2 / Fixed Frequency / Close iM 8 User Manual -- 31 --... -
Page 42: Ecg Parameters Setup (Optional Function)
Select “SETUP” to enter into setting interface by turning Control Knob in the main monitor interface. The default first page of “SETUP” interface is “SYSTEM” interface. Select “NEXT” button or press “ ” into the “ECG” page, as shown in figure 4.2. -- 32 -- iM 8 User Manual... - Page 43 RESET: Select it and press the control knob, all the parameters will return to the default. SAVE: Select it and press the control knob, all parameters of this page will be saved and it will return the “Monitoring” interface automatically. iM 8 User Manual -- 33 --...
-
Page 44: Nibp Parameters Setup
Set the second begin time of TIME SEGMENT2 data reviews and interval (or 10 minutes, 15 minutes, 30 minutes, close), 45 minutes, 60 minutes, 90 minutes, 2 hours, 4 hours, 6 hours, 8 hours, or off -- 34 -- iM 8 User Manual... -
Page 45: Spo Parameters Setup
SWEEP SPEED Set the sweep speed 12.5mm/s, 25mm/s, 50mm/s Methods of setting the parameters as follows: Rotate control knob to select item. The selected item will displayed with red font of yellow background. iM 8 User Manual -- 35 --... -
Page 46: Etco Parameters Setup (Optional)
Setup the range of the waveform display 0~15 %(0-114 mmHg) NO BRE TIMEOUT Non breath overtime setup 20, 40, 60 secs. UINT Unit choose % or mmHg Set O supply low (0%) and (50%) -- 36 -- iM 8 User Manual... -
Page 47: Other Parameters Setup
Select “SETUP” to enter into setting interface by turning Control Knob in the main monitor interface. The default first page of “SETUP” interface is “SYSTEM” interface. Select “NEXT” button or press “ ” into the “OTHER” page, as shown in figure 4.5. iM 8 User Manual -- 37 --... - Page 48 Select it and press the control knob, enter into to the next interface of the current interface, such as "SYSTEM," “ALARM”, "NIBP", "OTHER” and “ECG” interface. EXIT: Select it and press the control knob to exit this functional item. (Before exit please ensure all settings have been saved.) -- 38 -- iM 8 User Manual...
-
Page 49: Chapter 5 Alarm
Pulse rate upper limit alarm 20~350 HR/PR Lower Limit Pulse rate lower limit alarm 20~350 HR/PR Alarm Switch Alarm switch of pulse rate ON/ OFF SPO2 Upper Limit SPO2 upper limit alarm 40~100 iM 8 User Manual -- 39 --... - Page 50 NEXT: Select it and press the control knob, enter into to the next interface of the current interface, such as "SYSTEM," “ALARM”, "NIBP", "OTHER” and “ ECG” interface. EXIT: Select it and press the control knob to exit this functional item. (Before exit please ensure all settings have been saved.) -- 40 -- iM 8 User Manual...
-
Page 51: Alarm Indicators
08: air pressure error Systolic, diastolic, 09: weak signal NIBP measure no display, and fail 10: exceed the range MAP shows 7 11: excess movement 12: over pressure 13: signal saturation 19: overtime iM 8 User Manual -- 41 --... -
Page 52: Alarm Control
When speaker is on, “ “ is yellow. When speaker is off, “ “ is gray. When alarm is on, the alarm signal is yellow. When alarm is paused, “ “ is gray. -- 42 -- iM 8 User Manual... - Page 53 Have indicate info, but no glitter information district Sound off, light off Voice off, no alarm light Inhibition permanent Red words glitter in the alarm Have indicate info, but no glitter information district iM 8 User Manual -- 43 --...
-
Page 54: Alarm Record And History
The alarm table lists the alarm items before present time. Every alarm item shows the order, alarm and happening time. The selected alarm item is in yellow ground and the item in white ground is not selected. The alarm parameters table shows PR, SPO , TEMP, SYS, DIA, MAP, REP, EtCO -- 44 -- iM 8 User Manual... -
Page 55: Chapter 6 Patient Monitoring
Green ‟Right Leg‟: Costal margin of the right anterior axillary line Black C1: The 4 intercostals space of the right sternal margin White C2: The 4 intercostals space of the left sternal margin iM 8 User Manual -- 45 --... - Page 56 The potential equalization conductor must be connected to the earth for safety. Figure 6.1 WARNING: To avoid burn, use the defibrillation ECG cable and the electrodes supplied by The manufacturer when the monitor is used with the defibrillator. -- 46 -- iM 8 User Manual...
- Page 57 „turned off‟. After the electrocardial module being closed, the electrocardiograph will not be displayed, the heart rate value of this time is obtained from the pulse rate (if the blood oxygen module is not closed). iM 8 User Manual -- 47 --...
-
Page 58: Display Interface
“Resp: 20”: The measurement real-time data of Respiration parameter; “Ⅱ”: ECG lead of channel. The channel of Ⅰ, Ⅱ, Ⅲ, aVR, aVL, aVF, Ⅴ can be selected. “ ”: One measurement real-time waveform. -- 48 -- iM 8 User Manual... -
Page 59: Setup Menu
Rotate control knob to select item. The selected item will displayed with red font of yellow background. If doctors want to change the content of selected item. Press control knob, then the selected item changes into iM 8 User Manual -- 49 --... - Page 60 In the figure 6.5, the ECG setup is: SWEEP SPEED: 10mm/mv; TRACE GAIN: 25mm/s; LEAD TYPE: 5-LEADS; WAVE WIN-1: REP; WAVE WIN-2: II; ECG MODE: MODE 3; -- 50 -- iM 8 User Manual...
-
Page 61: Resp Monitoring (Optional)
NIBP Module Information Standard NIBP Configuration: The Biocare NIBP module Standard NIBP Configuration of this instrument is the Biocare NIBP module. The Non-invasive Blood Pressure (NIBP) measurement module is designed by the manufacturer. iM 8 User Manual -- 51 --... - Page 62 The NIBP module of our patient monitors adopted the oscillometric method to measure the blood pressure. In the process of measuring the blood pressure, the module records all the measuring process, analyzes the data one -- 52 -- iM 8 User Manual...
- Page 63 Roll up the sleeves. Thick clothes lead to lower accuracy. Put the arm on the desktop and at the same height with the heart, the patient should keep quiet and avoid iM 8 User Manual -- 53 --...
- Page 64 In this case, the monitor will adjust the inflation pressure and make another measurement until the pressure is get -- 54 -- iM 8 User Manual...
- Page 65 The accuracy of the blood pressure measurement depends on appropriate cuff. Measure the perimeter of the arm to select suitable cuff. Do not push or pull the cuff during measurement. External pressure may lead to low accuracy. iM 8 User Manual -- 55 --...
-
Page 66: Display Interface
Select “SETUP” to enter into setting interface by turning Control Knob in the main monitor interface. The default first page of “SETUP” interface is “SYSTEM” interface. Select “NEXT” button or press “ ” into the “NIBP” page, as shown in figure 6.8. -- 56 -- iM 8 User Manual... - Page 67 Select it and press the control knob, enter into to the next interface of the current interface, such as "SYSTEM," “ALARM”, "NIBP", "OTHER” and “ECG” interface. EXIT: Select it and press the control knob to exit this functional item.(Before exit please ensure all settings have been saved.) iM 8 User Manual -- 57 --...
-
Page 68: Calibration
Module Information Standard SPO Configuration: The Biocare SPO module Standard SPO Configuration of the instrument is the Biocare SPO module. The Module meets all relevant parts of the following Safety Standards: • IEC60601-1:2005 • EN ISO9919:2009 The first optional Configuration: Nellcor SPO... - Page 69 The second optional Configuration: Masimo SPO module The second optional SPO Configuration of this patient monitor is Masimo SPO module. Blood Oxygen measurement module is designed by Masimo Corporation. The module and accessories have been certified by CE. iM 8 User Manual -- 59 --...
- Page 70 1) The manufacturer or Nellcor probe placement instructions The clip should be placed on the finger correctly, do not reverse the placement (see Figure 6.12), otherwise the measurement result will be incorrect. Figure 6.12 -- 60 -- iM 8 User Manual...
- Page 71 Do not place the blood oxygen probe on the fingers with injured skin, edema or fragile finger. Do not to place the probe on the same finger over 2 hours to prevent the finger discomfort. Use the neonatal SPO probe to measure the neonatal blood oxygen. iM 8 User Manual -- 61 --...
- Page 72 Do not measure SPO in an environment with flammable anesthetic or mixture of flammable material and air, or N The measurement may be incorrect. It may be due to patients or mechanical influence. The conditions -- 62 -- iM 8 User Manual...
- Page 73 (exposure to excessive illumination can be corrected by covering the sensor with a dark material); Excessive patient motion; Venous pulsations; Intravascular dyes such as indocyanine green or methylene blue; Defibrillation; iM 8 User Manual -- 63 --...
- Page 74 This equipment has been tested and found to comply with the limits for medical devices to the EN 60601-1-2: 2002, Medical Device Directive 93/42/EEC. These limits are designed to provide reasonable protection -- 64 -- iM 8 User Manual...
- Page 75 Always turn off and disconnect the power cord from the AC power supply before cleaning the device Use cleaning solutions sparingly. To ensure patient electrical isolation, connect only to other equipment with electrically isolated circuits. iM 8 User Manual -- 65 --...
- Page 76 You may then clean the sensor by wiping it with a 70% isopropyl alcohol pad. Allow the sensor to dry prior to placement on a patient. The site must be checked at least every four (4) hours to ensure proper adhesion, skin integrity and proper alignment. -- 66 -- iM 8 User Manual...
- Page 77 Venous pulsations may cause erroneous low readings (e.g. tricuspid value regurgitation). Do not modify or alter the sensor in any way. Alterations or modification may affect performance and/or accuracy. iM 8 User Manual -- 67 --...
-
Page 78: Display Interface
Wave display interface If “PLE” wave of SPO is set in the WAVE WIN-1, PLE wave can be displayed in the upper windows‟ area of LCD display area, as shown as Figure 6.14. Figure 6.14 -- 68 -- iM 8 User Manual... -
Page 79: Setup Menu
Select it and press the control knob, enter into to the next interface of the current interface, such as "SYSTEM," “ALARM”, "NIBP", "OTHER” and “ECG” interface. EXIT: Select it and press the control knob to exit this functional item.(Before exit please ensure all settings have been saved.) iM 8 User Manual -- 69 --... -
Page 80: Temp Monitoring (Standard)
TEMP Module Information Standard TEMP Configuration: The Biocare TEMP module (conventional body temperature means) Standard TEMP Configuration of the instrument is the Biocare TEMP module. The temperature (TEMP) measurement module is designed by the manufacturer that is conventional body temperature means. - Page 81 4. The method of installing the probe cover: (1) put the probe cover‟s non film side into the groove of the installation ring; (2) align the installation ring‟s center and the probe‟s center, push the installation ring into the bottom (see Figure 6.19) Figure 6.19 iM 8 User Manual -- 71 --...
- Page 82 “measurement” button. Open the button after hearing tick in 2 seconds. (see Figure 6.22) Figure 6.22 8. Take out the thermometer and read the result. The result also shows on the patient monitor‟s screen.(see Figure 6.23) Figure 6.23 -- 72 -- iM 8 User Manual...
- Page 83 For thermal temperature probe, it is important to fix it onto the skin of a proper position and fix it. Temperature of the same patient but of the different body position will be different, and the value obtained will vary, please treat differently. iM 8 User Manual -- 73 --...
-
Page 84: Display Interface
Select “SETUP” to enter into setting interface by turning Control Knob in the main monitor interface. The default first page of “SETUP” interface is “SYSTEM” interface. Select “NEXT” button or press “ ” into the “OTHER” page, as shown in figure 6.25. Figure 6.25 -- 74 -- iM 8 User Manual... - Page 85 Select it and press the rotary knob, enter into to the next interface of the current interface, such as "SYSTEM," “ALARM”, "NIBP", "OTHER” and “ECG” interface. EXIT: Select it and press the rotary knob to exit this functional item.(Before exit please ensure all settings have been saved.) iM 8 User Manual -- 75 --...
-
Page 86: Etco Monitoring (Optional)
It shall always be used in combination with other vital signs monitoring devices and/or professional human judgments of patient condition. The EtCO probe is intended to be used by trained and authorized health care professionals only. -- 76 -- iM 8 User Manual... -
Page 87: Preparation
Always verify gas readings and waveforms on the monitor before connecting the airway adapter to the patient circuit. Perform the tightness check of the patient circuit with the IRMA probe snapped on the IRMA airway adapter iM 8 User Manual -- 77 --... - Page 88 Check that the LEGI shows a steady green light (indicating that the system is OK) Breathe into the sampling line and check that valid CO waveforms and values are displayed on the <host device>. Occlude the sampling line with a fingertip and wait for 10 seconds. -- 78 -- iM 8 User Manual...
- Page 89 Incorrect probe zeroing will result in false gas readings. Replace the adapter if rainout/condensation occurs inside the airway adapter. Use only PHASEIN manufactured IRMA airway adapters. The IRMA probe is not intended to be in patient contact. iM 8 User Manual -- 79 --...
- Page 90 Use of high frequency electrosurgical equipment in the vicinity of the monitor may produce interference and cause incorrect measurements. Do not use external ambient cooling of the ISA device. Do not apply negative pressure to the Nomoline (i.e. by a syringe) to remove condensed water. -- 80 -- iM 8 User Manual...
-
Page 91: Display Interface
8. System setup 9. FiCO : the least CO inhale quantity measured value 10. Patient information Figure 6.26 CO waveform and parameters 11. AwRR: the air flue breath value 12. Trend 13. Alarm trend iM 8 User Manual -- 81 --... -
Page 92: Parameters Setup
ON or disable AwRR upper limi Set the upper limit of AwRR alarm 0~100 AwRR lower limit Set the lower limit of AwRR alarm 0~100 AwRR alarm switch AwRR alarm switch ON or disable -- 82 -- iM 8 User Manual... -
Page 93: Zeroing Procedure
IRMA airway adapter before proceeding with the Zeroing Procedure. The green LED on the probe will be blinking for approximately 5 seconds while zeroing is in progress. iM 8 User Manual -- 83 --... -
Page 94: Alarms
NO MODULE Software error Restart the sensor The module has malfunctions. It should be sent to the Hardware error manufactory. Sensor error The sensor has error The module isn‟t performed zero Calibration lost -- 84 -- iM 8 User Manual... - Page 95 Also include an overview of the status indicated by the LEGI: Steady green light System OK LyBlinking green light Zeroing in progress Steady blue light Anesthetic agent present Steady red light Sensor error Blinking red light Check sampling line iM 8 User Manual -- 85 --...
- Page 96 Patient Monitoring -- Blank Page -- -- 86 -- iM 8 User Manual...
-
Page 97: Chapter 7 Reviewing And Printing
Display the current and the last blood pressure measurement recorded data of the current patient. Displayed blood pressure unit should be consistent with set blood pressure module. 7.1.2 TREND Table Trend table review Set displayed time interval. Figure 7.2 iM 8 User Manual -- 87 --... -
Page 98: Trend Graph
Select “FAST” and press the knob, and then rotate the knob. The knob is defined as the operation as fast forward or fast back of the trend cursor. Press it again to withdraw from the state of the cursor movement, then return to the menu operation. -- 88 -- iM 8 User Manual... -
Page 99: Trend Ruler
The monitor can connect “PRT 60 thermal Recorder”. PRT 60 thermal Recorder insets the left of the interface of the monitor, as shown in figure7.5. And tighten the screw. The interface in The interface in Recorder monitor Step1: iM 8 User Manual -- 89 --... -
Page 100: Installation Of Printing Paper
(3) Install the thermal paper in the position as the Figure instructs. NOTE: Positive and negative printing paper must be installed with right direction, otherwise no content is printed. (4) Close the lid of Recorder, and it is ready to use. -- 90 -- iM 8 User Manual... -
Page 101: Printing Setup
The methods of setting parameters as follows: Enter "other" of the main menu to see the functional menu, in the second page to set alarm print, regular print, print content. Introduce the print parameters setup as follows: iM 8 User Manual -- 91 --... -
Page 102: Printing Report
Only data but not waveform is printed in timing record. During alarm record, if the user press “RECORD” button again, the system won‟t pay attention to it, and continues printing until all contents is printed completely. -- 92 -- iM 8 User Manual... -
Page 103: Chapter 8 Maintenance
Never pour or spray water or any cleaning solution on the equipment or permit fluids to run behind switches, into the connectors, or into any ventilation openings in the equipment. e) Never use these cleaning agents: ● Abrasive cleaners or solvents of any kind, ● Acetone, iM 8 User Manual -- 93 --... -
Page 104: Display
Ethylate: 70% alcohol, 70% isopropanol Acetaldehyde Disinfection: To avoid extended damage to the equipment, disinfection is only recommended when stipulated as necessary in the Hospital Maintenance Schedule. Disinfection facilities should be cleaned first. -- 94 -- iM 8 User Manual... - Page 105 Disposable cuffs can be cleaned using soap solution to prevent infection. Reusable TEMP Probes The TEMP probe should not be heated above 100℃ (212℉). It should only be subjected briefly to temperatures between 80℃ (176℉) and 100℃ (212℉). iM 8 User Manual -- 95 --...
- Page 106 Caution The Nomoline sampling lines are non-sterile devices. To avoid damage, do not autoclave any part of the sampling line Never sterilize or immerse the ISA sidestream gas analyzer in liquid -- 96 -- iM 8 User Manual...
-
Page 107: Other
Please do not short, fire, extrude and disconnect the battery, or this may lead to fire or explosion. Pull the power plug when the battery is installed or replaced. iM 8 User Manual -- 97 --... -
Page 108: Periodic Check
The battery performance will be affected or invalid if it is not charged regularly. The battery is charged via the AC plug into the power socket for about 4~8 hours at least -- 98 -- iM 8 User Manual... -
Page 109: Service
3) Air pressure : 16.5kPa~106kPa 4) The room is well ventilated and without caustic gas. Note Please properly store the package. If the monitor needs to be returned, please use the package to protect the monitor. iM 8 User Manual -- 99 --... - Page 110 Maintenance -- Blank Page -- -- 100 -- iM 8 User Manual...
-
Page 111: Chapter 9 Trouble Shooting
“start/stop” button has a loose contact, some malfunctions in the charging control board, DC indicator is bad, the capacity of the battery is not enough or the battery is damaged. iM 8 User Manual -- 101 -... -
Page 112: Malfunction Instructions Displayed On The Screen
3. the SPO module failure 2. replace SPO line slot replace RA electrode invalidation the SPO module Lead off .LA electrode invalidation 4.replace high quality electrode LL electrode invalidation C electrode invalidation RL electrode invalidation -- 102 -- iM 8 User Manual... -
Page 113: Error Code Displayed On The Screen
Error Code Description No error Wrong cuff (Cuff not connected or not tied) Air leakage Air pressure wrong(unstable pressure) Signal weak Upper measurement Too much motion Over pressure tested Signal saturated Over time testing iM 8 User Manual -- 103 -... -
Page 114: Other Phenomena Of Malfunctions
3. dirt on the finger with the probe 4. re-plug or replace the probe or SPO 4. if the luminous diode does not flash, signal lines. then it shows that the SPO probe is -- 104 -- iM 8 User Manual... - Page 115 3. server body motion such as turning heating. the body frequently, server cough 3. keep the patient quiet iM 8 User Manual -- 105 -...
- Page 116 Trouble Shooting -- Blank Page -- -- 106 -- iM 8 User Manual...
-
Page 117: Appendix A Product Specifications
Drafty and without corrosive gas Transportation and Storage Environment Requirement Temperature -40° C ~ 55° C (-40° F ~131° F) ≤95% (non-condensing) Relative humidity Air pressure 16.5kPa ~ 106kPa Other Drafty and without corrosive gas iM 8 User Manual -- 107 -... -
Page 118: Power Supply Requirements
Heart disorder analysis Anti-polarized voltage ± 500 mV Baseline renewing time <5 s after the defibrillation ECG filter mode mode 1(diagnostic), mode 2(monitoring), mode 3(operation) Frequency characteristic 0.67Hz~40Hz Safeguard 4000V high voltage isolation, anti-defibrillation, -- 108 -- iM 8 User Manual... -
Page 119: Nibp
± 2% or ± 3 BPM, whichever is greater NIBP (SunTech) (Optional) Method of Measurement Oscillometric. Diastolic values correspond to Phase 5 Korotkoff sounds. Patients Neonatal, pediatric and adult patients Measurement Modes: Manual Adaptive or preset cuff inflation iM 8 User Manual -- 109 -... - Page 120 Internal operating software ensures that: Patient Safety • Maximum cuff inflation time is limited to 75 seconds • Duration of blood pressure reading is limited to 130 seconds (Adult mode) 120 seconds (Adult Motion Tolerant mode) -- 110 -- iM 8 User Manual...
-
Page 121: Spo
Alarm with sound and lights, and record the alarm status for review (NELLCOR) (Optional) Measuring method Dual wave length infrared wave Measuring Range 0~100% Alarm setup range 70~100% Resolution Precision ± 2% (70~100% adult/ Pediatric) iM 8 User Manual -- 111 -... -
Page 122: Resp (Optional)
1 rpm Precision The bigger one between ± 2 rpm or ± 2 % Alarm setup Respiration rate overruns, asphyxiation Alarm method Alarm with sound and lights, and record the alarm status for review -- 112 -- iM 8 User Manual... -
Page 123: Temp
: 4.5-5.5 VDC, max 1.0 W (power on surge@5 V less than Power supply 350 mA during 200 ms) Surface temperature IRMA CO : Max 41° C/106° F (at ambient temp 23° C) iM 8 User Manual -- 113 -... - Page 124 4.5 to 5.5 VDC, Power supply ISA CO : < 1.4 W (normal op.), < 1.8 W (peak @ 5 VDC) USB or RS-232 serial interface. Software upgrade possible using the Interface RS-232 serial interface. -- 114 -- iM 8 User Manual...
- Page 125 “Interfering gas and vapour effects” below. Interfering Gas and Vapour Effects Gas or Vapour Gas level IRMA CO 1&2) 60 vol% 4 vol% ENF,ISO,SEV 5 vol% +8%of reading 15 vol% +12%of reading iM 8 User Manual -- 115 -...
- Page 126 After being in a condensing atmosphere, the unit shall be stored for more than 24 hours in an environment within the temperature equivalent to the operating humidity. The humidity range 50~100% is valid range-40~40° C only. -- 116 -- iM 8 User Manual...
-
Page 127: Appendix B Emc Statement
CISPR 11 low-voltage power supply network that supplies buildings used for Harmonic emissions Class A domestic purposes. IEC 61000-3-2 Voltage Compliance Fluctuations/Flicker Emissions IEC61000-3-3 iM 8 User Manual -- 117 -... -
Page 128: Electromagnetic Immunity
3 A/m 3 A/m magnetic field typical commercial or hospital environment. IEC 61000-4-8 Note: U is the A.C. mains voltage prior to application of the test level. -- 118 -- iM 8 User Manual... - Page 129 . Over the frequency range 150 kHz to 80 MHz, field strengths should be less than 3 V/m. iM 8 User Manual -- 119 -...
- Page 130 Note 1: At 80 MHz and 800 MHz, the separation distance for the higher frequency range applies. Note 2: These guidelines may not apply in all situations. Electromagnetic propagation is affected by absorption and reflection from structures, objects and people. -- 120 -- iM 8 User Manual...
- Page 132 Shenzhen Biocare Bio-Medical Equipment Co., Ltd. Address: #16-1, Jinhui Road, Jinsha Community, Kengzi Sub-District, Pingshan New District, 518122 Shenzhen, PEOPLE'S REPUBLIC OF CHINA Tel: 86 -755 -33005899 Fax: 86-755-27960643 Website: http://www.biocare.com.cn...
Need help?
Do you have a question about the iM 8 and is the answer not in the manual?
Questions and answers