Sign In
Upload
Download
Table of Contents
Contents
Add to my manuals
Delete from my manuals
Share
URL of this page:
HTML Link:
Bookmark this page
Add
Manual will be automatically added to "My Manuals"
Print this page
×
Bookmark added
×
Added to my manuals
Manuals
Brands
Biocare Manuals
Medical Equipment
iE 101
User manual
Biocare iE 101 User Manual
Digital electrocardiograph
Hide thumbs
1
2
3
4
5
6
Table Of Contents
7
8
9
10
11
12
13
14
15
16
17
18
19
20
21
22
23
24
25
26
27
28
29
30
31
32
33
34
35
36
37
38
39
40
41
42
43
44
45
46
47
48
49
50
51
52
53
54
55
56
57
58
59
60
61
62
63
64
65
66
67
68
69
70
71
72
73
74
75
76
77
78
79
80
81
82
page
of
82
Go
/
82
Contents
Table of Contents
Troubleshooting
Bookmarks
Table of Contents
Table of Contents
Foreword
Chapter 1 Introduction
Equipment Overview
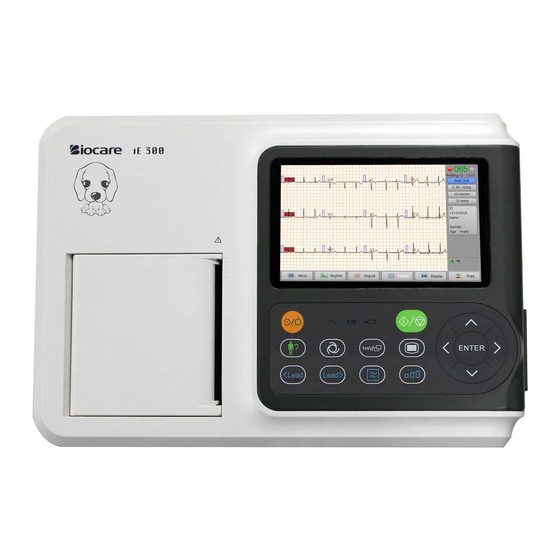
Front View
Left View
Right View
Operating Buttons
Handle Installation
Waveform Display
Same Screen Display
Split-Screen Display
Chapter 2 Preparation
Locate the ECG Machine
Install Recording Paper
Connect to Power Supply
Connect to Animal Cable
Power On/Off
Connect to Network
Apply Electrodes
Electrodes Attachment
Chapter 3 Entering Animal Information
Enter Animal Information
Introduction of Input Method
Standard Character Keyboard
Digital Keyboard
Chapter 4 ECG Recording
Introduction of Sensitivities, Filters, Print Speed
Record Ecgs
Main Steps to Record ECG
Introduction of Record Mode
Auto Mode
Manual Mode
Upload Mode
Advanced Mode
Rhythm Mode
Analysis Report Mode
Freeze Mode
Chapter 5 Setting System Parameters
ECG Setting
Print Setting
Display Setting
Animal Information Setting
System Setting
Factory Maintain
Chapter 6 Data Management
Open an ECG File
Edit an ECG File
Delete ECG Files
Copy and Move ECG Files
Chapter 7 Maintenance
Main Unit
Animal Cable
Cleaning and Disinfection
Recording Paper
Battery
Silicon Rubber Shaft for Printing
Thermal Print Head
Chapter 8 Troubleshooting
Lead Fault
Printer Failure
Indicator of Lead off
AC Interference
EMG Interference
Baseline Wander
The ECG Machine Cannot be Turned on
Paper Feeding Failure
Battery Is Quickly Charged and Discharged
File Uploading Failure
Appendix A Package and Accessories
Packing List
Dimensions and Weight
Appendix B Technical Specification
Specifications
Main Unit
Recorder Specification
Other Specification
Environment Requirements
Appendix C EMC-Guidance and Manufacture's Declaration
Guidance and Manufacturer's Declaration - Electromagnetic Emission
Guidance and Manufacture's Declaration-Electromagnetic Immunity for All EQUIPMENT and SYSTEMS
Guidance and Manufacture's Declaration-Electromagnetic Immunity for EQUIPMENT and SYSTEMS
Those Are Not LIFE-SUPPORTING
Recommended Separation Distance between Portable and Mobile RF Communications Equipment and the
EQUIPMENT or SYSTEM for EQUIPMENT or SYSTEM that Are Not LIFE-SUPPORTING
Advertisement
Quick Links
1
Equipment Overview
2
Factory Maintain
Download this manual
User Manual
Digital Electrocardiograph
Model: iE 101 & iE 300 for vet
P/N: 02111785-01
Version: V1.1
Shenzhen Biocare Bio-Medical Equipment Co., Ltd.
Date: 2019-08
Table of
Contents
Previous
Page
Next
Page
1
2
3
4
5
Advertisement
Table of Contents
Need help?
Do you have a question about the iE 101 and is the answer not in the manual?
Ask a question
Questions and answers
Related Manuals for Biocare iE 101
Medical Equipment Biocare iE 300 User Manual
Digital electrocardiograph (82 pages)
Medical Equipment Biocare iM 12 User Manual
Veterinary monitor (196 pages)
Medical Equipment Biocare iM 15 User Manual
Veterinary monitor (196 pages)
Medical Equipment Biocare iM 8 User Manual
Patient monitor (132 pages)
Medical Equipment Biocare iE 3 User Manual
Digital electrocardiograph (129 pages)
Medical Equipment Biocare iE 6 User Manual
Digital electrocardiograph (129 pages)
Medical Equipment Biocare PM-900 User Manual
Veterinary monitor (182 pages)
This manual is also suitable for:
Ie 300
Table of Contents
Save PDF
Print
Rename the bookmark
Delete bookmark?
Delete from my manuals?
Login
Sign In
OR
Sign in with Facebook
Sign in with Google
Upload manual
Upload from disk
Upload from URL


Need help?
Do you have a question about the iE 101 and is the answer not in the manual?
Questions and answers