
Related Manuals for OTTO MOTORS OTTO 100 V2.4


Summary of Contents for OTTO MOTORS OTTO 100 V2.4
- Page 1 OPERATION AND MAINTENANCE MANUAL OTTO 100 V2.4 OTTO 100 V2.4 Document ID: OMM-000094 Revision: A Original instructions provided in English...
-
Page 2: Contact Information
OTT O 1 0 0 V 2. 4 • O M M- 00 0 09 4 • R EV . A CONTACT INFORMATION OTTO Motors is committed to your success and satisfaction. We are located in Kitchener, Ontario. If you have any questions or concerns, visit our support knowledge base for more information, or get in touch with our support team. -
Page 3: Table Of Contents
OTT O 1 0 0 V 2. 4 • O M M- 00 0 09 4 • R EV . A 9 Components Overview 33 CONTENTS 9.1 Lift Appliance 33 Contact Information 2 9.2 Buttons and Ports 34 Contents 3 9.3 Robot State Indicators 35 List of Figures 5 9.4 Perception Sensors 39... - Page 4 13.11 Driving an OTTO AMR Autonomously 74 13.12 Driving with Markers 75 13.13 Driving with Waypoints or Routes 76 13.14 Connecting to the OTTO 100 V2.4 AMR 13.15 Connecting the OTTO 100 V2.4 AMR to the Network 80 14 Maintenance 81 14.1 Weekly Preventative Maintenance 82...
-
Page 5: List Of Figures
Figure 8 Effective sensor scanning areas for the OTTO 100 V2.4 AMR. For details see ICD-000078. Figure 9 OTTO 100 V2.4 AMR with the lift in the lowered position 33 Figure 10 OTTO 100 V2.4 AMR with the lift in the charge position 33 Figure 11 Rear view of the OTTO 100 V2.4 AMR... -
Page 6: List Of Tables
Table 3 Applicable Documents 20 Table 4 OTTO 100 V2.4 AMR System Specifications 30 Table 5 OTTO 100 V2.4 AMR light pipe patterns and indicated state 35 Table 6 Attachment Interface Pinout 46 Table 7 Approximate camera FOV as a green... -
Page 7: Important Safety Information
Failure to follow these instructions may result in INJURY or DAMAGE to the system and or property. The top priority of OTTO Motors is the safety of its users. OTTO Motors produces high power and fast- moving pieces of machinery that potentially could cause serious injury, including death, if improperly used or maintained. -
Page 8: Revision History
OTT O 1 0 0 V 2. 4 • O M M- 00 0 09 4 • R EV . A REVISION HISTORY Table 1 Revision History REVISION DATE CHANGES November 2020 Initial release © Clearpath Robotics Inc. 2020. All rights reserved. CLEARPATH and OTTO are trademarks of Clearpath Robotics Inc. All other product and company names listed are trademarks or trade names of their respective companies. -
Page 9: Hazards And Awareness
HAZARDS AND AWARENESS 2.1 General Hazard Labels Review the following to learn more about the labels that may be used on OTTO Motors products. Hazards can also apply to attachments and accessories used in conjunction with an OTTO Motors product. - Page 10 Handling technique when moving manually lifting autonomously or loads. when being driven manually. Always be aware of OTTO Motors products and their potential for movement. Tripping OTTO Motors Automated Be aware that Hazard products may pose Mobile Robot OTTO AMRs can a tripping hazard.
-
Page 11: Safety Awareness
OTT O 1 0 0 V 2. 4 • O M M- 00 0 09 4 • R EV . A 2.2 Safety Awareness Personnel present in an OTTO Motors facility need to be made aware or be accompanied by personnel who are familiar with the specific risks and hazards associated with automated mobile robots (AMR). - Page 12 Maintenance not outlined in the operations and maintenance manual can only be performed by OTTO Motors Authorized Personnel. © Clearpath Robotics Inc. 2020. All rights reserved. CLEARPATH and OTTO are trademarks of Clearpath Robotics Inc. All other product and company names listed are trademarks or trade names of their respective companies.
-
Page 13: Facility Conditions
OTT O 1 0 0 V 2. 4 • O M M- 00 0 09 4 • R EV . A 2.3 Facility Conditions OTTO AMRs, attachments, and accessories are designed to work on flat and clean surfaces - facility conditions greatly affect their ability to operate safely and navigate properly. -
Page 14: Payload Maximums
The OTTO 100 AMR requires a custom robot configuration in order to accommodate payloads that project beyond the dimensions of the base OTTO 100 AMR platform or Staging Cart. Please contact OTTO Motors if a custom robot configuration is required. -
Page 15: Battery Handling
OTT O 1 0 0 V 2. 4 • O M M- 00 0 09 4 • R EV . A 2.5 Battery Handling Like most applications using batteries with Lithium technology, special precautions should be taken to handle this type of material. Battery packs should only be handled by trained personnel to ensure proper handling. -
Page 16: Overhang And Underhang Detection
OTT O 1 0 0 V 2. 4 • O M M- 00 0 09 4 • R EV . A 2.6 Overhang and Underhang Detection Existing equipment in your facility could be rendered invisible to an OTTO AMR due to configuration of an "overhang"... -
Page 17: Disclaimer
OTTO Motors assumes no responsibility for any errors or omissions that may appear in this document. In no event shall OTTO Motors be liable for any costs or damages arising from the use of this document or the hardware and software described within. The reference documents listed in this manual shall be applicable at the latest revision in effect. -
Page 18: Intended Use
OTT O 1 0 0 V 2. 4 • O M M- 00 0 09 4 • R EV . A INTENDED USE OTTO Motors robots are Autonomous Mobile Robots (AMR) intended for use in industrial facilities. OTTO AMRs are intended to transport materials indoors in industrial buildings, utilizing visual mapping and location and intelligent navigation to plan their motion. -
Page 19: Introduction
Software Version 2.18. No field modifications of the OTTO 100 V2.4 AMR that influence the performance or safety of the robot shall be permitted. This includes, but is not exclusive to, modifications that affect the physical size, mass, or floor traction of the robot. No modifications may be carried out that affect the integrated sensors or internal electronics. -
Page 20: Applicable Documents
For additional information refer to the following documents. These documents are available on the OTTO Motors Support Center at help.ottomotors.com. Table 3 Applicable Documents REFERENCE NUMBER OTTO 100 V2.4/2.5 AMR Payload Interface ICD-000079 OTTO 100 V2.4/2.5 AMR Sensor Footprint ICD-000078 OTTO 100 Fast Charger Operation and Maintenance Manual... -
Page 21: Product Safety
6.2 Risk Reduction Despite the safety features OTTO Motors has put into place, the OTTO 100 V2.4 AMR is heavy and capable of moving quickly. The best way to ensure protection of life and equipment around the OTTO 100 V2.4 AMR is to keep a safe distance from it and pay attention to the light pipe and auditory warnings to anticipate the robot’s intentions. - Page 22 The OTTO 100 V2.4 AMR assumes the environment meets the requirements set by OTTO Motors for autonomous driving. Stairwells, loading docks, and other unprotected vertical drops must not be accessible to the OTTO 100 V2.4 AMR. It is unable to detect these vertical drops with its sensors.
-
Page 23: Figure 3 Pinch / Crush Zones As The Otto
OTT O 1 0 0 V 2. 4 • O M M- 00 0 09 4 • R EV . A Figure 3 Pinch / Crush Zones as the OTTO 100 V2.4 AMR docks Figure 4 Charger Contacts Danger Area ©... -
Page 24: Figure 5 Robot Charge Contacts Danger Area
OTT O 1 0 0 V 2. 4 • O M M- 00 0 09 4 • R EV . A Figure 5 Robot Charge Contacts Danger Area Pinch/Crush Objects can be pinched by lift plate. Never touch or place an object near the lift plate or near signal or charge contacts as this may result in pinching or crushing. -
Page 25: Figure 7 Lidar Detection Field Of View
Proper PPE, including approved safety footwear with toe cap, should be worn when operating around the OTTO 100 V2.4 AMR. While operating in a hazard zone, such as narrow spaces and docking, the OTTO 100 AMR will reduce the buffer zone further and reduce speed. -
Page 26: Safety Distance
6.5 Safety System Functionality The OTTO 100 V2.4 autonomous mobile robot (AMR) complies with ISO 3691-4 (2020) - Industrial trucks - Safety requirements and verification - Part 4: Driverless industrial trucks and their systems. The primary method of navigation and controlling the safety of motion is through the use of a robot- mounted laser scanner (Hokuyo UAM-05LP Safety Area Scanner) to ensure safe velocity and separation control. - Page 27 Additionally, the SAS or the OTTO Motors Safety System will trigger a hardware Safety Stop if the robot speed or differential between wheel speeds exceeds preset limits. This safety system meets the requirements for a PLd CAT 3 rating according to ISO EN 13849-1:2015.
- Page 28 OTT O 1 0 0 V 2. 4 • O M M- 00 0 09 4 • R EV . A Impact When the OTTO AMR is operated manually (while using OTTO App for mapping, for example) the rear-facing optical sensor is not active, and the user is responsible for obstacle avoidance and collision avoidance.
-
Page 29: In Case Of A Collision
Take photos or make a drawing. e. If the robot is connected to Fleet Manager, create a Manual Snapshot to capture diagnostic information and robot sensor data to assist OTTO Motors in diagnosing the incident cause. 4. Assess the state of the robot. -
Page 30: System Overview
OTT O 1 0 0 V 2. 4 • O M M- 00 0 09 4 • R EV . A SYSTEM OVERVIEW This section provides an overview of the important elements of the OTTO 100 V2.4 autonomous mobile robot (AMR) system. - Page 31 OTT O 1 0 0 V 2. 4 • O M M- 00 0 09 4 • R EV . A Battery and Power System Battery Run Time ~ 6 hrs for a typical use-case OTTO AMRs are designed for opportunity charging and will intelligently manage their own charging between Jobs.
- Page 32 Operating Environment Indoor Operating Temperature 20°C - 40°C (68°F to 104°F) Range Please contact OTTO Motors if lower operating temperatures are needed. Operating Relative 0 - 85 % non-condensing Humidity Maximum Operating 2000 m N.N. (6500 ft above sea level)
-
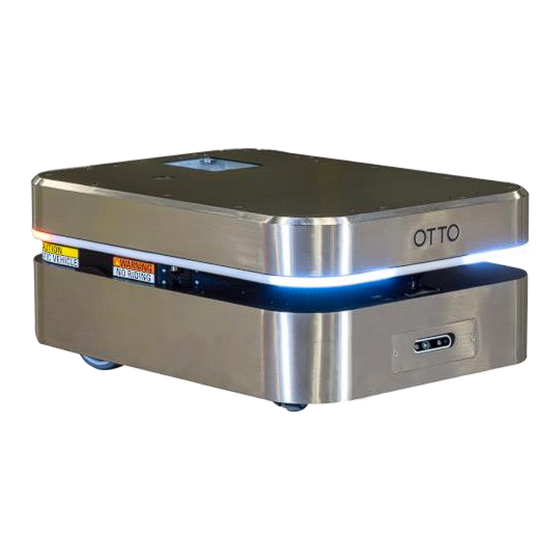
Page 33: Components Overview
9.1 Lift Appliance The OTTO 100 V2.4 AMR is equipped with an internal lift capable of lifting up to 150 kg. As seen below, the top half of the robot above the LiDAR cavity can be raised to pick up a payload or to expose the charge contacts. -
Page 34: Buttons And Ports
OTTO 100 V2.4 AMR from an unknown state. Momentarily pressing this button will boot up or shut down the OTTO 100 V2.4 AMR. This switch can be held for 10 seconds to reset all electronics within the OTTO 100 V2.4 AMR. -
Page 35: Robot State Indicators
The Ethernet Connection is located next to the Power Toggle button (see above) and is used to perform diagnostics or configure the robot. See Basic Usage for more detail on connecting to the OTTO 100 V2.4 AMR. 9.3 Robot State Indicators Light Pipe and Visual Indications 9.3.1... - Page 36 OTT O 1 0 0 V 2. 4 • O M M- 00 0 09 4 • R EV . A Reversing The OTTO AMR is reversing. Rear Solid Dull White in direction of travel Front Solid Red with Dull White Turning The OTTO AMR is turning.
- Page 37 OTT O 1 0 0 V 2. 4 • O M M- 00 0 09 4 • R EV . A Narrow Corridor The OTTO AMR is entering what it considers a narrow corridor. Front Dull White Rear Red Blinking Yellow Stripes Manual Control The OTTO AMR is being manually controlled.
- Page 38 Speaker 9.3.2 The speaker is located near the front of the OTTO 100 V2.4 AMR in the LiDAR cavity. The speaker is intended to warn users of an approaching robot and works with the light pipe to indicate various robot states.
-
Page 39: Perception Sensors
The LiDAR scans in a horizontal plane located 185 mm above the floor, projected out in front and to the sides of the robot. Obstacles with a height below 180 mm may not be detected by the OTTO 100 V2.4 AMR and will create a collision risk. - Page 40 3D Perception Camera 9.4.2 The OTTO 100 V2.4 AMR is equipped with a 3D Perception Camera so that the operation of the robot can be monitored for diagnostic purposes. The camera may be used in autonomous navigation to avoid overhanging obstacles in newer software versions.
-
Page 41: Circuit Breakers And Lock-Out/Tag-Out
The Lock-Out Tag-Out pin is not visible when the circuit breaker is switched closed. Figure 13 OTTO 100 V2.4 AMR as seen from the front with the lift in the lowered position © Clearpath Robotics Inc. 2020. All rights reserved. CLEARPATH and OTTO are trademarks of Clearpath Robotics Inc. All other product and company names listed are trademarks or trade names of their respective companies. -
Page 42: Otto 100 Charger/Fast Charger
OTT O 1 0 0 V 2. 4 • O M M- 00 0 09 4 • R EV . A 9.6 OTTO 100 Charger/Fast Charger OTTO 100 V2.4 AMRs can charge at OTTO 100 Charger/Fast Charger docks fully autonomously. See below for a visual of the large keyhole-shaped navigation footprint which must be clear of obstacles for autonomous charging. -
Page 43: Staging Cart
Staging Carts may be included in your installation. The Staging Cart is designed to transport payloads not exceeding 130 kg and objects placed on the cart must conform to the requirements for stability. The Staging Cart uses a braking mechanism to prevent it from rolling when not engaged with an OTTO 100 V2.4 AMR. -
Page 44: Attachment Interface
PC, power sourced from the robot battery, and interfacing with the robot Emergency Stop circuit. See ICD-000079 - OTTO 100 V2.4 AMR Payload Interface for more detail. These documents are available on the OTTO Motors Support Center at help.ottomotors.com. For safe loading, ensure that the center of mass is within the loading pyramid as indicated in ICD-000079. -
Page 45: Attachment Interface Connections
OTT O 1 0 0 V 2. 4 • O M M- 00 0 09 4 • R EV . A 10.2 Attachment Interface Connections The following circuits are presented at the payload connector access panel: • 1 x Power over Ethernet (PoE+) RJ45 bulkhead connector •... -
Page 46: Figure 16 37 Position Cpc Connector
OTT O 1 0 0 V 2. 4 • O M M- 00 0 09 4 • R EV . A Check the capabilities of your software version for the communications features supported by the OTTO Software for this port. CPC Connector 10.2.3 The mating connector for the 37-position CPC connector is TE Connectivity, CPC Plug Assembly Size 23-37,... - Page 47 OTT O 1 0 0 V 2. 4 • O M M- 00 0 09 4 • R EV . A 11-18 Isolated Digital Outputs (GPIO 8 - 15) 24 AWG External DIO Power, 24 – 36 VDC 24 AWG External E-Stop Channel A –...
- Page 48 OTT O 1 0 0 V 2. 4 • O M M- 00 0 09 4 • R EV . A Serial Communication 10.2.3.1 The 37-pin CPC connector supports serial communications with the onboard PC through use of a 3-wire, RS- 232 implementation.
-
Page 49: Figure 17 Reference Design, Di Sink Mode (1-Vecow Co., Ltd., 2016)
OTT O 1 0 0 V 2. 4 • O M M- 00 0 09 4 • R EV . A Figure 17 Reference Design, DI SINK Mode (1-Vecow Co., Ltd., 2016) Digital GPIO input signal circuit in SINK mode (NPN) is illustrated above. When eight DIs are used for NPN signals 24 VDC should be applied to Pin 9 (Digital Input Common). -
Page 50: Figure 19 Reference Design, Do Sink Mode (1-Vecow Co., Ltd., 2016)
External Emergency Stop 10.2.3.3 The OTTO 100 V2.4 AMR uses a two-channel, Emergency Stop system. The attachment interface provides a break-out of this two-channel circuit to allow for the incorporation of an attachment-mounted Emergency Stop trigger. This circuit operates by presenting a 24 V signal and monitoring the return lines. If the circuit is opened, the system will enter and remain in an Emergency Stop state. - Page 51 The interface presents access to two “dry” contact circuits which are controlled by the main safety relays of the OTTO 100 V2.4 AMR. A “dry” contact is a circuit that passes through a relay and has not been provided voltage, or “wetted”, by a voltage source.
-
Page 52: Figure 21 Contact Application Guide (3-Idec Corp., 2009)
If the OTTO 100 V2.4 AMR is in normal operation, opening the Auxiliary Contact Loop will prevent a reset of the Emergency Stop and clearing of safety stops. If the OTTO 100 V2.4 AMR is in an Emergency Stop state, opening this circuit is a way to prevent a reset of the Emergency Stop in a failure situation. - Page 53 Attachment Power 10.2.3.6 Power from the OTTO 100 V2.4 AMR can be sourced through the 37-pin CPC connector. This port provides un-switched battery voltage intended to drive a resistive load up to a maximum of 12.5 A. The voltage is driven directly from the battery and as such will vary between 22V and 29.2V depending upon the robot’s...
-
Page 54: Perception Functionality
11.1 3D Perception Field of View The single 3D camera on the front of the OTTO 100 V2.4 AMR has a 90° horizontal Field of View (FoV) and a 47° FoV above the floor. See ICD-000078 - OTTO 100 V2.4 AMR Sensor Footprint for more detail. These documents are available on the OTTO Support Center at help.ottomotors.com. -
Page 55: Detection Observations
OTT O 1 0 0 V 2. 4 • O M M- 00 0 09 4 • R EV . A 11.3 Detection Observations • Large textured objects (20 cm x 20 cm or greater) are detected at 3 m •... - Page 56 OTT O 1 0 0 V 2. 4 • O M M- 00 0 09 4 • R EV . A Pallet Jack Large Textured Underhang Medium Textured Underhang © Clearpath Robotics Inc. 2020. All rights reserved. CLEARPATH and OTTO are trademarks of Clearpath Robotics Inc. All other product and company names listed are trademarks or trade names of their respective companies.
- Page 57 OTT O 1 0 0 V 2. 4 • O M M- 00 0 09 4 • R EV . A Small Textured Underhang Conditional Pass Depending on the texture of the object, its surroundings, and robot speed, it is possible that the OTTO AMR will not...
- Page 58 OTT O 1 0 0 V 2. 4 • O M M- 00 0 09 4 • R EV . A Large Textured Overhang Thin Textured Conditional Overhang Pass When driving at high speeds, the OTTO AMR can end up with a bottom view of the obstacle, leaving the...
- Page 59 OTT O 1 0 0 V 2. 4 • O M M- 00 0 09 4 • R EV . A Large Uniform Overhan Elevated Pole © Clearpath Robotics Inc. 2020. All rights reserved. CLEARPATH and OTTO are trademarks of Clearpath Robotics Inc. All other product and company names listed are trademarks or trade names of their respective companies.
- Page 60 OTT O 1 0 0 V 2. 4 • O M M- 00 0 09 4 • R EV . A Fork Truck Conditional Tines on Pass Floor Tines can Profile only be detected at approximatel y 1.5 m from the robot.
- Page 61 OTT O 1 0 0 V 2. 4 • O M M- 00 0 09 4 • R EV . A Detection beyond 3.5 m is disabled within the software as beyond that distance the camera data is too noisy. Fork Truck Conditional...
-
Page 62: Unboxing
OTT O 1 0 0 V 2. 4 • O M M- 00 0 09 4 • R EV . A UNBOXING 12.1 Time Required Approximately 30 Minutes. 12.2 Required Materials • #2 Robinson or #2 Phillips screwdriver 12.3 What’s Inside •... -
Page 63: Figure 22 Crate Screws
OTT O 1 0 0 V 2. 4 • O M M- 00 0 09 4 • R EV . A Figure 22 Crate Screws 2. Remove top and front crate panel. 3. Remove wooden placeholders (2 x 2x4 wood pieces). Figure 23 Crate Wooden Placeholders 4. -
Page 64: Basic Usage
The robot must be locked out to properly protect the remaining connections. Normal maintenance will not require the user to open the OTTO 100 V2.4 AMR to expose these connections. © Clearpath Robotics Inc. 2020. All rights reserved. CLEARPATH and OTTO are trademarks of Clearpath Robotics Inc. All other product and company names listed are trademarks or trade names of their respective companies. - Page 65 OTT O 1 0 0 V 2. 4 • O M M- 00 0 09 4 • R EV . A Warning If the OTTO 100 V2.4 AMR has been operating immediately prior to performing maintenance, the motors and motor drivers on the traction circuit board (located on the bottom of the robot) may be at elevated temperatures which could cause a burn to the technician if contacted.
- Page 66 Caution Safety boots or shoes with steel toes should be worn at all times while working with an OTTO 100 autonomous mobile robot. OTTO 100 V2.4 Lock-Out Tag-Out 13.1.1 1. Press the Emergency Stop button. 2. Press and hold the Power button located on the rear of the robot for one second.
-
Page 67: Starting Up
3. Wait until all lights on the OTTO 100 V2.4 AMR are OFF (at least 30 seconds). This signifies that the main computer and all electronics have successfully powered down. -
Page 68: Charging
Only original OTTO Chargers from OTTO Motors should be used when charging the OTTO 100 V2.4 AMR to avoid any damage to the batteries If the OTTO 100 V2.4 AMR included an OTTO 100 Charger/Fast Charger, robots can be sent to charge autonomously without human intervention. -
Page 69: Moving An Unpowered Or Disabled Otto 100 V2.4
3. Wait until all lights on the OTTO 100 V2.4 AMR are OFF (at least 30 seconds). This signifies that the main computer and all electronics have successfully powered down. -
Page 70: Moving And Unpacking
13.6 Moving and Unpacking The OTTO 100 V2.4 AMR has a robust structure that allows it to be picked up or reoriented by hand or with the use of lifting machinery such as a forklift. When lifting the OTTO 100 V2.4 AMR, it is required to lift from the bottom of the robot using straps that are positioned behind the drive wheels and castors. -
Page 71: Storage
~50% every 12 months or sooner. If the OTTO 100 V2.4 AMR is at a higher SoC then mentioned above for storage the battery will need to be discharged, this can be done either by;... -
Page 72: Driving An Otto Amr Manually
OTT O 1 0 0 V 2. 4 • O M M- 00 0 09 4 • R EV . A 13.10 Driving an OTTO AMR Manually Caution While operating an OTTO autonomous mobile robot (AMR) in Manual mode, robot LiDAR safeguards are still active;... - Page 73 OTT O 1 0 0 V 2. 4 • O M M- 00 0 09 4 • R EV . A To adjust the top speed at which an OTTO AMR will travel, tap the Speed toggle. OTTO AMRs will drive slower when the Speed toggle is disabled and its field sets will narrow for easier navigation around close objects.
-
Page 74: Driving An Otto Amr Autonomously
OTT O 1 0 0 V 2. 4 • O M M- 00 0 09 4 • R EV . A 13.11 Driving an OTTO AMR Autonomously If the OTTO AMR has been added to Fleet Manager, the Map in OTTO App must match the Map in Fleet Manager. -
Page 75: Driving With Markers
OTT O 1 0 0 V 2. 4 • O M M- 00 0 09 4 • R EV . A 6. Move the green line inside the orientation circle to define the direction in which you want the OTTO AMR to be facing when it stops at the selected location. -
Page 76: Driving With Waypoints Or Routes
5. Select Stop to stop the OTTO AMR at any time. You can select the Drive Mode toggle at any point to enter Manual drive mode. 13.14 Connecting to the OTTO 100 V2.4 AMR OTTO autonomous mobile robots (AMR) can be interfaced with on an individual basis using a computer and network cable. - Page 77 OTT O 1 0 0 V 2. 4 • O M M- 00 0 09 4 • R EV . A Setting Your Computer's Network Address 13.14.2 In order to connect a computer to an OTTO autonomous mobile robot, the computer must have the following configurations: •...
- Page 78 OTT O 1 0 0 V 2. 4 • O M M- 00 0 09 4 • R EV . A Windows 7 13.14.2.2 1. In the bottom-right corner of the screen, right-click the Network icon and click Open Network and Sharing Center.
- Page 79 OTT O 1 0 0 V 2. 4 • O M M- 00 0 09 4 • R EV . A ipconfig 8. In the data that is returned, the should match the address entered in Step 5 above. IPv4 Address Pinging the OTTO AMR 13.14.3 1.
-
Page 80: Connecting The Otto 100 V2.4 Amr To The Network
OTT O 1 0 0 V 2. 4 • O M M- 00 0 09 4 • R EV . A 13.15 Connecting the OTTO 100 V2.4 AMR to the Network You'll need to connect your OTTO autonomous mobile robot (AMR) to your network to truly take advantage of the AMR's autonomous capabilities. -
Page 81: Maintenance
To order any of the part numbers referenced in the following maintenance procedures, please contact OTTO Motors Support. In the event that the below maintenance cannot be completed or the OTTO 100 V2.4 autonomous mobile robot requires further repairs, contact OTTO Motors. -
Page 82: Weekly Preventative Maintenance
Circle Check 14.1.1 Perform a circle check around the OTTO 100 V2.4 autonomous mobile robot daily to ensure no damage has occurred since the robot last ran. During this visual inspection, ensure the robot is turned on and verify that: •... - Page 83 • Flashlight • Antifog/Antistatic Lens Cleaning Wipes (OTTO Motors Part Number 015591) Caution Do not use abrasive items or solvents on the LiDAR assembly, as this will damage the LiDAR. Used and dirty cleaning cloths or wipes will scratch the window over time. The LiDAR window is a wear item but proper care and cleaning can significantly extend its life.
- Page 84 Grounding Strap Inspection 14.1.3 The grounding strap must fully contact the floor as the OTTO 100 V2.4 autonomous mobile robot moves. A grounding strap that cannot fully reach the floor poses an increased risk of accumulating static charge, which may influence the robot's performance and increase the risk of static discharges to people and other equipment.
- Page 85 Checking Charge Contacts 14.1.4 Observe the OTTO 100 V2.4 AMR in the charger or use OTTO App to raise the lift to charge height. Look for excessive wear of the copper charge contacts or excessive copper dust buildup. If the charge contacts are worn replace the parts.
- Page 86 14.1.6.3 1. OTTO Charger Setup a. Place a pylon in front of the OTTO 100 Charger/Fast Charger to ensure no OTTO 100 V2.4 AMRs drive into the Dock while it is being used. b. On the OTTO 100 Charger/Fast Charger (Ecotec battery charger) display, press the OK button to enter the charger’s menu and double-check the charging parameters:...
- Page 87 Jobs. 2. The OTTO 100 V2.4 AMR can be left unattended but the SoC should be checked every 30 minutes before the next charge cycle to make sure it is discharging as expected.
-
Page 88: Monthly Preventative Maintenance
Typically battery cells should be within a range of 50 mV - if not, the OTTO 100 V2.4 AMR’s battery may suddenly drop in SoC while operating or the OTTO 100 V2.4 AMR may unexpectedly shut off. To resolve this issue, it is required to perform the cell balancing of the battery and BMU. - Page 89 14.2.1.3 1. OTTO 100 V2.4 AMR Setup a. Ensure that the battery in the OTTO 100 V2.4 AMR has been drained down to around 10% - 14% as seen in the OTTO App or Fleet Manager. b. Ensure that the battery in the OTTO 100 V2.4 AMR has been drained down to around 10% - 14% as seen in the OTTO App or Fleet Manager.
- Page 90 1. After the OTTO 100 V2.4 AMR has sat turned off for 30 minutes, the cell balancing procedure is complete. 2. To verify that it has been performed correctly, run the OTTO 100 V2.4 AMR from 100% SOC to 10%: 3. Configure two Waypoints and have the OTTO 100 V2.4 AMR drive a route repeatedly between them.
-
Page 91: 3-Month Preventative Maintenance
OTT O 1 0 0 V 2. 4 • O M M- 00 0 09 4 • R EV . A 14.3 3-Month Preventative Maintenance Perform the following tasks once every 3 months: Wheel/Castor Inspection 14.3.1 Materials/Tools Required 14.3.1.1 • Two people •... -
Page 92: 36-Month Preventative Maintenance
OTTO AMR. When new, the OTTO 100 / OTTO 100 V2.4 Drive wheels have 10 mm of rubber thickness. If this is 8 mm or less, the wheel should be replaced. If any damage to the wheel is greater than 2 mm x 2 mm in size, greater than 2 mm in depth, results in raised areas on the wheel or causes the wheel to not roll smoothly (eg. -
Page 93: Disposal
OTT O 1 0 0 V 2. 4 • O M M- 00 0 09 4 • R EV . A DISPOSAL Always observe environmental protection regulations valid to your region. If disassembling the OTTO 100 V2.4 AMR for disposal, pass on any commercially-viable disassembled components for recycling. Separate materials as far as possible by type. 15.1 Battery Disposal Do not incinerate or dispose of the batteries. -
Page 94: Troubleshooting
Contact OTTO Motors Support if the issue cannot be resolved. © Clearpath Robotics Inc. 2020. All rights reserved. CLEARPATH and OTTO are trademarks of Clearpath Robotics Inc. All other product and company names listed are trademarks or trade names of their respective companies. - Page 95 Check that a valid LiDAR field set and Navigation Specification are loaded onto the OTTO AMR. Talk to OTTO Motors Support for instructions on diagnosing a blown traction motor fuse. The Navigation Specification will include information about the space required by the OTTO AMR for autonomous navigation.
-
Page 96: Declarations
OTT O 1 0 0 V 2. 4 • O M M- 00 0 09 4 • R EV . A DECLARATIONS 17.1 Supplier’s Declaration of Conformity 47 CFR § 2.1077 Compliance Information OTTO 100 V2.4 Responsible Party Clearpath US One Marina Park Drive, 10th Floor... -
Page 97: References
OTT O 1 0 0 V 2. 4 • O M M- 00 0 09 4 • R EV . A REFERENCES ECS-8000 User Manual, Vecow Co., Ltd., New Taipei City, Taiwan, 2016 RF1V Force Guided Relays / SF1V Relay Sockets, IDEC Corp., Osaka, Japan, 2009 ©...
Need help?
Do you have a question about the OTTO 100 V2.4 and is the answer not in the manual?
Questions and answers