Advertisement
Program Logic

Attention
- Please make sure the timer is in AutoRun states when set Rain Delay or Children Lock.
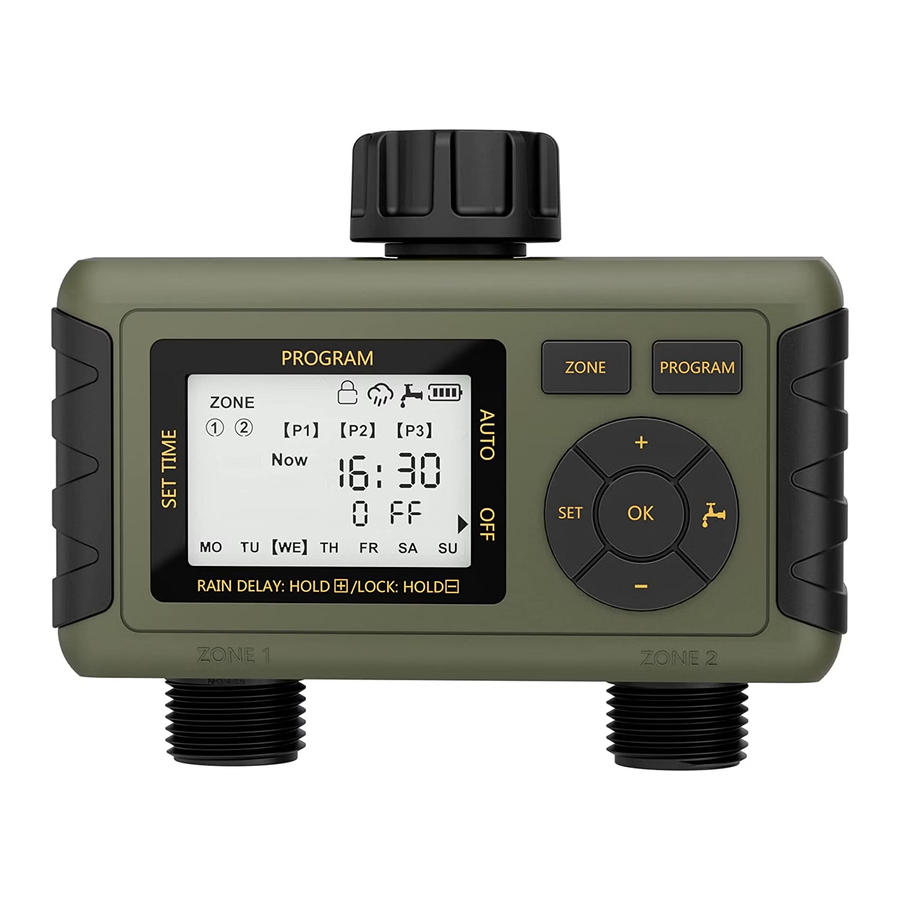
Product Appearance

Indicators Introduction

Automatic Watering Program Setting
- Set Time - Set the current week and time

- Press the "
![]() ", the "
", the "![]() " points to Set Time.
" points to Set Time. - Press the "
![]() " to set the current hour and minute. Press "
" to set the current hour and minute. Press "![]() " to confirm.
" to confirm. - Press the "
![]() " to set the current day of the week. Press "
" to set the current day of the week. Press "![]() " to save changes and moving to next setting, Program.
" to save changes and moving to next setting, Program.
- Press the "
- Set Z1/P1
- Program 1 State
- Press the "
![]() ", the "
", the "![]() " points to Program. And press the
" points to Program. And press the ![]() button to set Zone1/Zone2 press "
button to set Zone1/Zone2 press "![]() " to confirm.
" to confirm. - P1 have been selected and Press "
![]() "if switch to P1/P2/P3.
"if switch to P1/P2/P3.
- Press the "
- Program 1 State

 ", the "
 " points to Set Time.
 " to set the current hour and minute. Press "
 " to confirm.
 " to set the current day of the week. Press "
 ", the "
 " points to Program. And


 Note:
Note:
- Press the "
![]() ", OFF is displayed. By pressing "
", OFF is displayed. By pressing "![]() ",the time can be changed.
",the time can be changed. - Hours/minutes can be switched cyclically.


- Start Time
The default display of Start time is OFF. Press the "![]() " button to set the time to start watering, and press "
" button to set the time to start watering, and press "![]() " button to confirm.
" button to confirm.

- How long
Press the "![]() " to set the time of watering duration and press "
" to set the time of watering duration and press "![]() " to confirm.
" to confirm.
Watering can be customized to run from 1 min to 23hours 59 mins.
Note:·
The watering duration ranging from 00:00-23:59 If the hour of watering duration is set to 00 after switching, the program is OFF.

- Set Water Days
Press the "![]() " to choose the day of the week you would watering, and press "
" to choose the day of the week you would watering, and press "![]() " to confirm.
" to confirm.
![warning]() Note:
Note:
- The Water days can be cancelled when press "
![]() " button again if the week has been selected.
" button again if the week has been selected. - The day will come with a
![]() if be selected.
if be selected.

- The Water days can be cancelled when press "


- Z1/P2,Z1/P3... Setting
Follow the steps likes Z1/P1 setting to set Z1/P2,Z1/P3. (Set Zone/Program-start time-How long-water days)

- Auto
Press the "![]() ", the "
", the "![]() " points to Auto and the program will be running as you set before.
" points to Auto and the program will be running as you set before.

- OFF
Press the "![]() " button, the "
" button, the "![]() " points to OFF , the screen shows OFF and the battery level. All program are saved but the timer stop working.
" points to OFF , the screen shows OFF and the battery level. All program are saved but the timer stop working.

- Multi-Function
- Manual
Please make sure the timer is in Auto Run state.- Press the "
![]() " and Zone 1 have been select.
" and Zone 1 have been select. - Press "
![]() " to select watering duration from 1 min to 23 hours. Press "
" to select watering duration from 1 min to 23 hours. Press "![]() " to confirm the setting of Zone 1. And Zone 2 have been select.
" to confirm the setting of Zone 1. And Zone 2 have been select. - Press "
![]() " to select watering duration from 1 min to 23 hours. Press "
" to select watering duration from 1 min to 23 hours. Press "![]() " to confirm the setting of Zone 2.
" to confirm the setting of Zone 2.
Note:
- Press the "
- Manual


 " and Zone 1 have been select.
 " to select watering duration from
- Each program can only have one valve for watering.
- If Z1 or Z2 is set to 00, the zone will not be watered.
When you press the "![]() " button again, the manual watering task ends even if it is watering and the timer will switch back to Auto mode.
" button again, the manual watering task ends even if it is watering and the timer will switch back to Auto mode.


- Rain Delay
Please make sure the timer is in Auto Run state.- Hold and press "
![]() " button 5s until the
" button 5s until the ![]() appears on the screen.
appears on the screen. - Press "
![]() " button to set the duration of the delay from 1 to 7 days.
" button to set the duration of the delay from 1 to 7 days. - Press "
![]() " button it will start to watering.
" button it will start to watering.
Note:
- All Auto program are on hold during the rain delay. If you want to cancel the Rain Delay , press "
![]() " button 5s again. ·
" button 5s again. · - Rain delay allows you to postpone watering for 1 day and up to 7 days

- Hold and press "
 " button 5s until the
  appears
  " button to set the duration of the
  " button it will start to watering.

- Children Lock
Please make sure the timer is in Auto Run state. Hold and press "![]() " button 5s until the "
" button 5s until the "![]() " appears on the screen. If you want to cancel the "
" appears on the screen. If you want to cancel the "![]() ", press "
", press "![]() " button 5s again.
" button 5s again.


Battery Installation

- Open the battery cover.
- Insert four AA (1.5V) alkaline batteries.
Note:
- Please do not insert rechargeable batteries to avoid low voltage
- The display will turn on for 3 seconds when power on.
- The timer don't have programmable memory, it need to reset once power off.
![]()

Specification
| Inlet/Outlet Thread | NH3/4" |
| Working Water Pressure | 7.25psi - 116psi |
| Working Temperature | 40.1˚ F-113˚ F |
| Rain Delay Time | 1 day and up to 7 days |
| Watering Duration | 00:01-23:59 |
| Waterproof | IPX5 |
| Included in the box | 1 x Water Timer, 2 x Threaded connector, 1 x 1/2" inlet adapter, 3 x Extra Rubber Washers, 1 x Thread Seal Tape, Instruction |
Precautions
- Do not use your timer when the air temperature is below 40℉(4.5℃), the timers should be removed from the hose faucet and stored indoors to avoid potential frozen damage.
![]()
- Filter can trap dirt particles, please clean filter regularly and replace if worn.
![]()
- Do not mix alkaline, standard (carbon-zinc), or rechargeable (nickel cadmium) batteries. Used up or dead batteries must be removed from the timer and disposed of properly.
![]()
- Please replace batteries when the low battery indicator appears the display. When replacing the power unit, please make sure that the water timer is dry.
![]()


FAQ
Q1: The LCD screen does not display anything when the batteries are installed.
A1:
Four batteries loaded are new 1.5V AA alkaline batteries, make sure the batteries are properly placed in the battery box. Do not use rechargeable batteries, please you must use alkaline batteries.
Q2: Water does not come on at preset time.
A2: Check if:
- Clock should be set to the correct time.
- Start time is set to desired the time.
- Rain Delay is on.
- OFF mode is on.
- The batteries are low.
- The faucet is turned off.
Q3: The hose tap connection/outlet leaks.
A3: Check if:
- The O-ring is connected correctly to the hose tap.
- The connection outlet or water pipe is broken.
- The faucet and water pipe has a different thread.
If necessary, please use an appropriate adapter or PTFE tape.
Q4: Why is the water valve out of little water?
A4 : If your are gravity feed system such as rain barrel system, then it won't work and will keep low water pressure. Gravity feed has no real pressure when dealing with a rain barrel. It needs pressure measuring.
After-sales Service
The timer have one year warranty, if you have any questions, please feel free to contact via support@diivoosmart.com
The following conditions are not included in the warranty:
- Problems occur due to its use for other purposes, or improper use or use of components not supplied by Diivoo.
- Damages caused by improper use, for example, wrong of power supply, artificial damage, etc.
Need Help?
 support@diivoosmart.com

Documents / ResourcesDownload manual
Here you can download full pdf version of manual, it may contain additional safety instructions, warranty information, FCC rules, etc.
Advertisement


Need help?
Do you have a question about the WT-04 and is the answer not in the manual?
Questions and answers