
Related Manuals for Alcedo B21


Summary of Contents for Alcedo B21
- Page 1 Blood Pressure Monitor Model : B21 User Manual Questions or Concerns? info@alcedohealth.com (833)682-8655...
-
Page 2: Table Of Contents
Table of Contents Introduction and Intended Use Important Information on Blood Pressure and its Measurement Components of Your Blood Pressure Monitor Using Your Monitor for the First Time Measurement Procedure Care and Maintenance Warranty Certifications Technical Specifications EMC Declaration... -
Page 3: Introduction And Intended Use
Only a health-care professional is qualified to interpret blood pressure measurements. This device is not intended to replace regular This manual is for B21 models. It is a fully au- medical checkups. tomatic digital blood pressure measuring de- It is recommended that your physician review vice for use by adults on the upper arm at home your procedure for using this device. - Page 4 Contraindication Host products, including accessories, shall be processed in accordance with local regu- Use of this instrument on patients under dialysis lations after reaching the life cycle. therapy or on anticoagulant, antiplatelets, or ste- roids could cause internal bleeding. Note: Warnings and Precautions This device contains sensitive electronic com- ponents.
- Page 5 Do not position the device to make it dif- The separate ac adapter which is intended to connect USB interface of Blood Pressure Mon- ficult to operate the disconnection device itor has not been evaluated according to IEC while using adaptor. 60601-1.
-
Page 6: Important Information On Blood Pressure And Its Measurement
Note: To obtain the greatest accuracy from your blood pressure instrument, it is recommended that the in- strument be used within the specified temperature and the relative humidity, please see the Techni- cal Specifications. The cuff is treated as the applied part. The user should contact the manufacturer for assistance, if needed, in setting up, using or maintaining the device. - Page 7 Which Values are Normal? Please refer to the diagram below (Picture-01) Diastolic blood pressure (mmHg) Severe hypertension Moderate hypertension Mild hypertension High normal value Normal blood pressure Optimal blood Systolic blood pressure pressure (mmHg) (target value) 130 140 160 180 Picture-01...
- Page 8 There are six grids in the display of device. Please refer to the Table-01. Different grids represent different interval scales of WHO. Blood Pressure Value WHO Grids in Device WHO Classification DIA <80 & SYS <120 Optimal blood pressure DIA <85 & SYS <130 Normal blood pressure DIA <90 &...
- Page 9 If you have blood pressure values that are too What Can be Done if Regular High low, (i.e., systolic values under 105 mmHg and/or or Low Values are Obtained? diastolic values under 60 mmHg), consult your Consult your doctor. physician. Even with normal blood pressure val- Increased blood pressure values (various ues, a regular self-check with your blood pres- forms of hypertension) are associated with...
-
Page 10: Components Of Your Blood Pressure Monitor
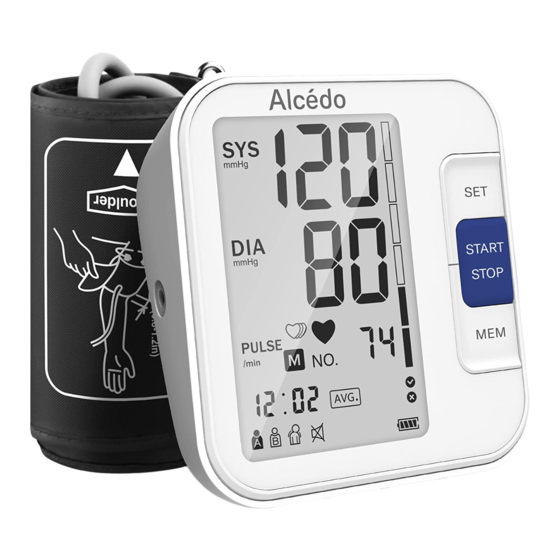
Components of Your Blood Pressure Monitor LCD Display Air Hose Artery Mark Air Plug Cuff Micro USB Power Cable Memory Button Start / Stop Button Set Button AC Adapter Port Battery Compartment Cuff Connector Port Speaker Picture-02... - Page 11 The Symbols on the LCD Display Systolic Blood Pressure Diastolic Blood Pressure Heartbeat Symbol (Flashes During Measurement) Irregular Heartbeat Symbol Memory Symbol Date/Time Display USER A USER B Movement Error Symbol Mute Symbol Average Value Symbol Low Battery Symbol Cuff Self-Checking Function Pulse Unit Symbol 7 8 9 10 WHO Function Symbol...
-
Page 12: Using Your Monitor For The First Time
Features of Model B21 Double users: Date/time Irregular heartbeat Talking function 2 x 120 sets memory display checking Average value Low battery display WHO function Auto power-off function External power Cuff self-checking Volume Large LCD adapter support function adjustment Display Note: Arm circumference should be measured with a measuring tape in the middle of the relaxed upper arm. - Page 13 Battery Replacement Dispose of the device, components and op- tional accessories according to applicable lo- Low Battery Indicator cal regulations. Unlawful disposal may cause environmental pollution. Battery is dangerous stuff, do not mix it with other rubbish. Micro USB Power Cable You may also use the monitor with the 5V micro USB power cable.
- Page 14 Note: Press the button to select User A or User B. No battery power is consumed while the mi- Then press button to confirm. If electrical power is interrupted (such as by Setting the Year: power socket), the monitor must be reset by When the year display is flashing, press the removing the power cable from the power button, the year will increase by 1 year each, hold...
- Page 15 Setting Time: When the hour display is flashing, press the button, the hour will increase by 1, press button to confirm, and follow the same way to set the minute. Press button to confirm. Year Month Time Setting Volume: Delete All Saved Results: When display with SP is flashing, press but- Select a user.
-
Page 16: Measurement Procedure
Measurement Procedure Note: You can’t delete individual results. All results will be deleted at once. Note: You should always be seated and calm be- Taking out the batteries will not delete saved fore and during measurement. results. However, it will reset some of your set- tings, such as date, time, and speaker volume. - Page 17 Common Sources of Error: Cuff works under the pressure range 0-300 mmHg. The wide range rigid cuff is: 8.7” – 15.7” (22 - 40 Note: Comparable blood pressure measurements cm). always require the same conditions. Note: Only use approved cuffs! Conditions should always be quiet.
- Page 18 Fitting the Cuff Please refer to Picture-04 The cuff is pre-formed for easier use. Remove tight or bulky clothing from your upper arm. Wrap the cuff around your upper left arm. The rubber tube should be on the inside of your arm extending downward to your hand.
- Page 19 Measure Procedure When the measurement has been concluded, the measured systolic and diastolic blood Please refer to Picture-05 pressure values, as well as the pulse will be displayed. Sit comfortably in a chair with your feet flat on the floor. Stretch your arm forward on the desk and keep relaxing, make sure the palm of hand is upturned.
- Page 20 Memory Viewing the Stored Values At the end of a measurement, this monitor auto- matically stores each result with date and time. Each unit stores 120 sets measurements for 2 us- Press the button. Select a user (A or B). ers, totally 240 sets (User A and B).
- Page 21 Display Readings Irregular Heartbeat Indicator The measurement results are displayed until you switch the device off. If no button is pressed for seconds, the device switches off automati- This will display if an irregular heartbeat is de- cally. tected during measurement. The result may differ from your normal basal blood pressure.
- Page 22 Recommended Use Methods Recommend that the patient relax as much as Upper arm is not possible and not talk during the measurement covered or pressed by gusset procedure. Recommend that take a 5 min break between Cuff and the measurements. heart are at Please sit vertically Any reading can be affected by the measurement...
- Page 23 Display Error Readings Symbol Cause Solution Replace both batteries with new ones. Check the bat- No display Weak battery or tery installation for proper placement of the battery appears improper placement polarities. Check if the pump is working or not. If it is working, Sensor abnormal then the problem is sensor abnormal.
- Page 24 Symbol Cause Solution The pressure that the sensor sensing is over Please send back to the local distributor. the limit The demarcation is incor- Please send back to the local distributor. rect or the device has not been demarcated Trouble Shooting Problem Check This Solution...
- Page 25 Symbol Descriptions The following symbols may appear in this manual, on the Digital Blood Pressure Monitor, or on it's accessories. Some of the symbols represent standards and compliances associated with the Digital Blood Pressure Monitor and its use. Authorized Representative in the Disposal: Do not dispose this product as European Community unsorted municipal waste.
- Page 26 Replacing Batteries Do not allow batteries to run out of charge in- side the monitor. This will damage the moni- When it is time to replace the batteries, will tor. Always replace batteries once pears on the display. flash on the display. You cannot take any further If you do not intend to use the device for a measurements and must replace the batteries.
-
Page 27: Care And Maintenance
Note: No power is taken from the batteries Handle the tube carefully. Do not pull on it. Do while the AC adapter is connected to the moni- not allow the tubing to kink and keep it away tor. If electrical power is interrupted, (e.g., by ac- from sharp edges. -
Page 28: Warranty
Warranty Certifications Device Standard Your blood pressure monitor is guaranteed for 1 year against manufacturers’ defects for the orig- This device is manufactured to meet the inal purchaser only, from date of purchase. The European blood pressure monitors: warranty does not apply to damage caused by IEC 80601-2-30 •... -
Page 29: Technical Specifications
Technical Specifications Pulse 40 to 199 per minute Model Weight 228.1 g (Batteries are not included) Cuff Pressure <300 mmHg Display Range 64*95 mm【2.52"x3.74"】 Display LCD Digital Display Automatically stores the last 120 Memory measurements for 2 users 11.8 x 11x 5.2 cm / (total 240) Monitor Size 4.65 x 4.33 x 2.05 inch... -
Page 30: Emc Declaration
EMC Declaration This product needs special precautions regarding EMC and needs to be installed and put into service according to the EMC information provided, and this unit can be affected by portable and mobile RF communications equipment. Do not use a mobile phone or other devices that emit electromagnetic fields, near the unit. This may result in in- correct operation of the unit. - Page 31 Guidance and manufacture’s declaration – electromagnetic immunity The device is intended for use in the electromagnetic environment specified below. The customer or the us- er of device should assure that it is used in such an environment. Immunity test IEC 60601 test level Compliance level Electromagnetic environment - guidance Floors should be wood, concrete or ceramic...
- Page 32 Guidance and manufacture’s declaration – electromagnetic immunity Power frequency Power frequency magnetic fields should (50Hz/60Hz) 30 A/m 30 A/m be at levels characteristic of a typical lo- magnetic field 50/60 Hz 50/60 Hz cation in a typical commercial or hospital IEC 61000-4-8 environment.
- Page 33 Guidance and manufacture’s declaration – electromagnetic immunity 80 MHz to 800 MHz:d=1.2 √p 800 MHz to 2.7 GHz:d=2.3 √p Where, P is the maximum output power rating of the transmitter in watts (W) ac- cording to the transmitter manufacturer and 10 V/m 10 V/m d is the recommended separation distance.
- Page 34 Recommended separation distances between portable and mobile RF communications equipment and the device The device is intended for use in an electromagnetic environment in which radiated RF disturbances are controlled. The customer or the user of the device can help prevent electromagnetic interference by maintaining a minimum distance between portable and mobile RF communications equipment (transmitters) and the device as recommended below, according to the maximum output power of the communications equipment.
- Page 35 Guidance and manufacturer’s declaration - electromagnetic immunity The device is intended for use in the electromagnetic environment specified below. The customer or the user of the device, should assure that it is used in such an environment. Test Maximum Immunity Band Distance frequency...
- Page 36 Guidance and manufacturer’s declaration - electromagnetic immunity GSM 1800; 1720 CDMA 1900; GSM 1900; Pulse Modulation 1845 1700 – 1990 217 Hz DECT; LTE Band 1, 3 1970 4, 25;UMTS Bluetooth, WLAN Pulse Modulation 2450 2400 – 2570 802.11 b/g/n, 217 Hz RFID 2450, LTE Band 7...
- Page 37 Guidance and manufacturer’s declaration - electromagnetic immunity The MANUFACTURER should consider reducing the minimum separation distance, based on RISK MANAGEMENT, and using higher IMMUNITY TEST LEVELS that are appropriate for the reduced minimum separation distance. Minimum separation distances for higher IMMUNITY TEST LEVELS shall be calculated using the following equation: Where P is the maximum power in W, d is the minimum separation distance in m, and E is the IMMUNITY TEST LEVEL in V/m.
- Page 38 Customer Support If you have any questions or concerns about your product, please contact our helpful Customer Support Team.* Email: info@alcedohealth.com Toll-Free: (833)682-8655 www.AlcedoHealth.com Support Hours Monday-Friday 10:00 am – 4:00 pm EST Distributed by: Nature Major Inc. 500 7th Ave New York, NY 10018 *Please have your order invoice and order ID ready before contacting Customer Support.
Need help?
Do you have a question about the B21 and is the answer not in the manual?
Questions and answers