Advertisement
Available languages
Available languages
Genmitsu 3018 CNC Spoilboard
Installation Guide
What you Will Need:
One of the Below:
⚫ Genmitsu 3018 PROVer
⚫ Genmitsu 3018 Pro
⚫ Genmitsu 3018 MX3
⚫ Genmitsu CNC MDF Spoilboard for 3018 CNC Router
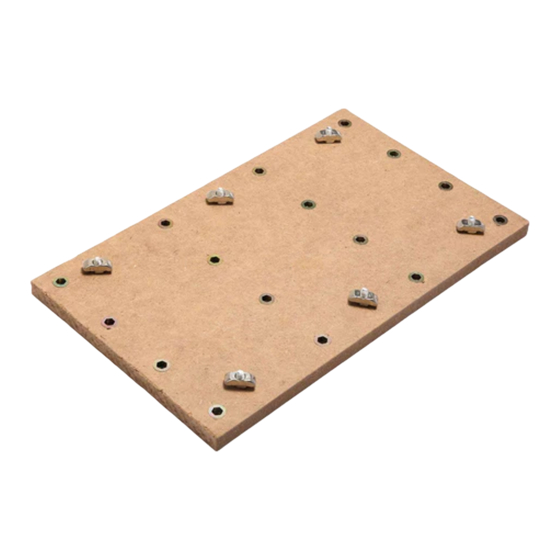
Step 1: Preparing your Spoilboard
When your spoilboard arrives, it should come with everything you need
installed. In order to check, please compare the bottom of your spoilboard to
the one shown below:
1
Advertisement
Table of Contents

Related Manuals for SainSmart Genmitsu 3018 CNC


Summary of Contents for SainSmart Genmitsu 3018 CNC
- Page 1 Genmitsu 3018 CNC Spoilboard Installation Guide What you Will Need: One of the Below: ⚫ Genmitsu 3018 PROVer ⚫ Genmitsu 3018 Pro ⚫ Genmitsu 3018 MX3 ⚫ Genmitsu CNC MDF Spoilboard for 3018 CNC Router Step 1: Preparing your Spoilboard When your spoilboard arrives, it should come with everything you need installed.
- Page 2 Assuming that your spoilboard looks like the above, you will want to partially unscrew the 6 T nuts shown above so that there will be some room for them to shift properly as you tighten them during installation. Next you will want to align the T Nuts so that they will be able to fit into the slots on your CNC bed.
- Page 3 As you can seem, it does not take much for these to line up. With the spoilboard in place, tighten the hex screws as far as they will go without over- tightening. As you do so, each T nut will rotate and clamp into place, scuring your spoilboard to the CNC bed.
- Page 4 Genmitsu 3018 CNC MDF-Platte Installationsanleitung Was Sie brauchen: Eines der unten aufgeführten: ⚫ Genmitsu 3018 PROVer ⚫ Genmitsu 3018 Pro ⚫ Genmitsu 3018 MX3 ⚫ Genmitsu CNC MDF-Platte für den 3018 CNC Fräsen Schritt 1: Bereiten Sie Ihre MDF-Platte vor Wenn Ihr Spoilboard ankommt, sollte es mit allem ausgestattet sein, was Sie installieren müssen.
- Page 5 Wenn Ihr Spoilboard sieht wie oben beschrieben aus, dann sollten Sie die oben gezeigten 6 T-Muttern teilweise abschrauben, damit sie beim Anziehen während der Installation etwas Platz haben, um sich richtig zu verschieben. Danach müssen Sie die Muttern so ausrichten, dass sie in die Schlitze Ihres CNC-Fräsbett passen.
- Page 6 Wie man sieht, braucht es nicht viel, damit diese sich aufreihen. Ziehen Sie die Sechskantschrauben bei montierter Plette bis zum Anschlag an, ohne sie zu fest anzuziehen. Während Sie dies tun, dreht und klemmt sich jede T-Mutter, wodurch Ihre MDF-Platte am CNC-Bett befestigt wird. Wenn Sie dies getan haben, versuchen Sie, Ihre MDF-Platte an jeder Ecke anzuheben, um sicherzustellen, dass alle T-Nutmuttern richtig im Bett verankert sind.
Need help?
Do you have a question about the Genmitsu 3018 CNC and is the answer not in the manual?
Questions and answers