Table of Contents
Advertisement
Quick Links
Advertisement
Table of Contents

Subscribe to Our Youtube Channel
Related Manuals for SainSmart INFI-20


Summary of Contents for SainSmart INFI-20
- Page 1 INFI-20 BELT 3D PRINTER USER MANUAL V1.1...
-
Page 2: Welcome
Thank you for purchasing the INFI-20 belt 3D printer from SainSmart.This user manual is designed to aid INFI-20 belt 3D printer users to assemble and use their new printer. Even if you are familiar with 3D prin�ng technology, we s�ll recommend you to read through this user manual, as there is a lot of important informa�on about INFI-20 for you to get a be�er 3D prin�ng experience. -
Page 3: Table Of Contents
Contents I. Welcome II. No�ce III. Part List IV. Printer Components V. Printer Parameters VI. Installa�on Instruc�ons VII. Menu Introduc�on VIII. Loading Filament IX. Levelling X. Prin�ng Your Own Models XI. WiFi Configura�on XII. Troubleshoo�ng... -
Page 4: No�Ce
II. No�ce 1. Do not try to use the machine in any way that is not described in use, so as to avoid accidental personal injury and property loss. 2. Please keep the machine away from flammable, explosive, corrosive, or high heat sources. -
Page 5: Part List
1 x Profile Bracket 1 1 x Profile Bracket 2 1 x Y-axis Fixing Plate 1 1 x Y-axis Fixing Plate 2 Accessory Tool List INFI-20 Belt 3D PRINTER USER MANUAL V1.0 1 x Manual 1 x Power Cord 1 x TF Card and Reader... -
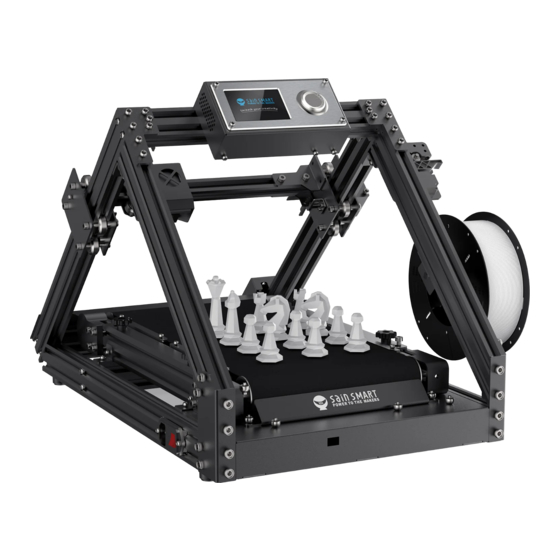
Page 6: Printer Components
IV. Printer Components 1.Bed Leveling Nut 2.LCD Screen 3.TF Card 4.Control Knob 5.Filament Sensor 6.X-axis Motor 7.Extruder 8.Belt Pla�orm 9.Voltage Selector 10.Y-axis Motor 11.Nozzle Kit 12.Z-axis Belt Motor 13.Belt Tensioning Screw 14.Filament Spool Holder 15.Power Switch and Socket 16.Y-axis Limit Adjustment Component... -
Page 7: Printer Parameters
V. Printer Parameters Model INFI-20 Print size 200 x 180 x ∞ mm Molding technology Number of nozzles Layer height 0.1-0.4mm Nozzle diameter 0.4mm Prin�ng accuracy ±0.1mm PLA / PETG Materials STL / OBJ / AMF File types SD Card Offline Prin�ng / WiFi Prin�ng mode... -
Page 8: Installa�On Instruc�Ons
VI.Installa�on Instruc�ons 1. Fix profile bracket 1 and 2 with hexagon socket flat round head screw M5x8. (Lock the front first, then the side.) 1 x Bo�om Belt Assembly 1 x Profile Bracket 1 1 x Profile Bracket 2 8 x Hexagon Socket Flat Round Head Screw M5x8 2. - Page 9 3. Insert the posi�oning pin on the Y-axis fixed plate into the corresponding hole of the aluminum profile, and then lock it with hexagon socket flat round head screw M5x8. 1 x Profile Bracket 1 1 x Profile Bracket 2 10 x Hexagon Socket Flat Round Head Screw M5x8 4.Cable Connec�on:...
-
Page 10: Menu Introduc�On
Connect E Motor Cable Connect Power Cable Install the Spool Holder VII Menu Introduc�on Print Select Print File Prepare Preheat... - Page 11 Prepare Layer Test Prepare Change Filament Move Axis Control & Home About Machine Informa�on...
-
Page 12: Loading Filament
VIII. Loading Filament Feeding Handle Step 1. Navigate to “Preheat” in “Prepare” menu and set your nozzle temperature and bed temp to the appropriate se�ngs for your filament. Step 2. Place your spool onto the filament holder. Step 3. Insert the filament into the filament detector sensor. Step 4. - Page 13 2. Adjust the height of your belt. Step 1. Navigate to the “Prepare” menu. Step 2. Select “Layer test” func�on. A�er wai�ng for the nozzle to heat up,nozzle will keep moving and extruding out filament to help you adjust the distance between the nozzle and the belt.
- Page 14 4. Home the printer and adjust the screws in the Y-axis limit switch to make sure a proper distance between the nozzle and the pla�orm. (Use the 0.1mm feeler gauge to assist.) 5. To make sure the nozzle is at the correct height above the pla�orm: First, loosen two fixing screws at the endstop, then turn the bo�om adjus�ng screw to adjust the height of the endstop, turn clockwise to move the nozzle closer to the pla�orm and vice versa.
- Page 15 6. Turn the four pla�orm adjustment nuts counterclockwise to li� the pla�orm. All nuts should be adjusted, each rota�on should be less than 180°. Use the feeler gauge to test the distance between the nozzle and the pla�orm. Pla�orm Adjustment Nuts 7.
-
Page 16: Prin�Ng Your Own Models
X. Pri�ng Your Own Models 1.Installing So�ware Check your accessories box for the included SD card. ① Install the sainsmart belt 3D printer slicer so�ware. ② Import the included machine and filament print profiles. ③ 2.Print from SD Card Copy the gcode file generated to memory card. -
Page 17: Wifi Configura�On
XI. WiFi Configura�on Note: Before enabling WiFi on your INFI-20, please note that the INFI-20 only supports 2.4GHz WiFi, not 5GHz. If your router has these two bands combined, please separate them so that the INFI-20 can recognize your WiFi network. In addi�on, do not use the same SSID for your 2.4 GHz WiFi and 5GHz WiFi. - Page 18 3. Open the browser, navigate to the IP address displayed. Notes: If no IP address is displayed, 1. Please repeat step. 2. Make sure the password you entered is correct. 3. Make sure you have a stable wifi connec�on.
-
Page 19: Troubleshoo�Ng
XII. Troubleshoo�ng Fault diagnosis Cause of failure 1. Wipe the memory card Memory card Start 2. Format the memory card 3. Replace the memory card 1. File name is modified to Printed by memory card File name English and digital formats 1. - Page 20 If you need any assistance,please contact us via; Email: support@sainsmart.com Facebook messenger: h�ps://m.me/Sainsmart www.sainsmart.com 2711 Centerville road, Wilmington, DE, 19808, United States...
Need help?
Do you have a question about the INFI-20 and is the answer not in the manual?
Questions and answers