Advertisement
Quick Links
Energiser Installation Guide
Thank you for purchasing a Rutland mains powered electric fence energiser.
We believe this unit is the best of its kind for ease of use, reliability and
durability. This guide provides instruction to properly install, operate and
maintain your unit, ensuring the most effective performance.
For Mains Powered Energisers
ESM401, ESM402,
ESM602, or ESM902
ESM1100, ESM2200,
ESM3300, or ESM4400
Advertisement

Related Manuals for Rutland ESM401


Summary of Contents for Rutland ESM401
- Page 1 Energiser Installation Guide For Mains Powered Energisers Thank you for purchasing a Rutland mains powered electric fence energiser. We believe this unit is the best of its kind for ease of use, reliability and durability. This guide provides instruction to properly install, operate and maintain your unit, ensuring the most effective performance.
-
Page 2: Before You Start
Before You Start Installation of Energiser and Fence Electric fences should be installed and operated so that they cause no danger to persons, animals or surroundings and as far as is reasonably practicable, they are out of reach of children and not subject to mechanical damage. - Page 3 • If the electric fence is intended to deter birds from roosting on buildings, do not connect the fence wire to the earth terminal. Use a warning sign at any point where a person may access the fence wire. Manufacture Standard Built to Comply with CE, IPX4, EN60355-2-76 Health &...
- Page 4 Energiser Installation Overview of Installed Energiser Earth connection (green) Mains power plug Fence connection (red) - 4 -...
- Page 5 STEP 1: Mount Energiser IMPORTANT: Mount in an inside location or in a waterproof enclosure Single screw mounting Double screw mounting - 5 -...
- Page 6 STEP 2: Connect Earth and Fence Terminals Lead-out cable Connect lead-out cable to EARTH (green) terminal Connect lead-out cable to FENCE (red) terminal - 6 -...
- Page 7 STEP 3: Connect Earth System Earth connection NOTE: Connect additional earth stakes with lead-out cable if required Ensure Earth System is Sound - 7 -...
- Page 8 STEP 4: Connect Lead-Out Cable to Fence Line Poly wire connection Part no.18-172 Poly tape connection Part no.30-158 Poly rope connection Part no. 30-125 Ensure Fence System is Sound • Ensure all connection points such as joiners and insulators are sound and secure •...
- Page 9 STEP 5: Power Energiser NOTE: Energiser will be outputting voltage at this point – to avoid shock do not touch fence terminal or fence wire. - 9 -...
- Page 10 Energiser Operation For Models: ESM401, ESM402, ESM602, ESM902 Pulse indicator • flashes to indicate voltage output Power indicator • flashes to show energiser has power Fence terminal (red) • connect to fence line Earth terminal (green) • connect to earth stake...
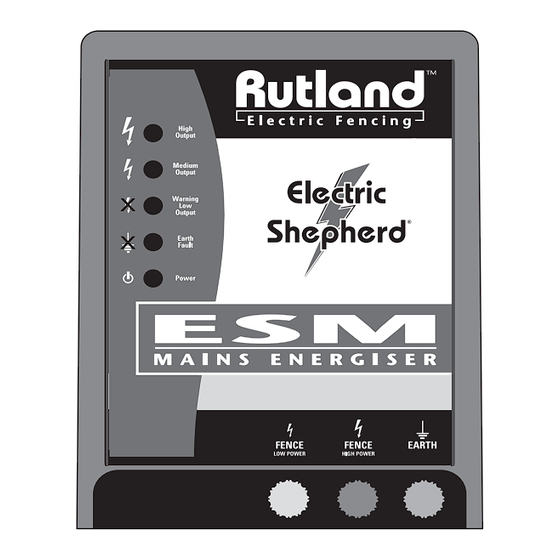
- Page 11 Energiser Operation For Models: ESM1100, ESM2200, ESM3300, ESM4400 Pulse indicator–high output • flashes if over 5,000 volts output Pulse indicator– medium output • flashes if over 3,000 volts are being output Warning low output • flashes and alarm sounds if output drops below 3,000 volts Earth fault alarm •...
-
Page 12: Maintenance/Testing
Fence Line Maintenance • Regularly test voltage at the furthest point on the fence line from the energiser – we recommend Rutland Digital Tester 14-172 or 8-Light Tester 14-173 • Routinely check all fence and earth connections to ensure they are... - Page 13 Energiser Troubleshooting - 13 -...
-
Page 14: Warranty
Rutland Electric Fencing Co. Ltd. or the seller. The buyer shall assume all such risks. - Page 15 Please visit our website for further installation tips, product manuals and additional electric fencing information. www.Rutland-Electric-Fencing.co.uk - 15 -...
- Page 16 To request a Rutland Electric Fencing Co Ltd. catalogue or for information on any Rutland product, please contact us at: Rutland Electric Fencing Co Ltd. Fencing House 8 Lands End Way Oakham, Rutland LE15 6RF UK Web: www.Rutland-Electric-Fencing.co.uk Email: Enquiries@Rutland-Electric-Fencing.co.uk Phone: (44) 0 1572 722558 –...
Need help?
Do you have a question about the ESM401 and is the answer not in the manual?
Questions and answers